
This Easy Peach Galette has an incredibly flaky, light, and crisp homemade pie crust , topped with fresh, juicy peaches! It’s a simple dessert to make for your family in a pinch, yet fancy enough for company!
Learn how to make the PERFECT pie crust and filling for this gorgeous rustic summer dessert with my detailed, step by step recipe!

- Peach galette recipe highlights
- Ingredients
- How to make a peach galette
- Pro tips and secrets to my perfect galette crust
- How to serve this galette
- Storage instructions
- More tips and frequently asked questions
Summer doesn’t mean that baking takes a back seat in our house. Au contraire! With the bounty of fruits that comes with the season, tarts, pies, galettes like this strawberry tart , strawberry galette , mixed berry pie , and even peach cobbler and peach bars are unavoidable.
While I do love a homey pie or tart, they just take too much time to make. That’s where these simple, rustic galettes come into the picture!

Peach galette recipe highlights
- Simple recipe . Much easier than tarts and dessert pie recipes , and they are free-form, so you don’t need any special pans to make them .
- The crust is an all butter pie crust which makes an incredibly light, flaky, and crisp crust , and then it’s topped with fresh, sweet, juicy peaches!
- This recipe ensures that your crust is not at all soggy or too hard . Just the perfect flaky, buttery texture you’ll love in a galette crust.
- Versatile and adaptable recipe . You can use this peach galette recipe to make any type of fruit galette – plums, nectarines, pluots, apricots, apples, strawberries, blueberries, raspberries, blackberries etc.
- I provide detailed, step by step instructions to ensure perfect results for your easy peach galette!

There are only 2 components to this peach galette
- Pie crust – pie crusts are very easy to make. And they are very forgiving, especially when you make them free-form like for this easy galette. It’s completely OK even if it shrinks, and you don’t have to blind bake. But you can make this recipe even easier by using store-bought pie crust.
- Filling – pretty much anything goes. I’m making a peach galette here to make the most of the juicy peaches that I got my hands on recently at our local grocery store. You could even make a mixed stone fruit galette instead, and maybe throw some berries in there too, or make my strawberry galette recipe instead.
Ingredients
Pie crust ingredients
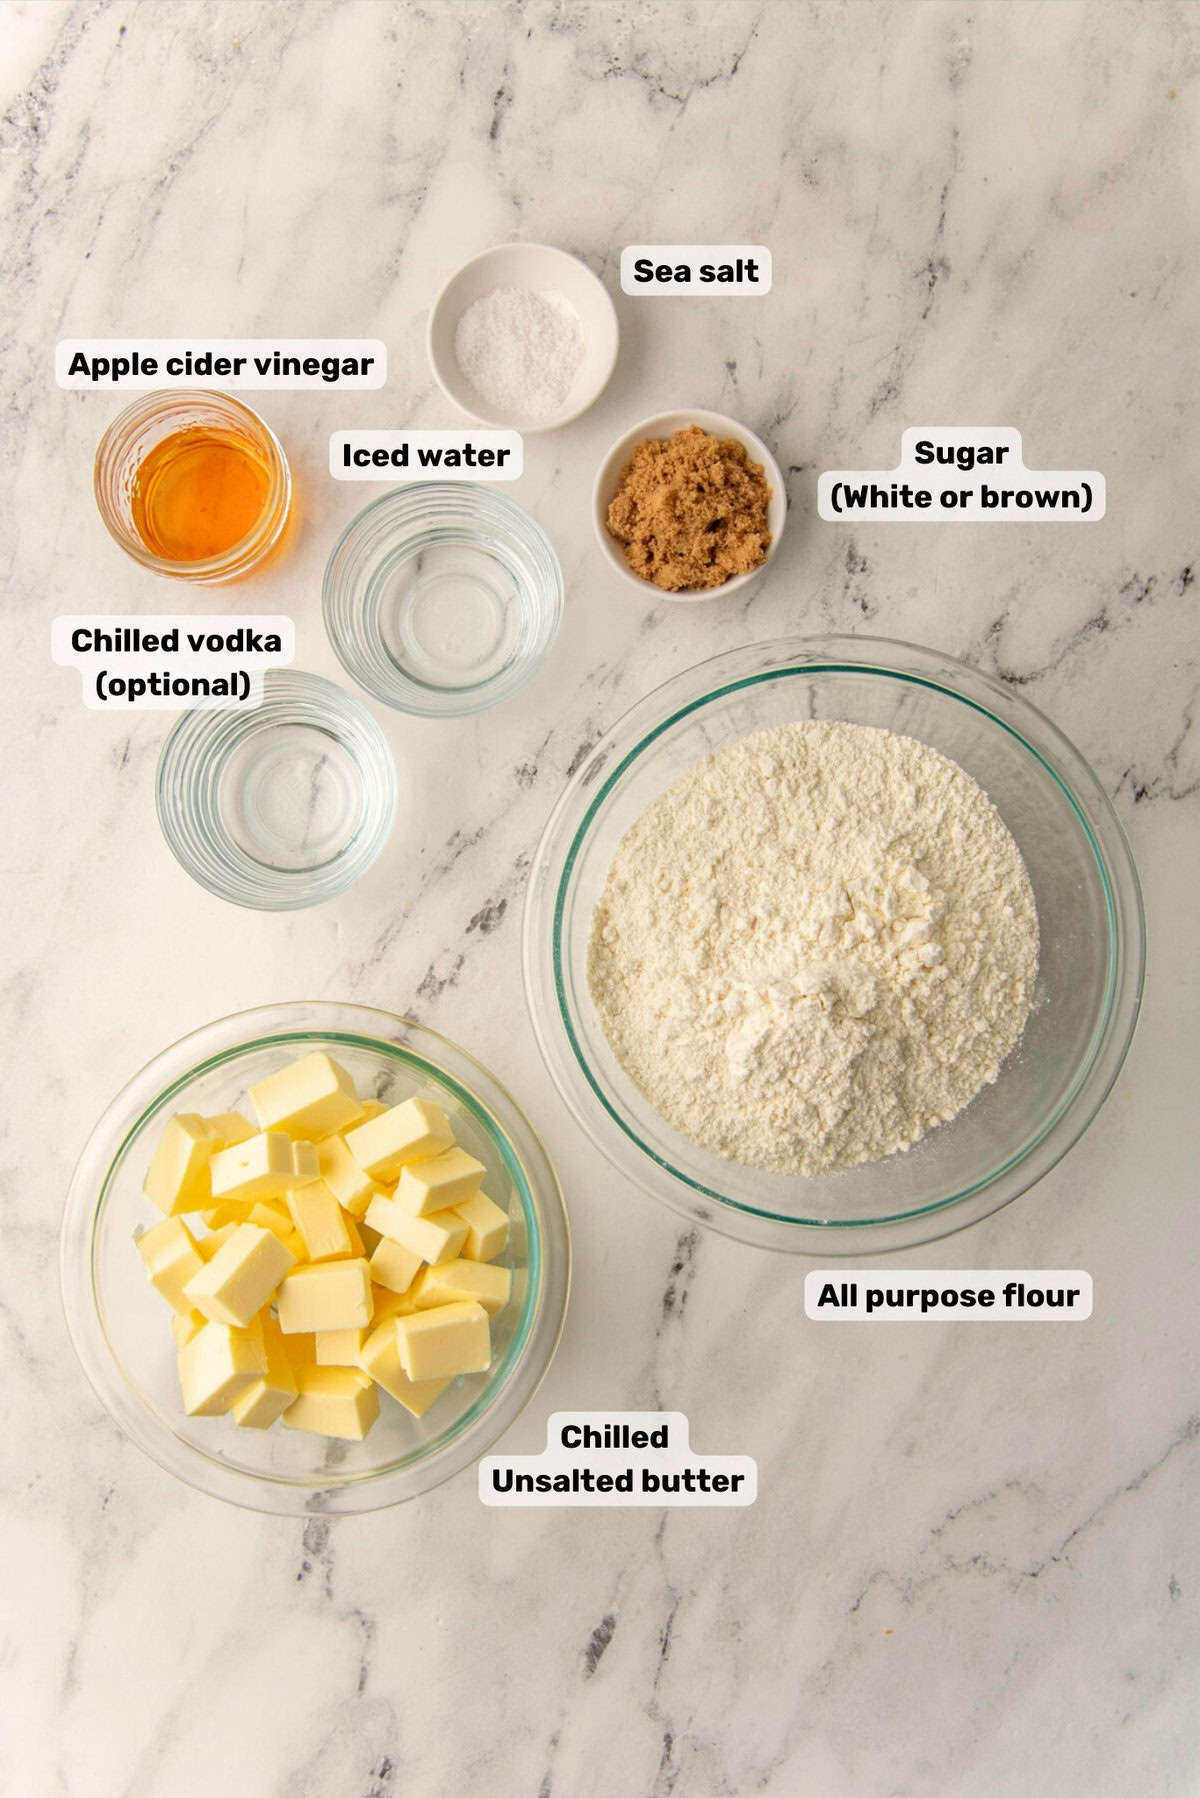
For a perfect, flaky pie crust, you have to ensure that all the ingredients for the crust are chilled.
- Unsalted butter – You can use salted butter as well, but adjust the salt in the recipe to compensate for the salt in the butter if you do so.
- Water – Water is necessary to bring the dough together. However, too much water in the dough can result in too much gluten development. This could make it hard to roll out the dough.
- Vodka – This is optional. I use vodka as a substitute for some of the water in the recipe. You can replace it with water instead. But the vodka helps to prevent gluten formation by adding moisture to the dough without adding water.
- Vinegar – Vinegar is another ingredient that helps to reduce gluten formation in the dough. The acidity inhibits gluten formation. But I also love the slight fruity tang from using Apple cider vinegar.
- AP flour – All purpose flour is a great flour to use to make pie crusts. I do not recommend using bread flour due to the higher protein content. You can use cake flour if that’s all you have at home. But AP flour is what works perfectly well for this recipe.
- Sugar and salt – Added for flavor. Sugar can also help with the coloring of the dough (due to caramelization). Salt prevents the pie crust from tasting bland.

Peach filling ingredients
- Peaches – I recommend going by weight rather than quantity, since weight will change depending on the size of the peaches you have. If in doubt, have more peaches at hand so you have more than enough for the filling. How can you say no to more juicy, ripe, in season peaches? I prefer to use fresh peaches over canned peaches for this recipe.
- Cornstarch / Instant ClearJel – The starch in the recipe acts as a thickener for the pie filling. As the galette bakes, the juices in the fruit will leech out and start to heat up. The starch molecules in the cornstarch / tapioca will absorb the liquid and swell up and thicken the mixture. This is crucial to prevent the juices from making the crust too soggy. Instead of using regular cornstarch, you can also use Instant ClearJel (my recommendation) , or tapioca starch as well.
- Sugar – Sugar adds sweetness to the filling and brings out the fruity flavor of the peaches as they cook.
- Lemon juice or lime juice – The citric acid in lemon also helps to brighten up the flavors of the peaches.
- Vanilla and salt – Optional, but both ingredients add flavor.
- Other optional add-ins – Bourbon or Amaretto to add more flavor. Thyme, rosemary, and basil are herbs that pair well with peaches.
Ingredients to finish the galette
- Egg yolks and milk – The egg wash helps to create a golden brown shiny crust on your galette. You can substitute this with a plain milk or cream wash instead as well. It just won’t be as shiny then though.
- Raw sugar (optional) – The addition of the sugar helps to create a lovely sweet crunchy texture on your crust. The sugar will stick to the crust only if you have an egg wash or milk wash on the crust.
- Semolina – This is optional. I like to sprinkle semolina on the bottom of the crust, and along with sugar. This adds an extra layer of crunch.

How to make a peach galette
How to make the galette crust
I use my homemade pie crust recipe here. You can make the pie crust in two different ways – using the food processor OR by hand .
The reason why the crust for this galette is special is that it’s an all butter pie crust which not only makes it super easy to make, but it’s also incredibly light, flaky and delicious!
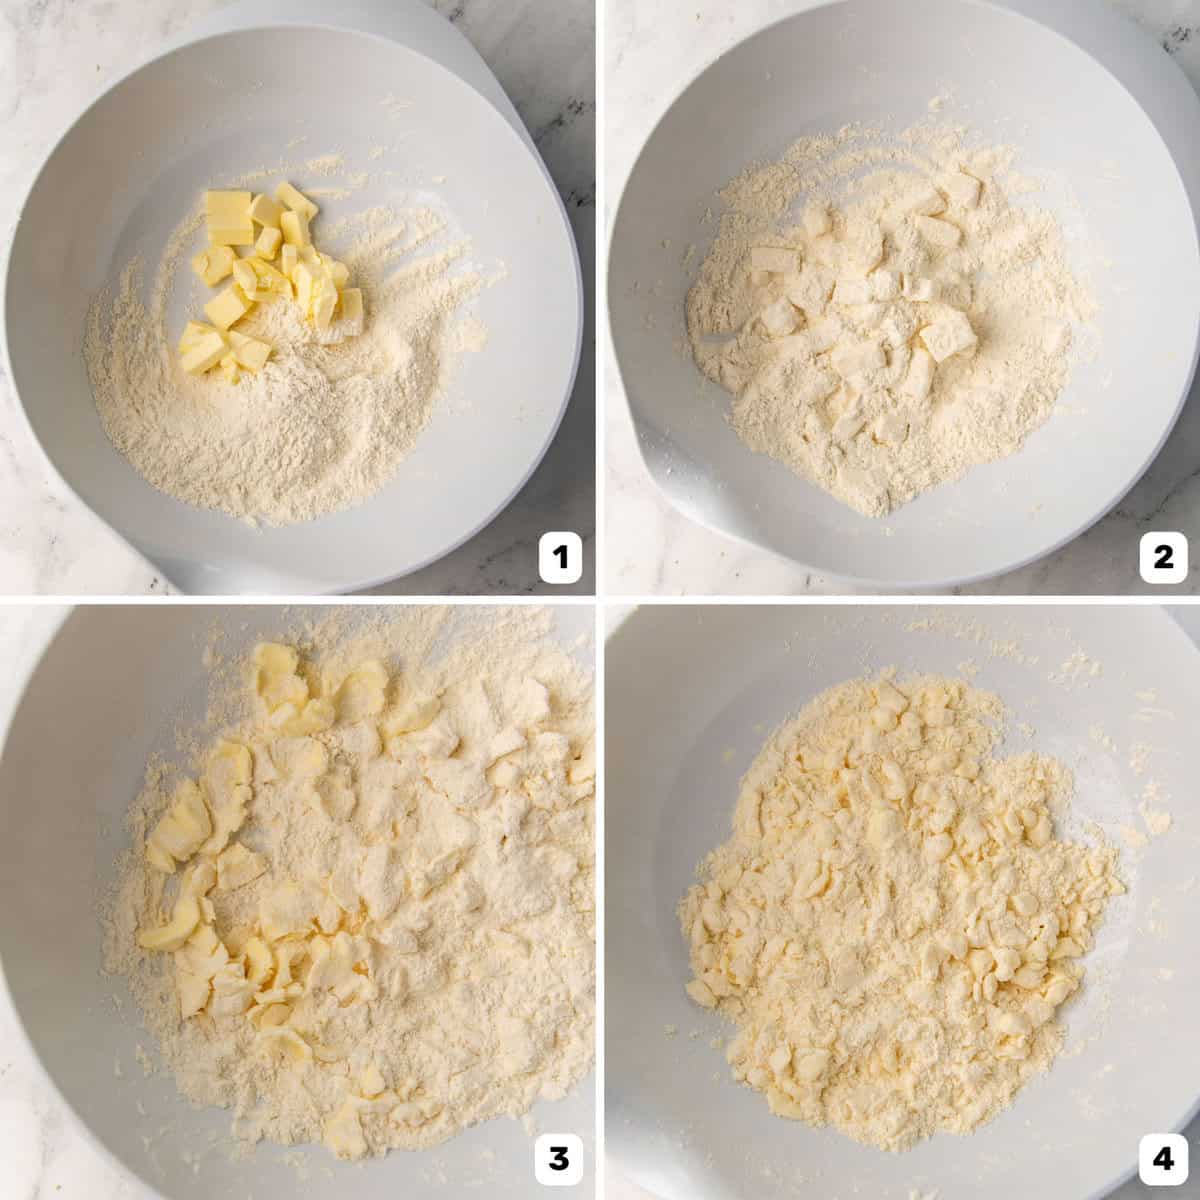
Mix the flour, salt, and sugar (image 1) . Then add the chilled and cubed butter and toss to coat (image 2) . Cut or flatten the butter cubes into the flour (image 3) .
Rub the butter and flour together, so that you have smaller clumps of butter – about as large as hazelnuts – all coated in the flour (image 4) . If the butter is softening too much, chill the mixture in the freezer for a few minutes until the butter hardens again.
Add the apple cider vinegar and mix it in with your fingers or a fork (image 5) . Then add the water and/or vodka while mixing it in until you start to form large clumps of butter, flour, and liquid (image 6) .
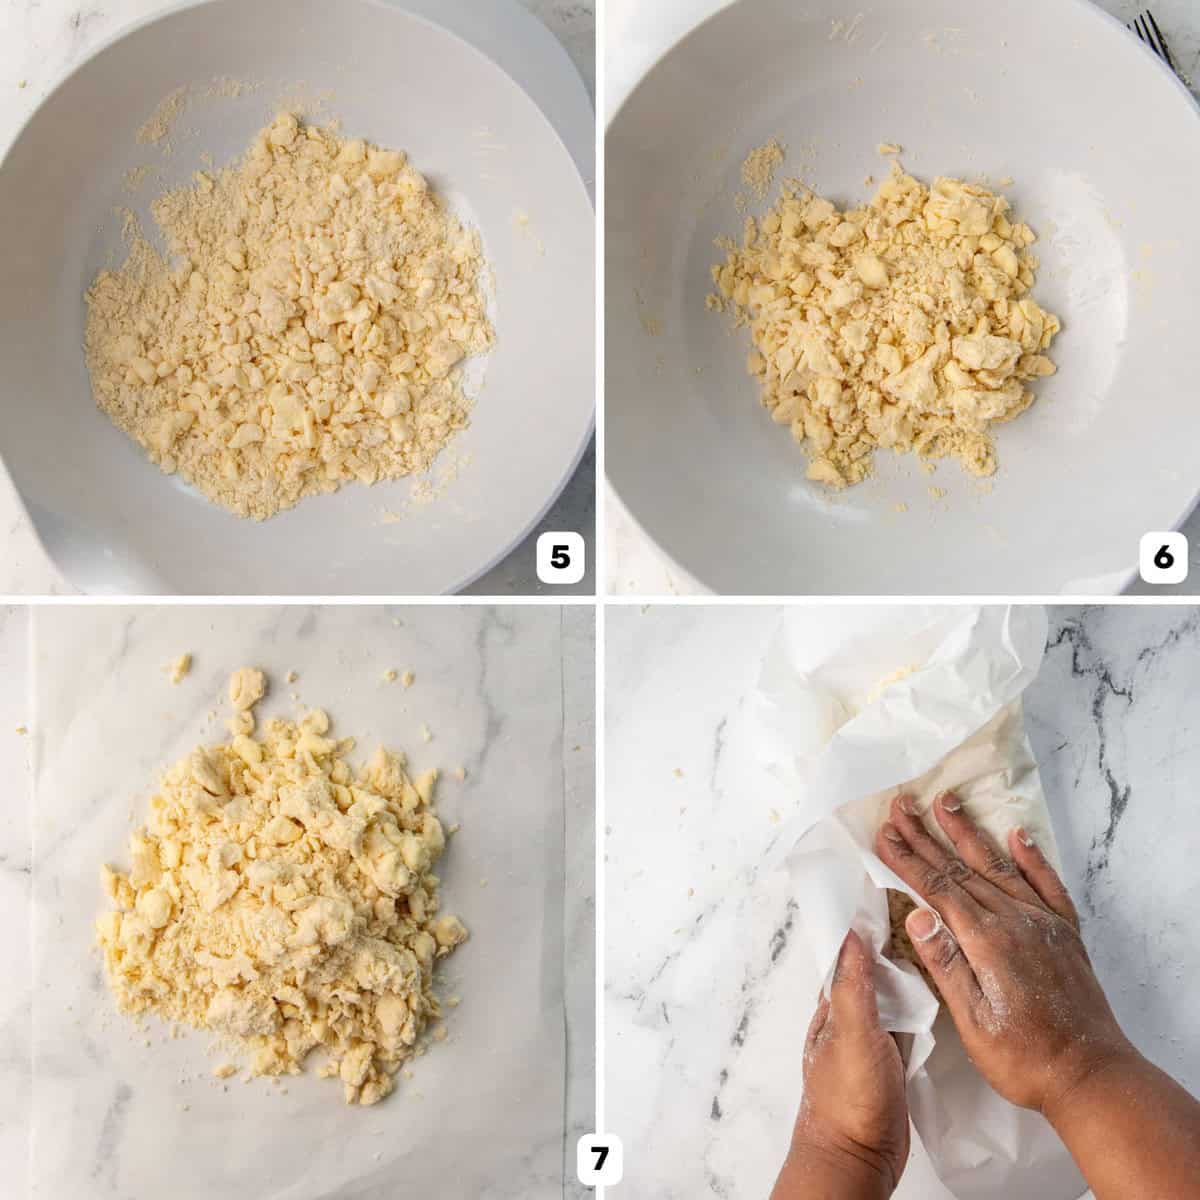
The pie crust dough is done if the dough forms into a large clump when squeezed together, while still looking a little dry.
Turn the dough out onto a parchment paper and use the paper to squeeze the dough together to form a dough (image 7) .
Fold the dough over itself until the dough comes together. The dough should still have cracks on it, and dry spots too (image 8) .
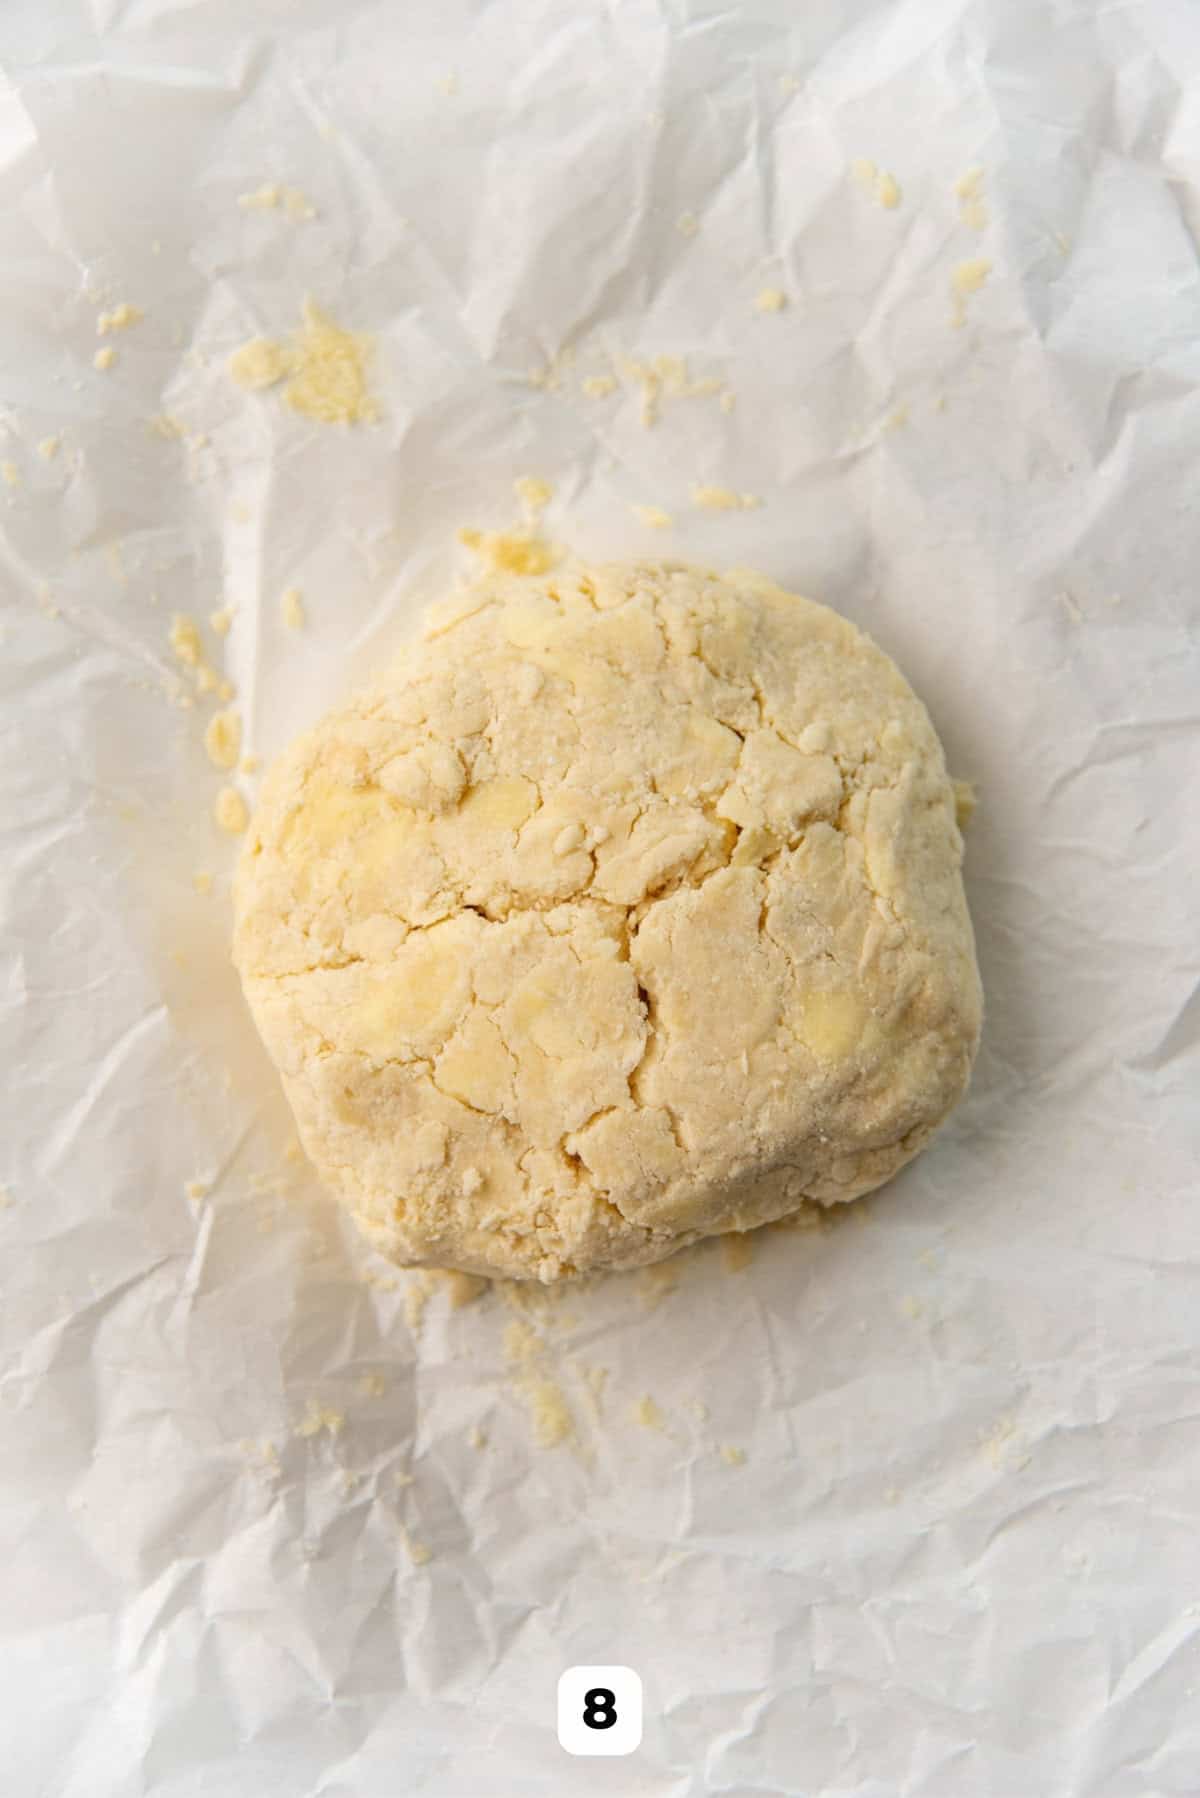
For extra flakiness – Cut the dough in 4 and stack them on top of each other, and then flatten it all using a parchment paper or your palm.
Form the dough into a disc again and wrap it with plastic wrap or parchment paper. Store in the fridge for about 1 hour until the dough has rested and becomes evenly hydrated.
How to make the peach galette filling
There’s no pre-cooking involved, so the filling for this summer dessert couldn’t be easier. It’s simply fresh peach slices, tossed with a handful of ingredients and layered on top of the pie dough.
What kind of peaches to use for this galette?
You can use yellow or white peaches. Yellow peaches are definitely more common.
Both have very similar flavors, but the white peaches are said to be a little less acidic than yellow peaches, making them a little sweeter.
If you’re lucky enough to find donut peaches, you can use those too!
How to choose ripe peaches for this galette
Look for good peaches that have a little “give” when you gently press them . Make sure to use the pads of your fingers to press the peaches, and not your nails. Also make sure not to squeeze them too hard, as they will bruise.
Slightly overripe peaches are also perfect for this recipe, since you’ll be cooking them. Just make sure these sweet peaches don’t have any large bruises on the skin.
Ripe peaches should also smell sweet when you smell them near the stem.
My peaches are not ripe, can I still use them?
If your peaches are not ripe, I do not recommend using them here as they won’t be sweet enough.
However, you can place the peaches in a paper bag or cardboard box (closed), and leave them in your kitchen. They will ripen fast this way.
To speed up the ripening, place an apple or banana in the paper bag or box.

Preparing the filling
Remove the pit from the peaches. I first cut them in half and twist the halves to remove the seed from one side. Then I halve the peach half with the seed and remove the piece without the seed, and cut out or pull out the seed from the remaining piece of peach (image 9) .
Then cut the peaches into thick slices – about ¼ inch thick (or 5 mm) (image 10) . Alternatively, you can cut the peaches into thick wedges or cubes. Place them in a large bowl (image 11) .
Set aside a little sugar to sprinkle on top later. Whisk the cornstarch and sugar together until well-mixed (image 12) . Add this to the peaches along with the lemon juice (image 13) . Add vanilla, chopped herbs, and salt at this point too (image 14) .
Carefully fold the peach slices until all the peaches are coated well and mixed through. Set aside while you prepare the pie crust.

Preparing and baking the peach galette
Roll out the chilled pie crust on a floured surface. You can find out more about how to roll out the pie crust properly in my step by step guide on how to make pie crust (for beginners).
Make sure to roll out the dough to an even thickness, and maintain a circle shape. It doesn’t have to be perfect. The circle should roughly be about 14 inches in diameter (image 15) .
If you have any jagged, rough edges, you can either cut it out, OR use your hands to make the edges smooth (image 16) .
Take a parchment paper and sprinkle the bottom with semolina flour. Place the pie crust on top of this.
Next, take your peach filling and place the peaches in the middle of the pie crust leaving a 2 – 2.5 inch border.
You can arrange the peach wedges in a circular pattern, OR form a criss-cross grid pattern, with sliced peaches as shown below that looks fancy (image 17) .
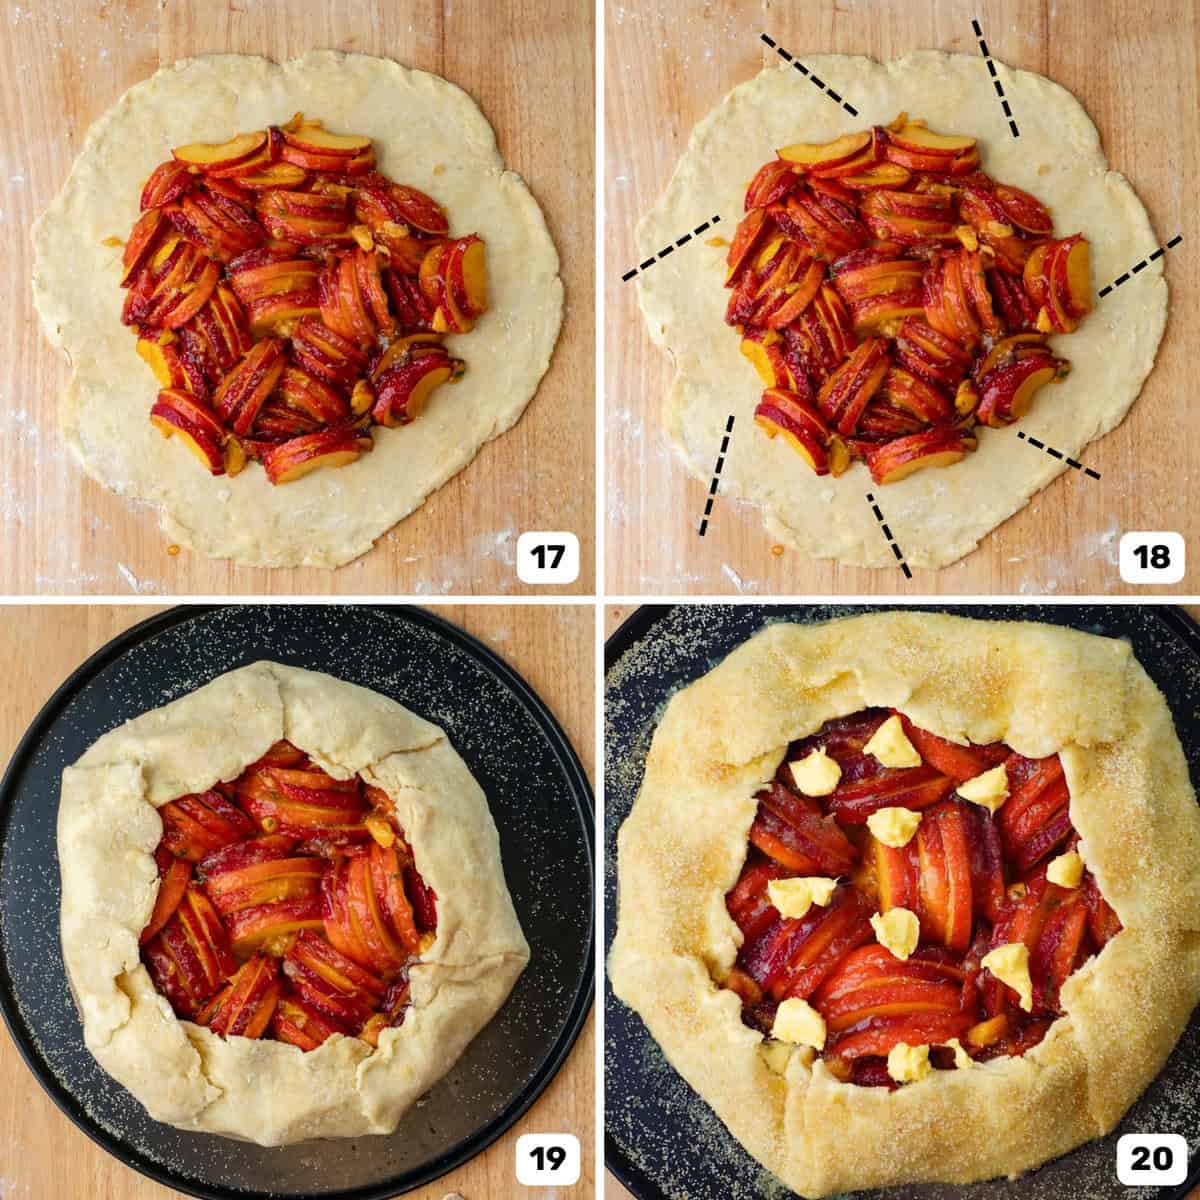
Alternatively, just pile the peaches into the middle of the dough for an even more rustic look.
Make some angular cuts on the pie crust to make it easier to fold over (image 18) . Then fold over the pie crust over the filling. Use water or some of the egg wash to make sure the folded over crust sticks together well (image 19) . Sprinkle the remaining sugar on top of the peaches.
Refrigerate for about 15 minutes.
Before baking, brush the galette with egg wash and sprinkle the raw sugar on top of the crust and dot the butter on top of the peaches as well (image 20) .
Bake the peach galette in a preheated oven. To ensure a beautiful, flaky crust ,
- Bake in the lower third in the oven.
- Place the galette on a preheated baking tray so that the crust is in contact with a hot tray.
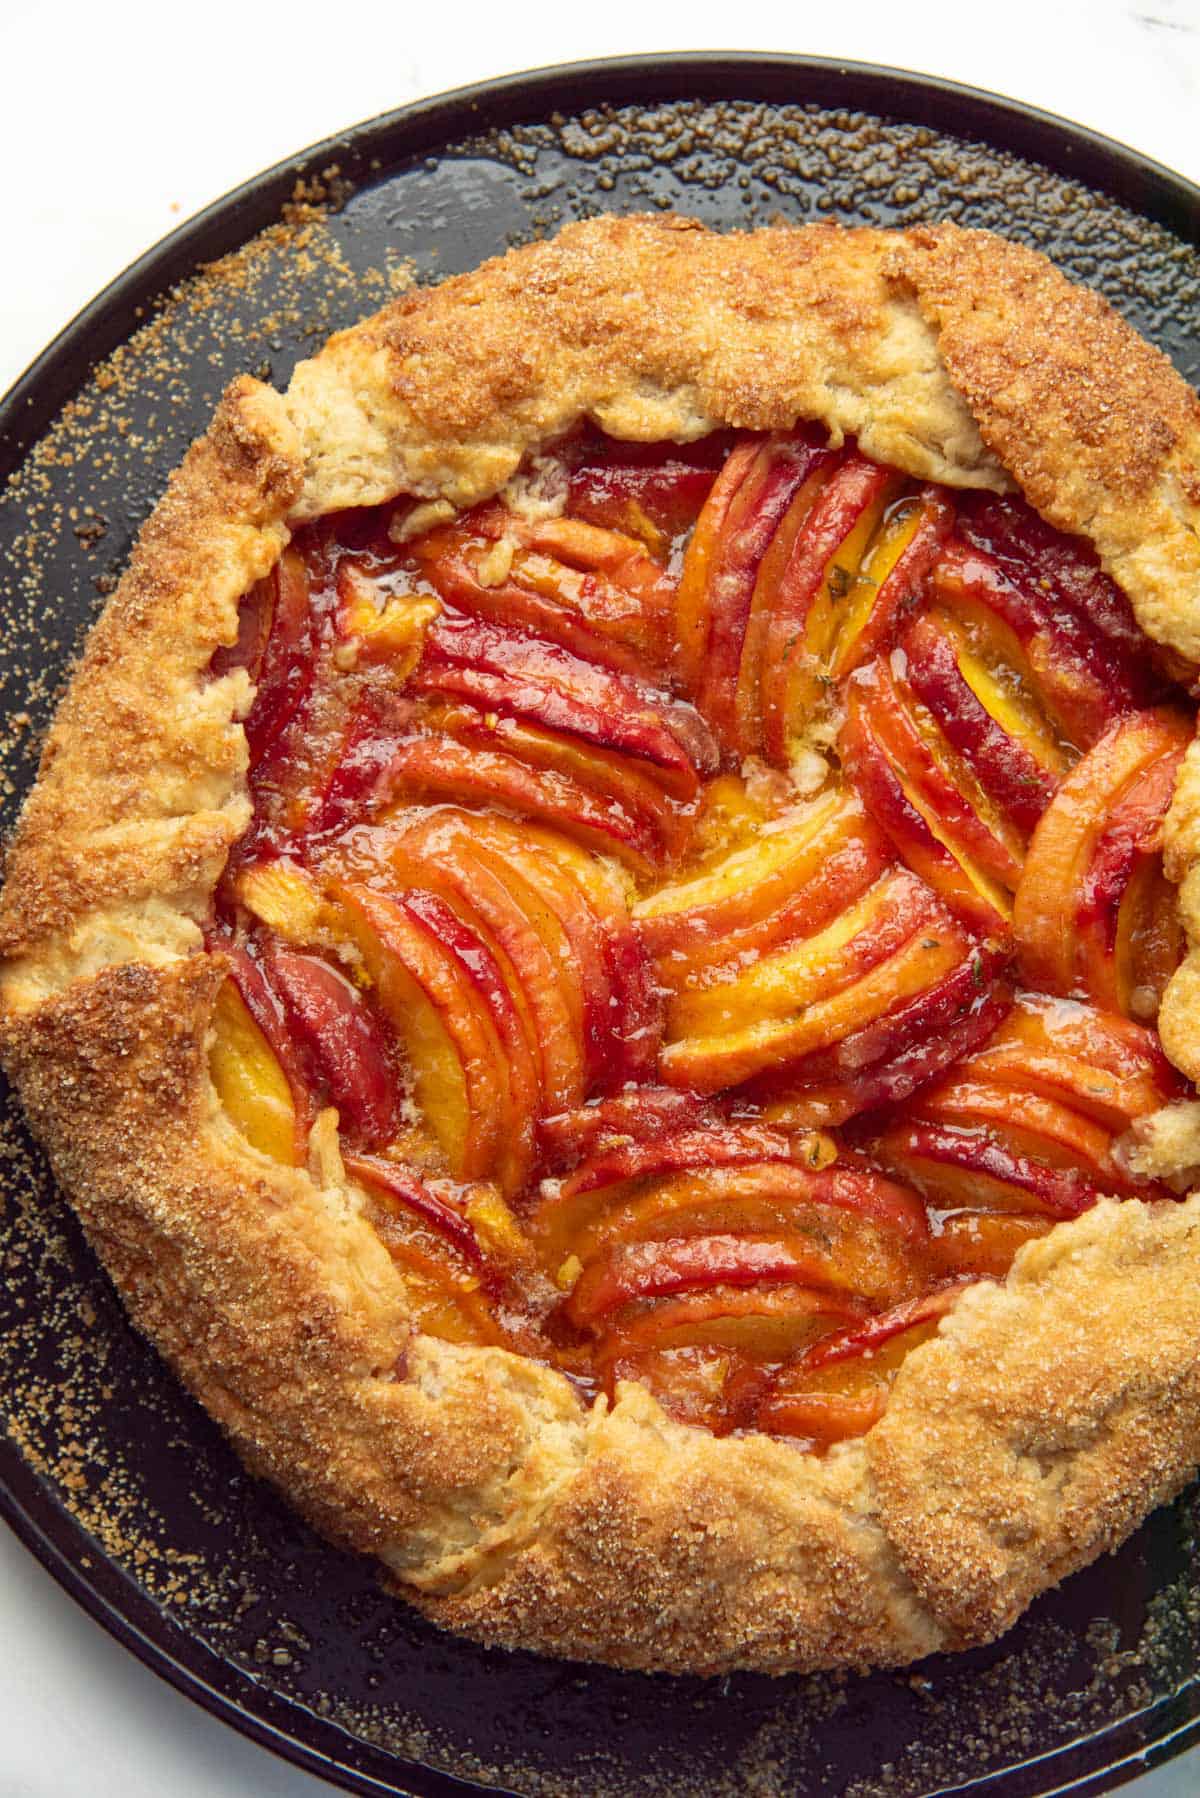
Once baked and the crust is beautifully golden, remove the peach galette from the oven and let it rest and cool down for about 20 minutes to allow the juices to thicken and settle.
Pro tips and secrets to my perfect galette crust
Galette crust is simply pie crust that is used as a tart. The tips for making this galette crust are identical to the tips for making homemade pie crust as well!
The perfect galette crust will have some gluten in the dough so that it can create flaky layers and be cohesive, BUT not too much gluten that it becomes rubbery and hard to roll out. These are the tips and tricks I use to achieve that.
Using vinegar and vodka
A trick that I learned several years ago when making dough for pastries (such as puff pastry or shortcrust pastry or pie crust like this) is that vinegar and vodka are truly a magical ingredients when making pie crust!
The addition of the acid inhibits some of the gluten formation in the dough, making it easier to handle and roll out the dough. As a result, the baked crust is just so light and flaky. However, apple cider vinegar can also add additional flavor too.
Gluten loves water, and flour will form gluten in the presence of water, even while the dough is just resting. Vodka contributes to hydrating the flour in the dough helping it form a cohesive dough, without the water that can cause gluten formation.
However, do keep in mind that not all of the alcohol will burn off during the baking process, and if that is of concern to you, you can leave it out, or use ice water instead.
Keeping the pie dough chilled at each step
Using chilled ingredients, and ensuring it is cold at each step will keep the butter cold in the dough. The butter pieces will melt and create pockets in the dough which will result in flaky layers as it bakes.
It is also very important to not overhandle the dough to keep it nice and tender. The more your “knead” the dough, and the more gluten will develop, the more rubbery and touch the crust will be.
Size of the butter pieces
As you cut the butter into the flour, keep an eye on the size of the butter pieces. Larger the pieces of butter = more flaky pockets in the pie crust. Smaller the pieces of butter, the more mealy and sandy the crust will be (like pâte sucrée ).
For this peach galette recipe, we are looking for butter pieces that are about the size of hazelnuts or chickpeas. This will yield that flakiness we desire, while still maintaining a thinner crust.
Don’t skip the thickener
Since I first shared the recipe, I have made fruit galettes many times! Cornstarch or tapioca starch is perfect to thicken the peach pie filling, but I have since switched to using Instant ClearJel, which is modified cornstarch that thickens the filling even before heating it, AND it freezes well!
Bake the galette in the lower third of the oven, on top of a preheated baking tray
This will ensure that the bottom of the crust will bake well, and create nice layers, without burning the top of the crust.
How to serve this galette
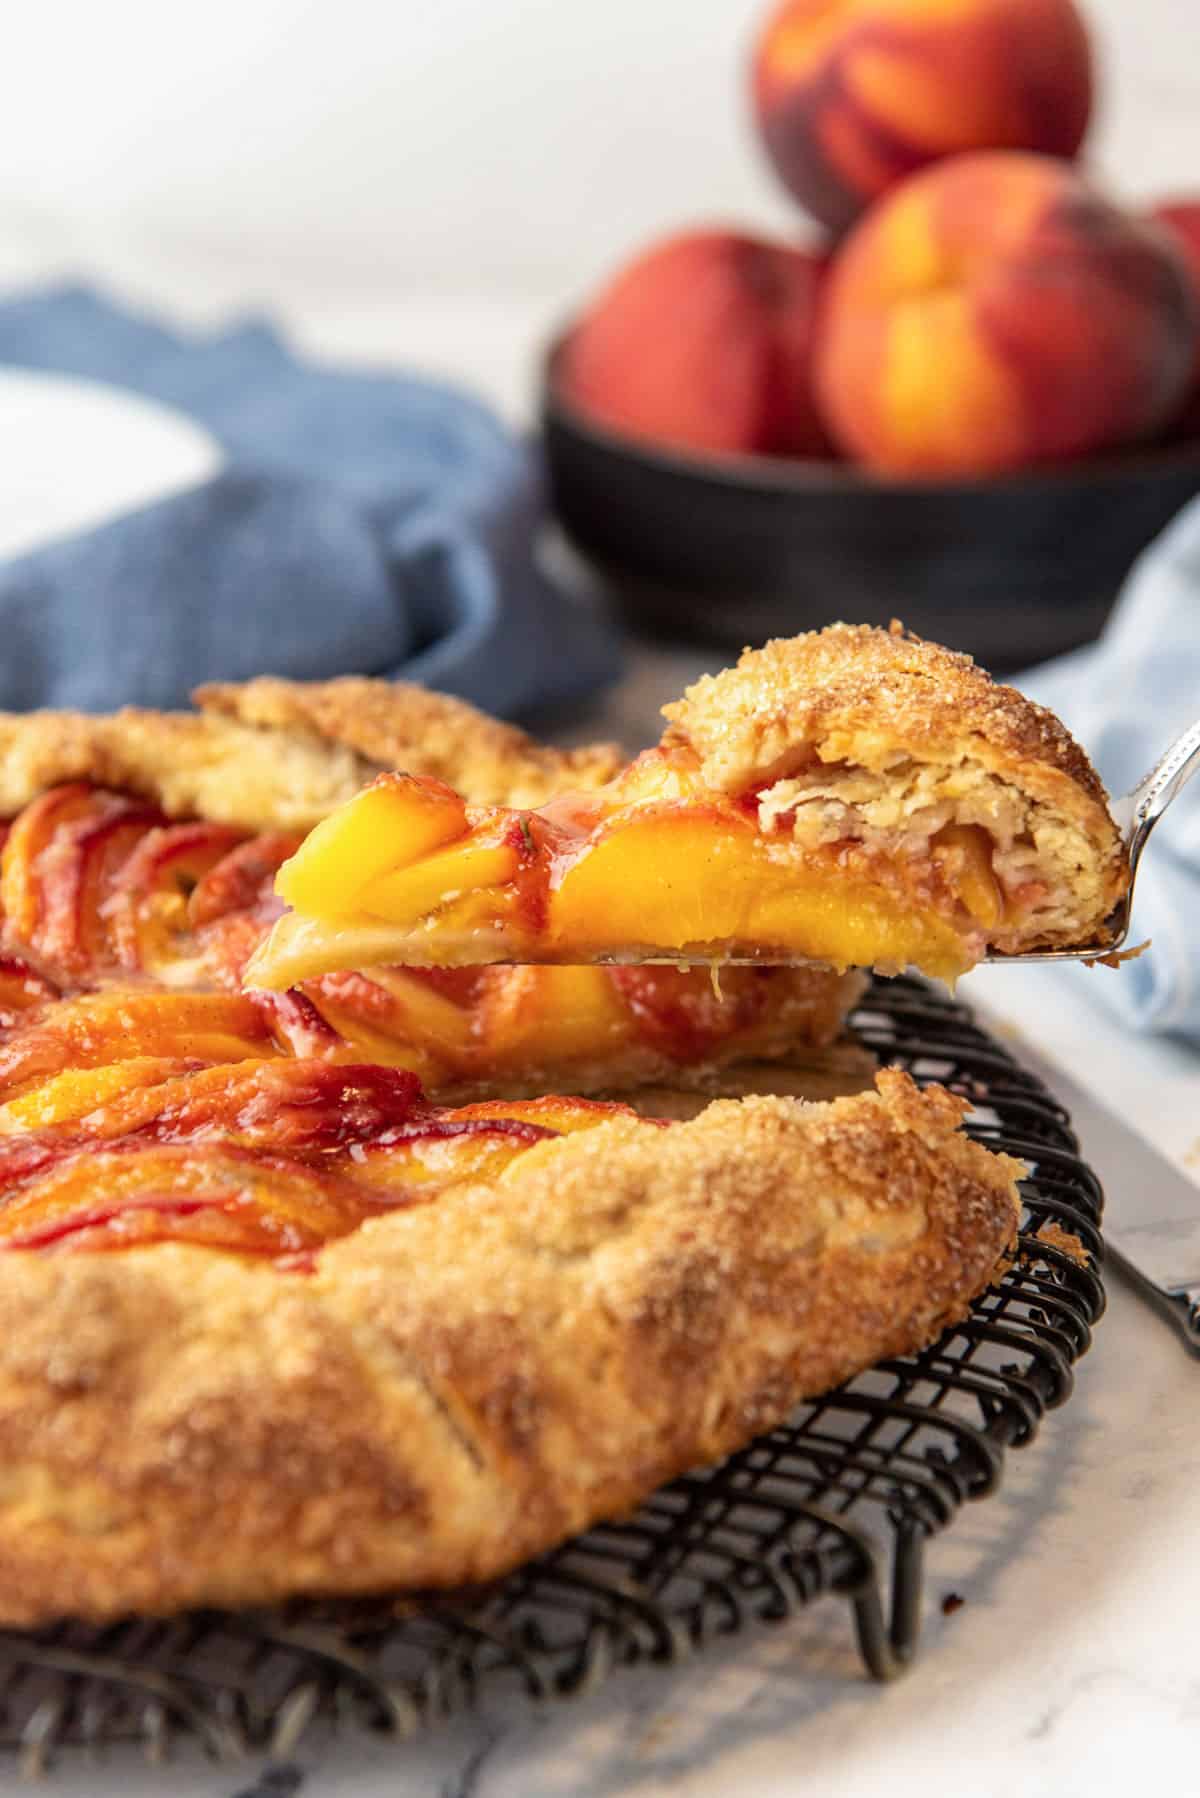
This rustic peach galette is best served slightly warm, or at room temperature. Since a galette is much thinner than a pie, they cool down much faster, and the filling doesn’t have to “set” for you to cut into it.
But I have had leftovers cold too, and they are still just as delicious. The crust however is best when warm or at room temperature.
And nothing like a slice of this peach galette with a scoop of ice cream ( vanilla ice cream , cereal milk ice cream , lemon ice cream , butterscotch ice cream are some of my favorites) or whipped cream in the summer heat!
Storage instructions
Leftovers can be stored at room temperature for about 1 – 2 days, and then in the fridge for another 2 – 3 days. The flavors will become stale as time goes by.
You can wrap a baked galette and freeze it for up to 4 months. Then let it thaw out at room temperature before serving. However, this may change the texture of the pie crust, since it won’t be as crisp.
Warm up the galette in a preheated oven for a few minutes to make the galette taste better before serving.

How do you prevent the crust from getting soggy in this peach galette?
There are two tips for making sure your crust isn’t soggy. Make sure the crust doesn’t soak up too much liquid. As the fresh peaches cook, they release their juices which can make the pie crust soggy. Some galette recipes call for a filling (such as frangipane) below the fresh fruit layer to prevent soggy pie crusts – but that’s just more work. Instead, the fresh peaches here are gently tossed with some starch (cornstarch, tapioca starch or Instant clearjel) and lemon juice (or a generous pinch of citric acid), before being layered over the pie dough. So, as the peaches cook and the juices are released, they’ll be thickened by the starch. This makes the peach filling very juicy WITHOUT being too liquidy or soggy. Instant ClearJel thickens the juices from the peaches even before cooking it, so it’s excellent to prevent the crust from getting soggy. Bake the crust in the lower third of the oven, WITH a preheated tray or stone. This works best if your oven has a heat element at the bottom of the oven. Preheating a baking tray in your oven before baking the galette in the lower third, will ensure the crust is in direct contact with the heat from the oven tray, and close to the heat source. This ensures that the galette crust bakes from the bottom, and caramelizes better.
Can you make this galette ahead of time?
Both the pie crust and filling can be made ahead of time! However, I would not store the unbaked galette WITH the filling. This is because the crust will absorb the juices from the filling as it sits in the fridge. Roll out the pie dough and cover it with plastic wrap and store it in the fridge for up to 2 days. The filling can also be mixed and stored in the fridge for up to 2 days in an airtight container. Since the prep work has already been done, just assemble the galette and bake on the day you need it. For best results, this rustic dessert should be served the same day you make it. Leftovers can be stored in the fridge for about 3 days, but the crust will get soggy in the fridge. Reheat the galette at about 200 F for about 15 – 20 minutes to make the crust crunchy again.
Is it better to freeze peach galette baked or unbaked?
I prefer to bake my peach galette and then freeze it. Here’s why. The fruit filling will expel more liquid as it thaws out, and this can lead to a soggy bottom crust as you bake it from frozen. Instead, bake your peach galette first, but take it out just as the crust turns a light golden brown. Let the galette cool completely, and wrap and freeze the galette. The galette should be good for up to 4 months this way. Also remember to use tapioca starch OR instant clearjel, if you’re freezing it. When you’re ready to serve, let the galette thaw out (in the fridge or room temperature). Preheat a baking tray in the oven, and then place the galette on top of it and let it bake until the crust is a dark golden brown, and the filling is bubbling.
Is galette crust the same as pie dough?
Yes, it is! This is why the same tips for maintaining a tender and flaky crust apply to both types of crust. Just like a pie crust, you can choose to have a flaky crust or a mealy crust for a galette as well.
Can I use store-bought pie crust instead?
Absolutely! This makes this recipe even easier. If you have access to pre-made shortcrust pastry or pie crust, you can use this as well, because it’s the closest in texture to pie crust.
Can I use puff pastry to make a galette?
You can, but be careful. Puff pastry is known to “puff up” a lot as it bakes. This is because it has so many flaky layers. When you make this galette with puff pastry, the crust will puff up a lot more than if you make this with pie crust.
Can I double this recipe?
You can absolutely make double the amount! I actually prefer to make a double batch of pie crust, so that I can store the other for later. Easily double the pie crust recipe, and the filling, and make two smaller galettes, or one very large galette that is oval in shape, so that it can fit in a half sheet pan.
Why is my dough shrinking when I roll it out?
This is because the gluten in the dough was overworked. So, the dough isn’t relaxed enough. Cover the dough with plastic wrap and return it to the fridge. The longer the better. This will allow the dough to relax again, and it should be easier to roll out afterwards.
Recipe
Easy Peach Galette
Ingredients
Pie crust
- 150 g unsalted butter 1 ⅓ sticks / 11 tbsp (chilled)
- 60 mL ice water you can substitute half the amount ( 30 mL / 2 tbsp) with chilled vodka if you prefer
- 15 mL apple cider vinegar chilled
- 200 g AP flour about 1 ⅔ cups (spooned and leveled, and preferably chilled)
- 15 g sugar generous 1 tbsp (white or brown sugar)
- ½ tsp fine sea salt
Peach filling
- 560 g peaches about 5 - 6 medium peaches, pitted and cut in half about 3 ¾ - 4 cups of sliced peaches)
- 50 g white sugar ¼ cup
- 15 g Instant ClearJel 1 ½ tbsp (or cornstarch / tapioca starch)
- 30 mL lemon juice 2 tbsp
- 1 pinch sea salt recommended, but optional
- 5 ml vanilla 1 tsp
- 3 sprigs thyme or 1 sprig rosemary
Egg wash
- 1 egg yolk
- 45 mL milk 3 tbsp (or cream)
To finish the galette
- 15 g unsalted butter about 1 tbsp (optional)
- Extra flour for dusting and rolling
- Raw sugar optional (to sprinkle on top of the galette)
- Semolina flour optional (to sprinkle on the crust)
Instructions
Pie crust (makes enough for1galette)
- Slice the chilled butter into small pieces (each stick of butter into 16 pieces). Freeze this butter on a plate for about 10 - 15 minutes.
- Next, make sure the liquid and the flour are all chilled as well.
- Place the flour, salt, and sugar in a food processor or bowl. Pulse or whisk to mix the ingredients. 200 g AP flour, 15 g sugar, ½ tsp fine sea salt
- Add the chilled unsalted butter and toss to coat. Use your fingers to press into the butter and flatten them. Toss the butter pieces to coat, and gently rub the flour and butter mixture together until you have have chickpea-sized / hazelnut-sized butter pieces in with the flour. If using a food processor, pulse a few times to achieve the same result. 150 g unsalted butter
- Next, add the apple cider vinegar and use your fingers or a fork to stir to mix the liquid into the flour. With a food processor, pulse just 2 - 3 times to mix in the vinegar. 15 mL apple cider vinegar
- Add the rest of the liquid (water and vodka - if using) to the flour mixture. Start with half, and stir or toss the mixture to let the liquid mix in. Add the rest in small amounts until you can see the pie dough forming larger clumps. If using a food processor - pulse a few times while adding the liquid and check in between to make sure you’re not adding too much liquid. 60 mL ice water
- The pie crust has enough water when you take a portion of the dough and squeeze it in your hand and it forms a cohesive dough with some dry spots. If needed, add extra chilled water (1 tbsp at a time), to get the right consistency. If the dough is too wet, then add a little extra flour.
- Turn the dough clumps onto a parchment paper or work surface. Use the parchment paper to fold the dough over itself to bring it together. You can also use your hands, but make sure to not overwork the dough. The flour and butter mixture should form into a dough disc, with some cracks and dry spots still visible.
- Form the dough into a disc shape and wrap it with plastic wrap or use the same parchment paper and refrigerate for at least 1 hour.
- When you’re ready to make the galette, remove the crust from the fridge and let it soften for a bit (about 10 - 20 minutes). The dough will be easier to roll out when it’s still cold but malleable.
Peach filling
- While the pie crust is chilling in the fridge, make the peach filling.
- Cut each peach in half and twist to remove the pit from one half. Then, cut the other half into quarters to make it easier to remove the pit (see pictures in the post). Alternatively, use a melon baller to carefully remove the pit. 560 g peaches
- Slice each peach portion into ¼ inch thick slices or ¼ inch thick wedges. Place these in a large bowl.
- Reserve about 1 - 2 tbsp of the sugar in a small bowl. Add the Instant ClearJel (or cornstarch) to the rest of the sugar and whisk to mix these two ingredients together. This is especially important if you’re using Instant ClearJel.
- Add the starch and sugar mixture to the peaches. Add the lemon juice, vanilla, and salt (if using), along with the herbs (optional). Very gently toss to mix with the peaches. Set it aside in the fridge, until you have the crust ready. 50 g white sugar, 15 g Instant ClearJel, 30 mL lemon juice, 1 pinch sea salt, 5 ml vanilla, 3 sprigs thyme
Egg wash
- Make the egg wash while the galette is chilling in the fridge and the oven is preheating. Mix the egg yolk and milk together and set aside. 1 egg yolk, 45 mL milk
Galette assembly
- Preheat a conventional oven to 400°F / 205°C. Place a baking tray in the lower third of your oven, so that it can preheat as well.
- Dust your work surface with flour, and place the cold (but malleable) pie dough on it. Dust the top of the pie disc with a little flour as well. Roll out the pie disc until you have a rough round-shaped disc that’s about 14 inches in diameter. Extra flour
- Use your hands to smooth out the edges of the pie crust so that it’s not as jagged, and has a fairly smooth edge. Alternatively, you can trim the jagged edges.
- If the pie crust softens too much at any stage, or starts to shrink, return the dough to the fridge to let it chill and rest.
- Place the rolled out pie crust on a parchment paper. OPTIONAL - sprinkle a light coating of semolina flour on top of the parchment paper before placing the rolled out dough. This will help to create a crunchy crust. You can also sprinkle some semolina on top of the dough as well. This can act as a barrier between the pie crust and filling. Semolina flour
- Starting from the middle of the crust, place the peach slices / wedges on top of the pie dough, leaving a 2 inch border from the edge of the pie crust. You have the option of placing the peaches however you like, in a rustic way, OR to make a pattern with the peaches (see pictures in the post for reference). See recipe notes below for two more options (peach wedges or slices).
- Scrape any sugar and juices from the filling onto the peaches. Sprinkle the sugar that you set aside at the start ( 1 - 2 tbsp) over the peach slices / wedges. 50 g white sugar
- Next, fold the pie crust OVER the edge of the peach filling. To have a neater galette, make angled cuts on the crust where it folds (see post for more detail). This prevents the crust from being too thick where it folds over. Use water or the egg wash to stick the crust together and seal it properly at the folds. This will help prevent the crust from unfolding while it bakes, and to keep the filling inside without leaking out.
- Repeat the process along the entire border of the galette so that the edge of the peach filling is enclosed in the pie crust. See pictures in the post for reference.
- Place the galette (along with the parchment paper) on a different plate or tray, and transfer it to the fridge. Refrigerate the galette for about 15 - 20 minutes until it firms up.
- The oven should have been preheated for at least 30 minutes by this point, with the baking tray inside the oven.
- Remove the galette from the fridge and generously brush the top of the pie dough with the egg wash. Dot the butter over the surface of the peach filling. OPTIONAL - sprinkle some raw sugar and semolina over the pie crust. Raw sugar, 15 g unsalted butter
- Carefully remove the preheated baking tray from the oven and place the galette with the parchment paper on top of the preheated baking tray. Then return this to the lower third of the oven.
- Immediately lower the oven temperature to 375°F / 191°C.
- Bake in the preheated oven for about 45 - 50 minutes, until the crust is golden brown and the filling is nice and bubbly. Remove the galette from the oven and let it slightly cool down for a few minutes on the hot baking tray.
- Once the galette has slightly cooled down, carefully remove it with the parchment paper (support the bottom of the galette) and place it on a baking rack to cool. This will help prevent the bottom from getting soggy as well.
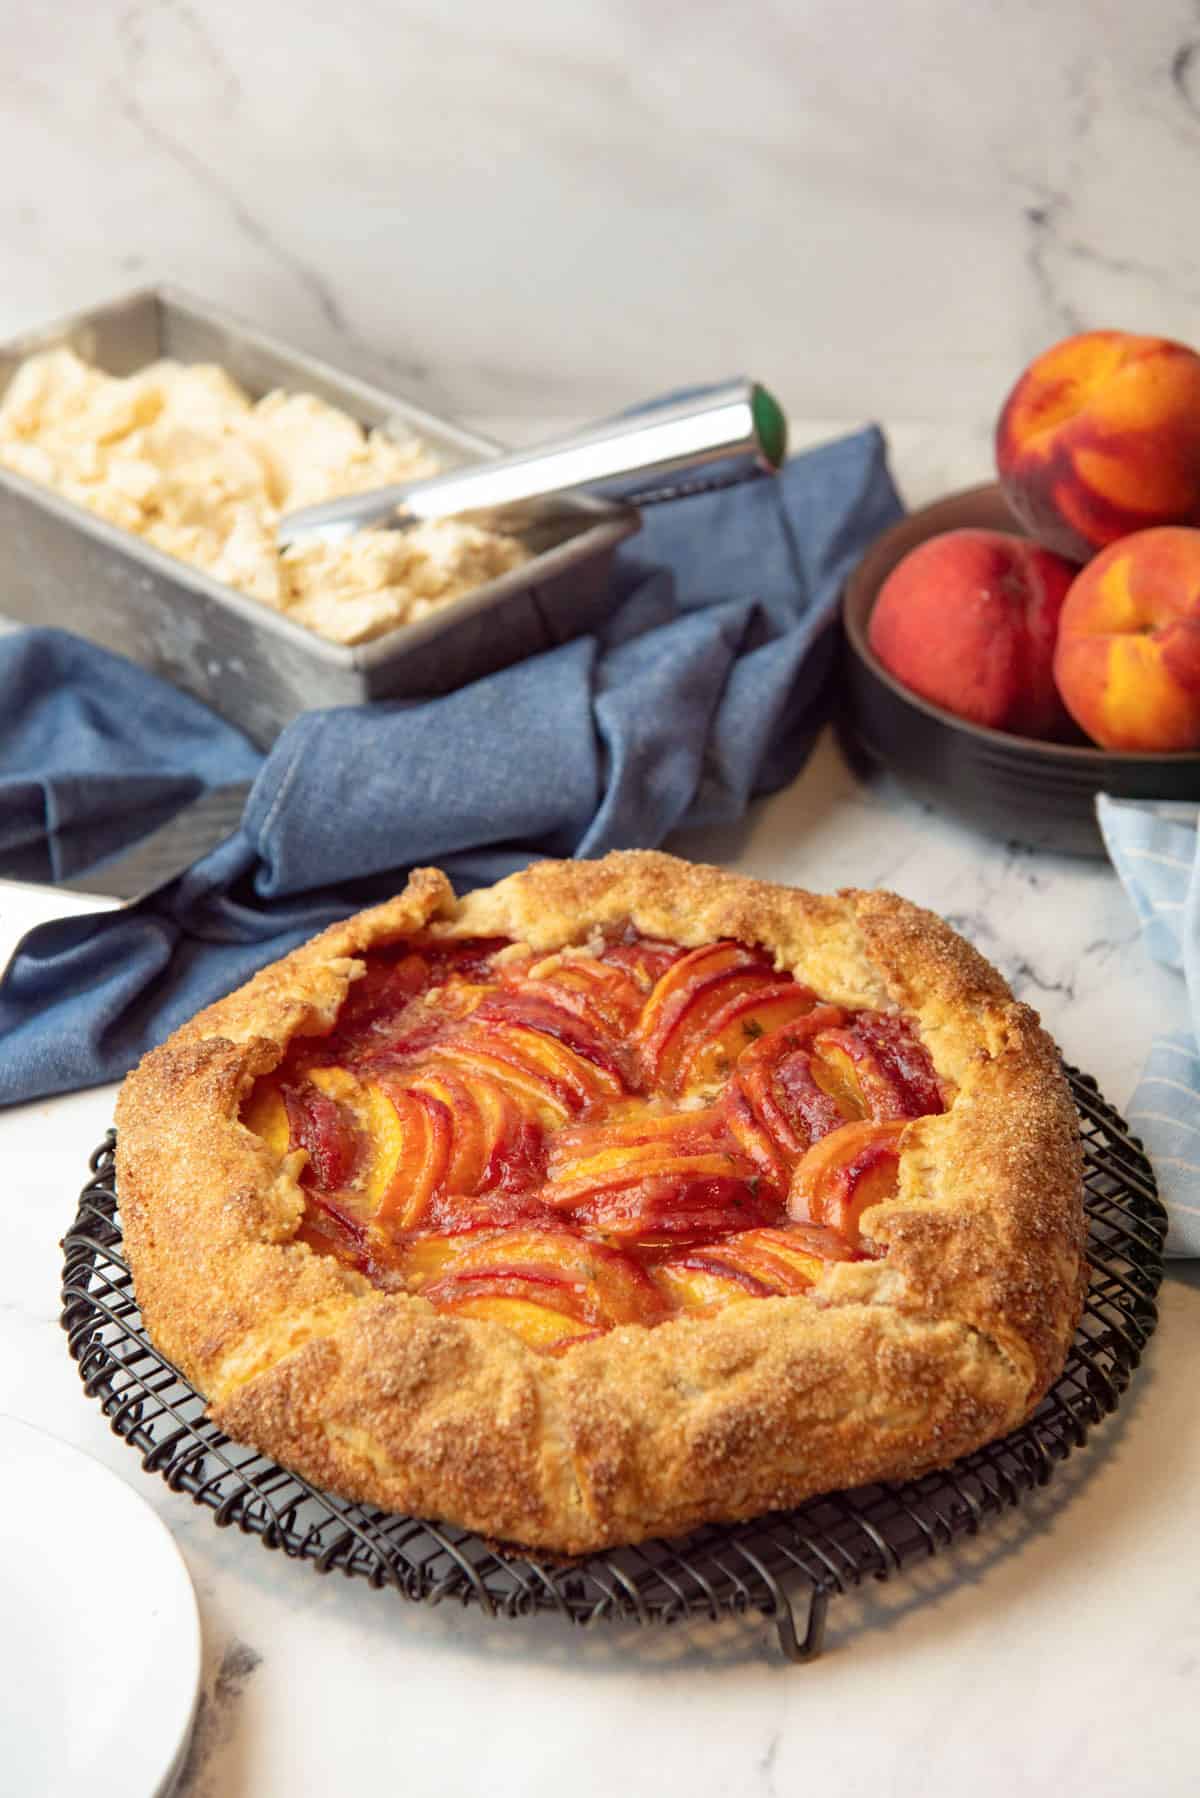
- Serve the galette warm, or at room temperature, with a scoop of vanilla ice cream or whipped cream.
Video
Notes
Note on arranging the peach filling
Other peach recipes you may enjoy
- Peach cobbler
- Peach relish
- Peach melba popsicles
- Peach shrub
Nutrition
Recipe from The Flavor Bender by Dini Kodippili
Easy Peach Galette https://www.theflavorbender.com/easy-peach-galette/
