
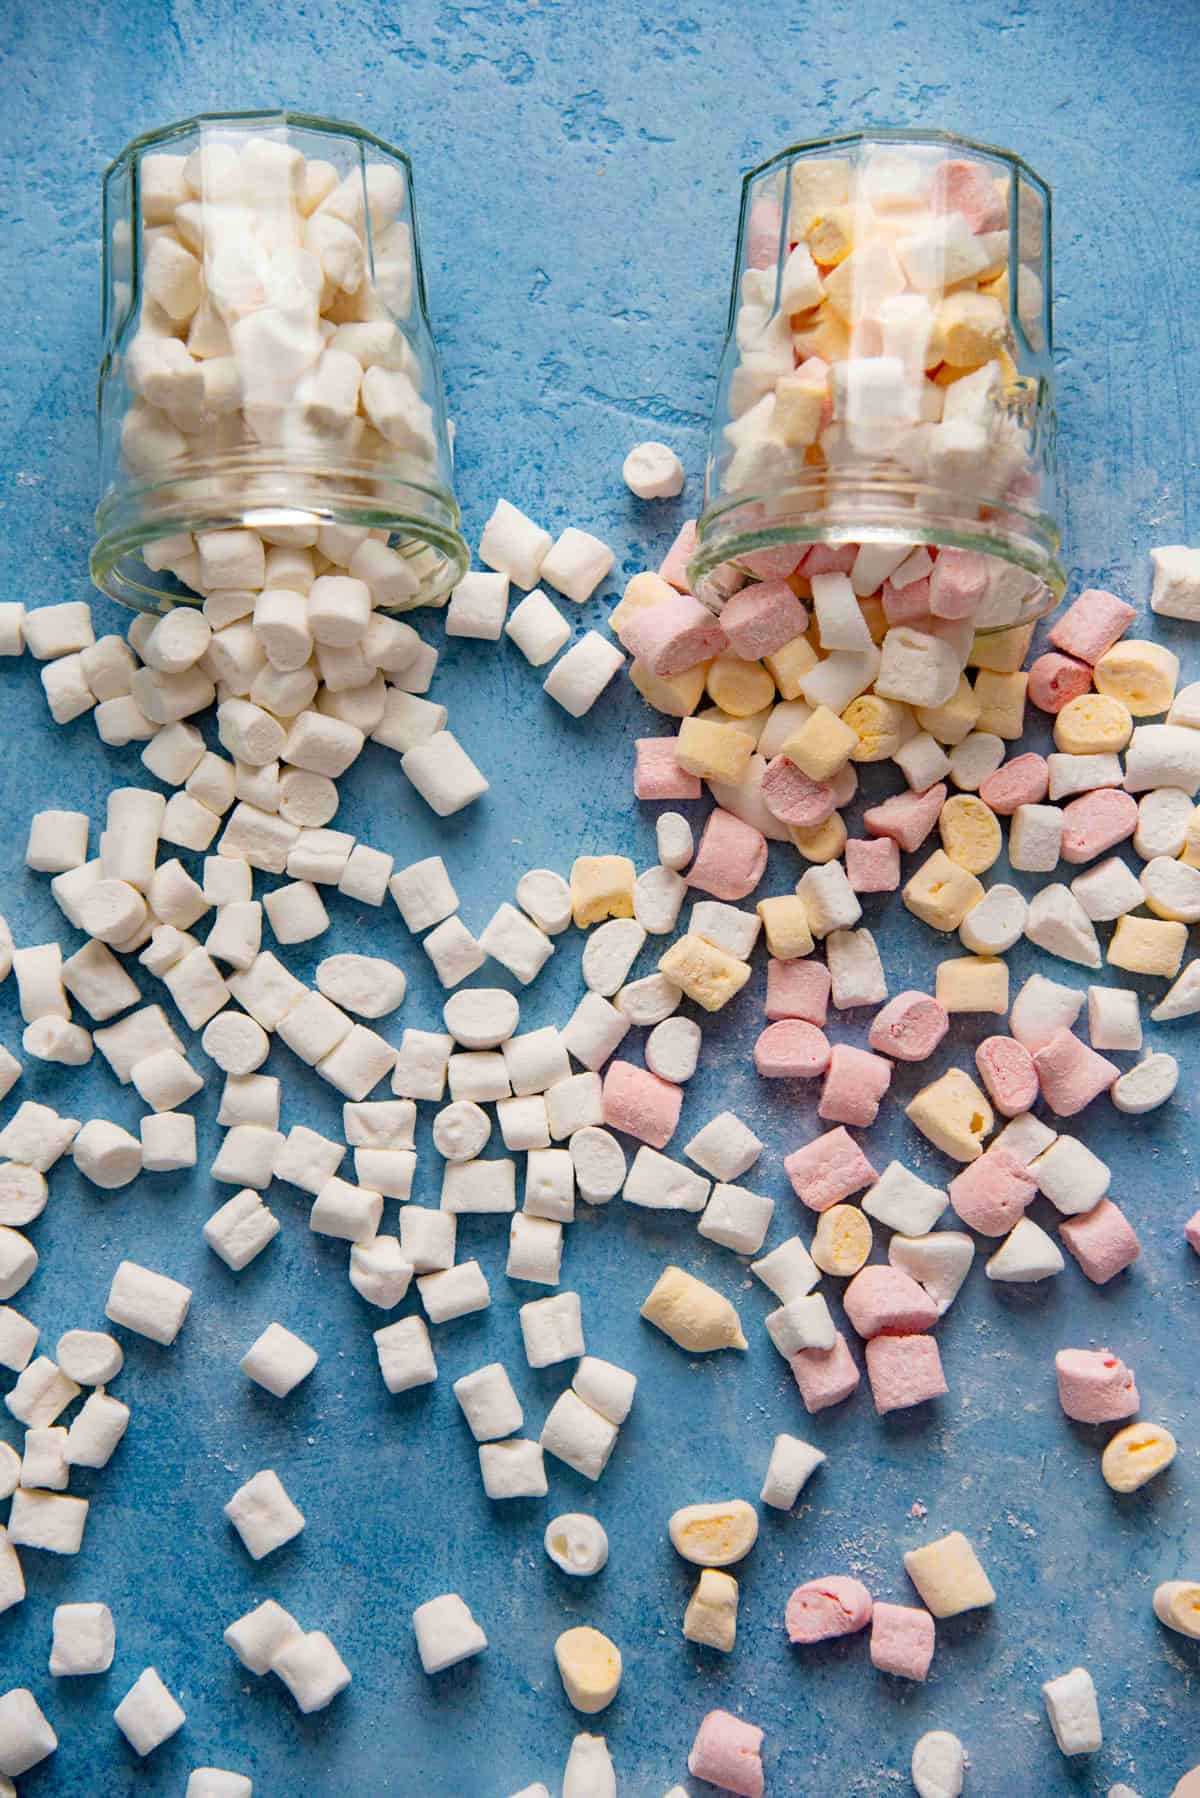
Your favorite homemade marshmallows recipe in the form of mini marshmallows ! I show you how to pipe marshmallows as well as make fruit flavored, colored mini marshmallows.
These pillowy soft, fluffy, colorful mini marshmallows are SO much fun to make and eat, and you can pair them with a variety of other applications too.
For YEARS, a lot of my lovely readers have been asking me if my popular homemade marshmallows recipe could be piped. And now I can finally say yes, yes you can!
Not only am I sharing how to pipe marshmallows here, but the recipe also show you how to make flavored and colored mini marshmallows.
So you can make a variety of fun fruit flavored and rainbow colored marshmallows!
- Why this recipe works
- Ingredients you’ll need
- How to make mini marshmallows (piped marshmallows) Tips for piping
- My best recipe tips
- Frequently asked questions
- Recipe variations
- What to pair with mini marshmallows
Why this recipe works

- Based on my reader-favorite base marshmallow recipe that many tens of thousands of my readers have made and shared over the years. So, you get the same foolproof results with these mini marshmallows too.
- These homemade mini marshmallows are softer and taste so much better than store-bought . They melt in your mouth because they don’t utilize any stabilizers.
- Step-by-step instructions with visual cues that are easy to follow for beginners too.
- I show how to add flavors and colors to make fruit flavored mini marshmallows that actually have so much more fruit flavor than store-bought ones.
- While I do use piping bags and piping tips, you can make these with gallon ziploc bags too .
- If you prefer not to pipe marshmallows, I also share how to make mini marshmallows without piping . But then the shape will be square rather than rounded or cylindrical.

Ingredients you’ll need
For vanilla marshmallows

- White sugar
- Corn syrup or golden syrup
- Water (for the sugar syrup)
- Gelatin powder
- Water (to bloom the gelatin)
- Salt
- Vanilla
- Cornstarch + confectioner’s sugar (for the dusting powder)
OPTIONAL flavoring

Here, I split one batch into 3 portions and then color and flavor each portion. I chose vanilla, lemon, and strawberry for the flavors. Here are a couple more options besides those.
- Lemon – Lemon extract / flavor + yellow gel food coloring
- Strawberry – Strawberry extract + red gel food coloring
- Raspberry – Raspberry extract + red food coloring
- Lime – Lime flavoring / extract + green gel food coloring
- Orange – Orange extract + orange gel food coloring
Equipment you’ll need
- Stand mixer with whisk attachment
- Multiple mixer bowls (if you want to make multiple flavors)
- Piping bags (a minimum of 2 x 18 inch piping bags)
- Round piping tip (1/2 cm width)
- Gallon Ziploc bags (instead of piping bags + piping tips)
- Parchment paper
- Multiple half sheet pans or full sheet pans (to pipe marshmallows onto)

How to make mini marshmallows (piped marshmallows)
Step 1 – Get all the ingredients ready and bloom the gelatin
Measure all the ingredients, and make sure there’s no grease contamination.
Sift and prepare the dusting powder. You’ll need a generous amount of it as the piped marshmallows will need to be coated well after they set.
In the mixer bowl, place the water and sprinkle the gelatin (image 1) . Stir to saturate the gelatin with the water and set it aside for at least 10 minutes to bloom.
Any traces of butter or oil or grease will prevent the marshmallow mixture from fluffing up, or will cause a fluffy marshmallow mixture to deflate.
Also, if you’d like to split one batch to make multiple colors or flavors, then remember to weigh the empty mixer bowl, so you can calculate the final weight of the mixture and split it evenly.

Step 2 – Make the sugar syrup
In a pot, combine the sugar, corn syrup, and water (image 2) . Stir to saturate the water with the sugar.
Heat the sugar syrup over medium heat, while swirling the pot occasionally until it starts to simmer and the sugar is mostly dissolved (image 3) . Close the pot with the lid and lower the heat to simmer the sugar syrup for about 2 minutes (image 4) .
After 2 minutes, remove the lid and make sure there are no sugar crystals stuck on the sides of the pot (condensation should have washed down any sugar crystals). The sugar should also be completely dissolved by now (image 5) .

Bring the heat back to medium (or to a gentle boil), and heat the syrup until it reaches 240 – 245 F (firm ball stage) (image 6) .
Check the temperature with a candy thermometer or digital thermometer every few minutes to monitor this. Occasionally swirl the pot to make sure the syrup is heating evenly. Do not stir , as the syrup can re-crystallize if it’s agitated too much.
Once the syrup reaches firm ball stage, remove from the heat and let the bubbles subside for a couple of minutes while you get the mixer ready.
It’s really important to cook the syrup to the correct temperature. It’s not enough to just “boil” the sugar syrup.
Here’s why.
- Between 240 – 245 F, the sugar concentration in the syrup is between 85 – 87%. So, it only contains about 15% (or less) water content.
- If the sugar syrup has more than 15% water content, and if you add that to the gelatin, the mixture will not fluff up. This is due to the higher water content.
- A more liquid mixture will be harder to pipe as well.
Step 3 – Make the marshmallow mixture

Add the salt and whisk the bloomed gelatin with the whisk in the stand mixer for a few seconds to break it up.
Then while whisking on medium – low speed, carefully stream in the hot sugar syrup (image 7) . Avoid the whisk to prevent the syrup from splashing back (as it could burn you!).
After you add all the sugar syrup, gradually increase the whisking speed to high and whisk for at least 5 minutes (image 8) . The mixture should become white and fluffy like meringue, and triple in volume (image 9) .
When the mixture has achieved this consistency, add the vanilla and whisk for a further 1 minute on high speed to mix it in well (image 10) . If you want to add color, add gel food coloring along with the vanilla to color the marshmallow base.
Step 4 – Flavor and color the mixture (optional)
You can skip this step if you only want to make one color and flavor of marshmallows.
In this post, I make two batches (separately). I kept one as white vanilla mini marshmallows.
Then I split the second batch into three to make vanilla, strawberry, and lemon marshmallows that can be mixed together to make my version of fruity mini marshmallows.

I weighed the mixing bowl first to get the final marshmallow mixture weight (total weight of mixture and bowl – weight of empty bowl = weight of marshmallow mixture).
Divide the weight by three and split the mixture into three separate bowls (image 12) .
The vanilla portion can go straight into a large piping bag (image 11) . Twist the open end to keep it sealed in.
The other two portions are flavored with extract, with a few drops of gel food coloring. Fold the mixture to evenly mix in the extract and coloring and then transfer each flavor mixture into separate big piping bags (images 13 – 14) and twist to close the open end (image 15) .
I use LorAnn bakery emulsions to flavor the marshmallows. Both the strawberry and lemon extracts are excellent, and I especially love the lemon flavor.
It’s really important to fold in the extract and color and place the marshmallow mixture in the piping bag while it’s still warm.
That way you can get all of the mixture into the piping bag before it gets too sticky and harder to pipe.
Step 5 – How to pipe marshmallows

This technique requires more time and patience than setting and cutting marshmallow blocks. But it’s SO MUCH FUN! We’re piping marshmallow lines or tubes (or ropes) here, and then cutting them into smaller pieces once set.
To prevent the marshmallow from sticking to the baking tray, line the baking trays with parchment paper or a silpat. Then generously dust the surface with the cornstarch / confectioner’s sugar powder (image 16) . I use a total of 3 half sheet pans for 1 batch of marshmallow.
Attach a round pastry tip with an opening of about 1/2 cm to another pastry bag. Then cut a large opening in the marshmallow filled piping bag and place it inside the pastry tip bag. Alternatively you can cut the hole from the pastry bag as well, but the piping bag will give a more rounded shape.
Pipe lines of the marshmallow mixture over the dusted half sheet pan (image 17) . Either use scissors or the edge of the tray to trim the marshmallow at the end.

Tips for piping
To get evenly thick ropes of marshmallows,
- Apply even, gentle pressure on the piping bag so that it pipes out an even amount of marshmallow mixture throughout.
- While applying gentle pressure, make sure to move the piping bag over the tray at even speed .
- By varying the pressure and speed, you can control the width of the marshmallow lines . As the marshmallow mixture gets thicker, you may need to either apply more pressure or move more slowly (or both).
- Don’t drag the pastry tip along the surface. This will cause the marshmallow to become flat or deformed. Instead, pipe about 1 – 2 inches above (see image 17) , and allow the marshmallow to “lay” on top of the dusted tray.
- Don’t leave too much space between piped lines, just make sure there is enough space for the marshmallow lines to not touch.
- Don’t let the marshmallow ropes touch . If the piped marshmallow lines do accidentally touch or cross over however, don’t worry. You can cut them AFTER they have set. Don’t try to separate them while they’re sticky.
- When the marshmallow mixture is too warm , the piped lines will lose their round shape and flatten. If this happens, let the mixture cool down slightly.
- When the marshmallow mixture is too cold , the piped lines will come out thick (needs more pressure, and won’t flow as easily), and will also have a rough surface.
- Marshmallows will pipe easily and with a smooth surface when it’s at the correct temperature. See below.

Once a few marshmallow ropes have been piped (about 1/3 – 1/2 of the mixture), dust more of the dusting powder over the piped lines (image 18) .
Continue to pipe out all of the marshmallow mix and cover with dusting powder. It doesn’t need to completely coat the ropes, since we’ll be doing that in the next step.
Step 6 – Let the marshmallow set and cure

After about 30 – 45 minutes, the marshmallows should be set enough to manually coat them with the dusting powder.
To do this, coat your fingers with the dusting powder and gently loosen the marshmallows and flip them in the dusting powder to coat (image 19) . Don’t squeeze the marshmallow since it’ll still be soft.
Cover the trays with plastic wrap and let them set for another 4 – 5 hours (or overnight) at room temperature.
Step 7 – Cut the marshmallows
Loosen the set marshmallow “ropes” from the baking trays. Be gentle, so you don’t break, stretch, or tear the marshmallows (images 20 -21) .
To cut them into mini marshmallows,
- Snip them into smaller pieces with scissors (image 22) , OR
- Cut using a knife or other sharp blade.
Either cut one rope at a time, or multiple together.
Any thick portions of marshmallow can be cut lengthwise before cutting into mini pieces (image 23) .

Step 8 – Store the marshmallows
Toss the cut mini marshmallows in the dusting powder to prevent them from sticking together (image 24) .
You can keep each flavor separate (image 25) , or mix them together. Store the marshmallows in an airtight container. They will last for at least a couple of months!

My best recipe tips
- All the ingredients and utensils that you use should be clean and free of any grease / fat . Otherwise the mixture won’t fluff up, just like with meringue.
- When heating the sugar syrup, make sure to check the temperature OR do a cold water test to make sure it reaches 240 – 245 F (i.e. firm ball stage – as explained in my article on cooked sugar stages ).
- To get proper temperature readings, the thermometer tip should be submerged in the syrup WITHOUT touching the bottom of the pot.
- Be careful when handling the sugar syrup , as it’s very hot and could burn you easily!
- Flavor and color the marshmallow mix after it has reached peak volume, but while it’s still warm . This makes it easier to fold the mixture AND to pipe the marshmallows.
- It takes some practice to pipe marshmallows, but these mini marshmallows are the perfect way to practice before trying other shapes.
- Work quickly while the mixture has the right consistency and before it cools down and thickens too much.
- If you don’t want to be piping marshmallows, then you can spread the marshmallow mixture on a half sheet pan (buttered and lined with parchment paper) and let it cure overnight. This can then be cut into mini marshmallows (1 x 1 cm).

Why did my marshmallow mixture not fluff up?
It takes a few minutes for the marshmallow mixture to properly fluff up. If the mixture is still runny and not fluffing up like meringue, it could be for any of these reasons. 1 – The mixture was accidentally mixed with some form of fat during the process. Make sure all the ingredients and utensils have no fat on them. 2 – Make sure you didn’t substitute the gelatin. Agar agar does not fluff up the same way as gelatin. 3 – The sugar syrup was not boiled to the correct temperature. If that’s the case, the excess water will weigh down the mixture and not let it fluff up into a thick, stiff mixture.
Why are my piped marshmallows flat?
Can I pipe with a star tip?
You can. But make sure to play around with timing to get the right consistency of the marshmallow mixture, so that it will retain the pattern of the piping tip. Make sure to work quickly, OR keep the marshmallow mixture at the ideal piping temperature.
Can I pipe marshmallow shapes instead?
Absolutely! Pipe the marshmallow mixture into any shape you like. Just make sure to dust it with the dusting powder to prevent a skin from forming on top.
Is it possible to make dehydrated mini marshmallows?
I haven’t tried to do so with this recipe… yet! Since these marshmallows don’t contain stabilizers, I’m not sure how well it would stand up to being dehydrated.
Can I make marshmallow ropes (flumps) with this recipe?
You can! It does involve more work though. After piping “marshmallow tubes”, let them set for about 30 – 40 minutes WITHOUT dusting them. Then with very gentle hands, take two tubes and twist them together. Use some extra marshmallow to stick the two tubes together on each end so that it’s more secure. Then dust the twisted rope and let it cure overnight before cutting into smaller sections.

Recipe variations
In this recipe, I make,
- Vanilla mini marshmallows
- Fruity mini marshmallows
You can also make,
- Other fruit flavored marshmallows Lime, orange, raspberry etc.
- Rainbow mini marshmallows – Without adding any flavor, you can just add color to the base recipe and make these.
You can also turn any of my flavored marshmallow recipes into mini marshmallows.
- Coffee marshmallows
- Ube marshmallows
- Peppermint marshmallows

What to pair with mini marshmallows
Since these mini marshmallows are made without stabilizers, they do not behave the same way as store-bought mini marshmallows.
Without stabilizers, these mini marshmallows melt more easily when heated (or even in your mouth!). They also caramelize better and taste better. Plus, they are softer too.
These mini marshmallows are excellent for,
- Hot chocolates – Mini marshmallows for hot chocolate is about the most perfect use for them. Pair these with my French hot chocolate , peanut butter hot chocolate , dairy free hot chocolate , or white hot chocolate too.
- Ambrosia salad or any dessert salads
- Rocky road bars
- Sweet potato casserole (they’ll caramelize beautifully on top of the sweet potato casserole)
- Gift-giving! A bag of mini marshmallows is such a fun edible gift during the holidays.

Recipe
Homemade Mini Marshmallows
Ingredients
Base marshmallow mixture
- 400 g white sugar 2 cups
- 100 g corn syrup or honey about ⅓ cup (check recipe notes below for more 1:1 invert sugar substitution options)
- 120 mL water ½ cup, for the sugar syrup
- 120 mL water ½ cup, to bloom the gelatin
- 18 g gelatin powder 6 tsp / about 2.5 - 3 packets of Knox gelatin
- ⅛ tsp kosher salt / sea salt
- 2 tsp vanilla extract
For flavoring per½batch (optional)
- 1 tsp strawberry extract I use LorAnn bakery emulsion (see recipe notes)
- 2-3 drops red gel food coloring
- 1 tsp lemon extract I use LorAnn bakery emulsion (see recipe notes)
- 2-3 drops egg yellow gel food coloring
Dusting powder
- 180 g cornstarch sifted, about ¾ cup
- 90 g confectioner’s sugar sifted, about ¾ cup
Instructions
Dusting powder
- Sieve the confectioner’s sugar and cornstarch together until well combined. Set aside until needed. 180 g cornstarch, 90 g confectioner’s sugar
Prepping the pan
- Line multiple half sheet pans with parchment paper or silpat and generously dust the surface with the dusting powder. Set aside until needed. (I use 3 half sheet pans per batch.)
Base marshmallow mix
Blooming the gelatin
- First weigh the empty mixer bowl and write it down. This is so you can calculate how to split the marshmallow mixture if you want to make multiple flavors with one batch.
- Place the water in the mixer bowl. Sprinkle the gelatin over the water and stir to saturate the gelatin in the water. Set it aside for at least 10 minutes while you get the syrup and the pan ready. 120 mL water, 18 g gelatin powder
Making the sugar syrup
- Place the sugar and water in a pot. Add the corn syrup or honey (or other invert sugar substitute). Stir very gently until the sugar is moistened and mixed with the water. 400 g white sugar, 120 mL water, 100 g corn syrup or honey
- Heat over medium / medium high heat until the sugar syrup starts to simmer. Gently swirl the pan to evenly distribute the heat, and to help dissolve the sugar.
- When the syrup comes to a boil, cover the saucepan with a lid and lower the heat to medium / medium low to simmer the syrup. Let the syrup simmer for about 2 minutes, without lifting the lid off the saucepan.
- After 2 minutes, remove the lid and check to make sure there are no sugar crystals on the sides of the saucepan. If there are crystals on the sides, then cover the saucepan for a further minute to allow the condensation to wash down the sugar crystals into the syrup.
- Clip the sugar thermometer to the side of the saucepan to monitor the temperature, or if you have an instant read thermometer, check the sugar syrup temperature every few minutes.
- Continue to cook the sugar syrup on medium / medium high heat until it reaches the correct temperature. Gently and frequently swirl the pan to ensure the syrup is cooking evenly.
Heating the syrup to the correct temperature
- The sugar syrup must be heated to between 240 - 245°F.
- For most climates, around 242 - 243°F works great.
- If you don’t have a sugar thermometer , please check the sugar stage every 5 minutes with the cold water test until it reaches the firm-ball stage. (Please read the notes in my basic marshmallows post to learn how to do this.)
- When the sugar syrup reaches the correct temperature, remove it from the heat and let the bubbles subside for a few seconds.
Making the marshmallow mix
- Place the bowl with the bloomed gelatin in the mixer with a whisk attachment. Whisk the gelatin on medium speed for a few seconds to break it up. Add the salt to the gelatin as well. ⅛ tsp kosher salt / sea salt
- While the mixer is running on medium / medium low speed, carefully stream in the sugar syrup. Do not dump it all at once.
- Do not pour the syrup directly on the whisk to avoid splash back, and instead pour it along the wall of the bowl. Pour in all of the sugar syrup and the heat should dissolve all of the gelatin.
- Increase the speed gradually to high (9 or 10), and whisk the mixture for at least 5 - 6 minutes. The marshmallow base should increase about 3 times in size and become white, fluffy, and smooth. It should look like a very fine, glossy, thick meringue.
- Once the mixture has tripled in volume (minimum of 5 minutes of whisking), lower the whisking speed to medium and add the vanilla extract. After adding the vanilla, increase the speed again and whisk for a further 1 - 2 minutes until it’s mixed through. 2 tsp vanilla extract
- The total whisking time can be between 5 - 8 minutes.
- Since it’s easier to mix and scrape the marshmallow mixture into piping bags while it’s warm, stop whisking the marshmallow mix while the bowl is still warm to the touch.
- Making only one flavor - If you’re only making vanilla mini marshmallows, scrape the mixture into piping bags and twist the open end to close. Set it aside.
Making multiple flavors
- Weigh the mixer bowl with the marshmallow mixture. Deduct the weight of the empty bowl to get the total weight of the marshmallow mixture. Then calculate how much each portion would weigh depending on how many flavors you want. I evenly split 1 batch into 3 portions here (for 3 flavors).
- Weigh out equal amounts of the marshmallow mixture into 3 bowls. Vanilla mixture can go straight into the piping bag.
- Add the strawberry extract and red food coloring into one portion and fold it in to evenly mix in the flavor and color. 1 tsp strawberry extract, 2-3 drops red gel food coloring
- Add the lemon extract and yellow coloring into the second portion and fold it in to evenly mix in the flavor and color. 1 tsp lemon extract, 2-3 drops egg yellow gel food coloring
- Put each flavor into piping bags and twist to close the bags (to keep air out).
Piping marshmallows
- In a separate piping bag, place the round pastry tip (about 1 cm opening). Cut the tip off of one of the marshmallow bags and place it inside the pastry bag with the piping tip.
- The marshmallow mixture should still be warm when you pipe it onto the dusting powder on the sheet pan. If the mixture cools down too much, it’ll be hard to pipe the marshmallow smoothly.
- Hold the piping bag with the tip about 1 - 2 inches above the sheet pan. With consistent pressure, gently squeeze the marshmallow mixture out of the piping tip while moving along the length or width of the pan (either direction is fine) to allow the marshmallow tube to “lay down” on the dusting powder lined sheet pan. The pressure and how fast you need to move will vary depending on the thickness you want AND the consistency of the mixture.
- Snip the marshmallow tube with scissors when you reach the edge of the pan (or use the edge of the pan itself to cut the marshmallow tube). Pipe marshmallow tubes fairly close together, but making sure that they do not stick together. The further apart you pipe the marshmallow tubes, the more space you’ll need (and more sheet pans).
- Dust the tops of the marshmallow tubes with the dusting powder and let it set for about 30 - 40 minutes.
- After 30 - 40 minutes, the marshmallows will still be sticky, but you should still be able to gently move the marshmallows around if you dust your fingers with dusting powder. Gently lift and roll the marshmallow ropes to coat all sides in the dusting powder.
- Cover the marshmallows with a lid or plastic wrap and let them set for about 4 - 5 hours or overnight at room temperature.
Cutting the marshmallows
- After the marshmallows have set, gently lift the marshmallow tubes off of the half sheet pans. Coat them in the dusting powder to make sure they don’t stick together.
- Either cut the tubes with scissors into mini marshmallows, or use a knife / blade to cut multiple tubes at once. If the marshmallows ropes are too thick, cut them lengthwise first to make them smaller.
- Toss the cut marshmallows in the dusting powder and store in an airtight container with some extra dusting powder. You can keep the flavors separate, or mix them all together.
Notes
Invert sugar options
Notes on flavoring / coloring
Other flavors for fruity mini marshmallows
- Lime extract with green coloring
- Orange extract with orange coloring
- Raspberry extract with red coloring
Notes on how to adapt the recipe
Storage instructions
More helpful information
Marshmallow flavor variations
- Vanilla marshmallows
- Chocolate marshmallows
- Coffee marshmallows
- Ube marshmallows
- Toasted coconut marshmallows
- Lemon marshmallows - add lemon zest to the sugar syrup. Substitute 1/4 cup of the water used to make the sugar syrup with strained lemon juice. Then proceed as normal with the rest of the recipe.
- Peppermint marshmallows
- Butterscotch marshmallows
- Tahini marshmallows
- Chocolate chip mint marshmallows - add 1/2 cup of grated milk chocolate (or finely chopped chocolate) and 2 tsp of pepper mint extract to the marshmallow base and mix to combine.
- Unicorn marshmallows - you will need to work quickly for these. Divide the marshmallows into 3 portions. Color each portion with pink, blue, and purple. Swirl the colors together and spread them in the prepared pan.
- Orange blossom marshmallows with pistachios
- Butterscotch swirled marshmallows
Nutrition
Recipe from The Flavor Bender by Dini Kodippili
Homemade Mini Marshmallows https://www.theflavorbender.com/homemade-mini-marshmallows-recipe/
