
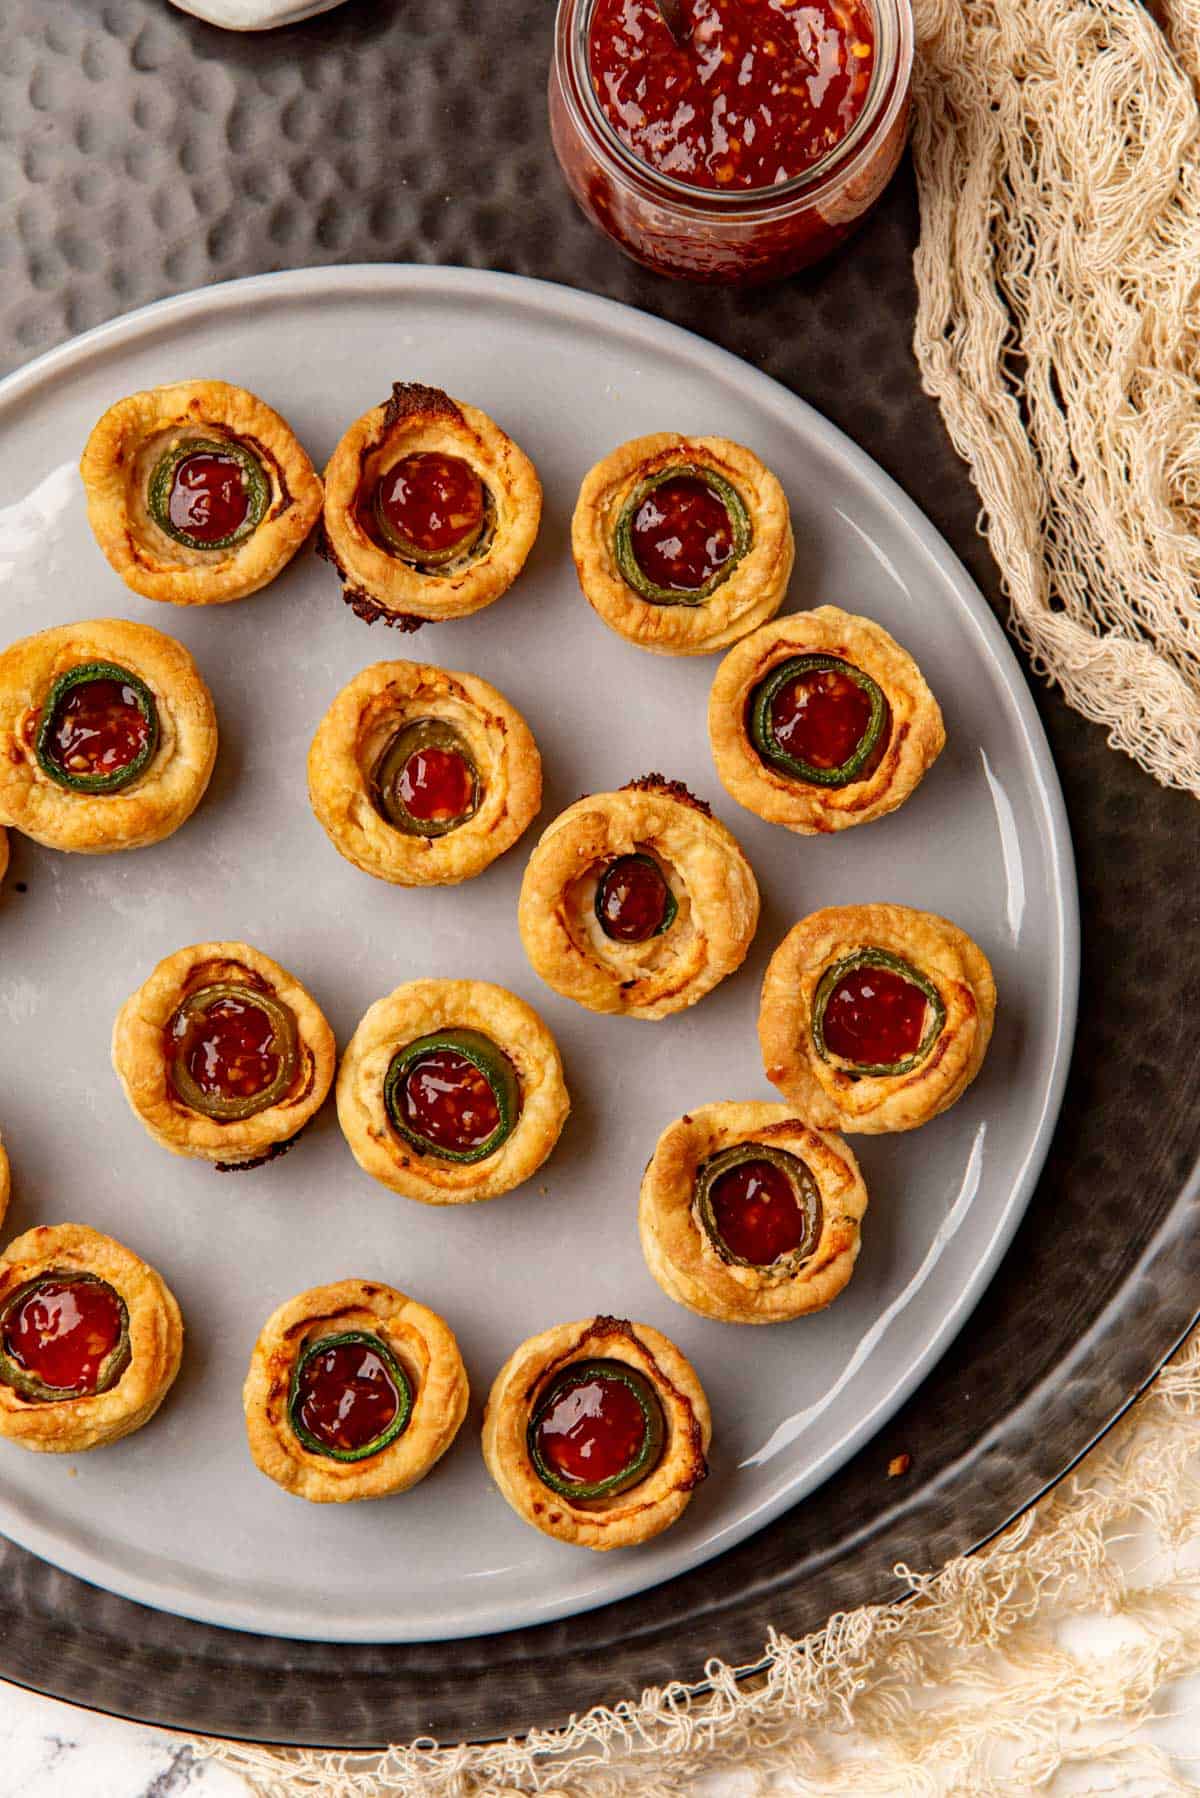
All the flavors of jalapeno poppers and jalapeno bites , but better and more fun! These Jalapeno Eyeball Tarts are such an easy Halloween party food idea.
A creamy cream cheese filling packed with herbs, spices and more jalapeno, in a buttery, crisp puff pastry base, and topped with a sweet chili sauce!
<img loading=“lazy” src=“https://www.theflavorbender.com/wp-content/uploads/2024/09/Jalapeno-eyeball-tarts-4.jpg" onerror=“this.onerror=null;this.src=‘https://blogger.googleusercontent.com/img/a/AVvXsEhe7F7TRXHtjiKvHb5vS7DmnxvpHiDyoYyYvm1nHB3Qp2_w3BnM6A2eq4v7FYxCC9bfZt3a9vIMtAYEKUiaDQbHMg-ViyGmRIj39MLp0bGFfgfYw1Dc9q_H-T0wiTm3l0Uq42dETrN9eC8aGJ9_IORZsxST1AcLR7np1koOfcc7tnHa4S8Mwz_xD9d0=s16000';" alt=“Mini tarts that look like Halloween eyeballs, with a red sweet chili sauce "eyeball iris". - 2”>
- Why I love this easy Halloween appetizer recipe
- Ingredients to make jalapeno eyeball tarts
- How to make jalapeno eyeball tarts
- Variations of this eyeball recipe
- Make ahead tips
- Storage tips
Why I love this easy Halloween appetizer recipe
- All the flavors of jalapeno poppers, but better! And with a Halloween twist. Buttery and crisp puff pastry base, creamy and cheesy cream cheese filling, with herbs, spices and more jalapeno! All topped with a jalapeno and sweet chili sauce “eyeball”. What’s not to love? They are perfect savory Halloween snacks.
- So easy to make and big on flavor!
- I show two ways to make these Halloween savory treats. One very easy method, and a little bit more involved second method, but one with minimal food waste.
- Using the pastel de nata method for the tarts, you end up with super flaky puff pastry tart shells!
- Bite-sized, cheesy, a little spicy, sweet, buttery, flaky, and delicious! Perfect as Halloween party food!
- Yes, they are perfect as a Halloween appetizer, because the tarts look like little creepy eyeballs, BUT they can pass off as fancy appetizers for any party – themed or not.
- I share different ingredient substitutions and additions , so you can make variations of this same appetizer – from the most simple to more flavor combinations.
These delicious Halloween savory appetizers are a great twist on the classic jalapeno popper! I love how they look like creepy eyeballs with the red “iris”, and are so cheesy with tons of flavor.
Such a fun Halloween themed food idea that you can serve at any party, along with these gnarly Halloween witch finger cookies and any one of more of these spooky Halloween recipes .
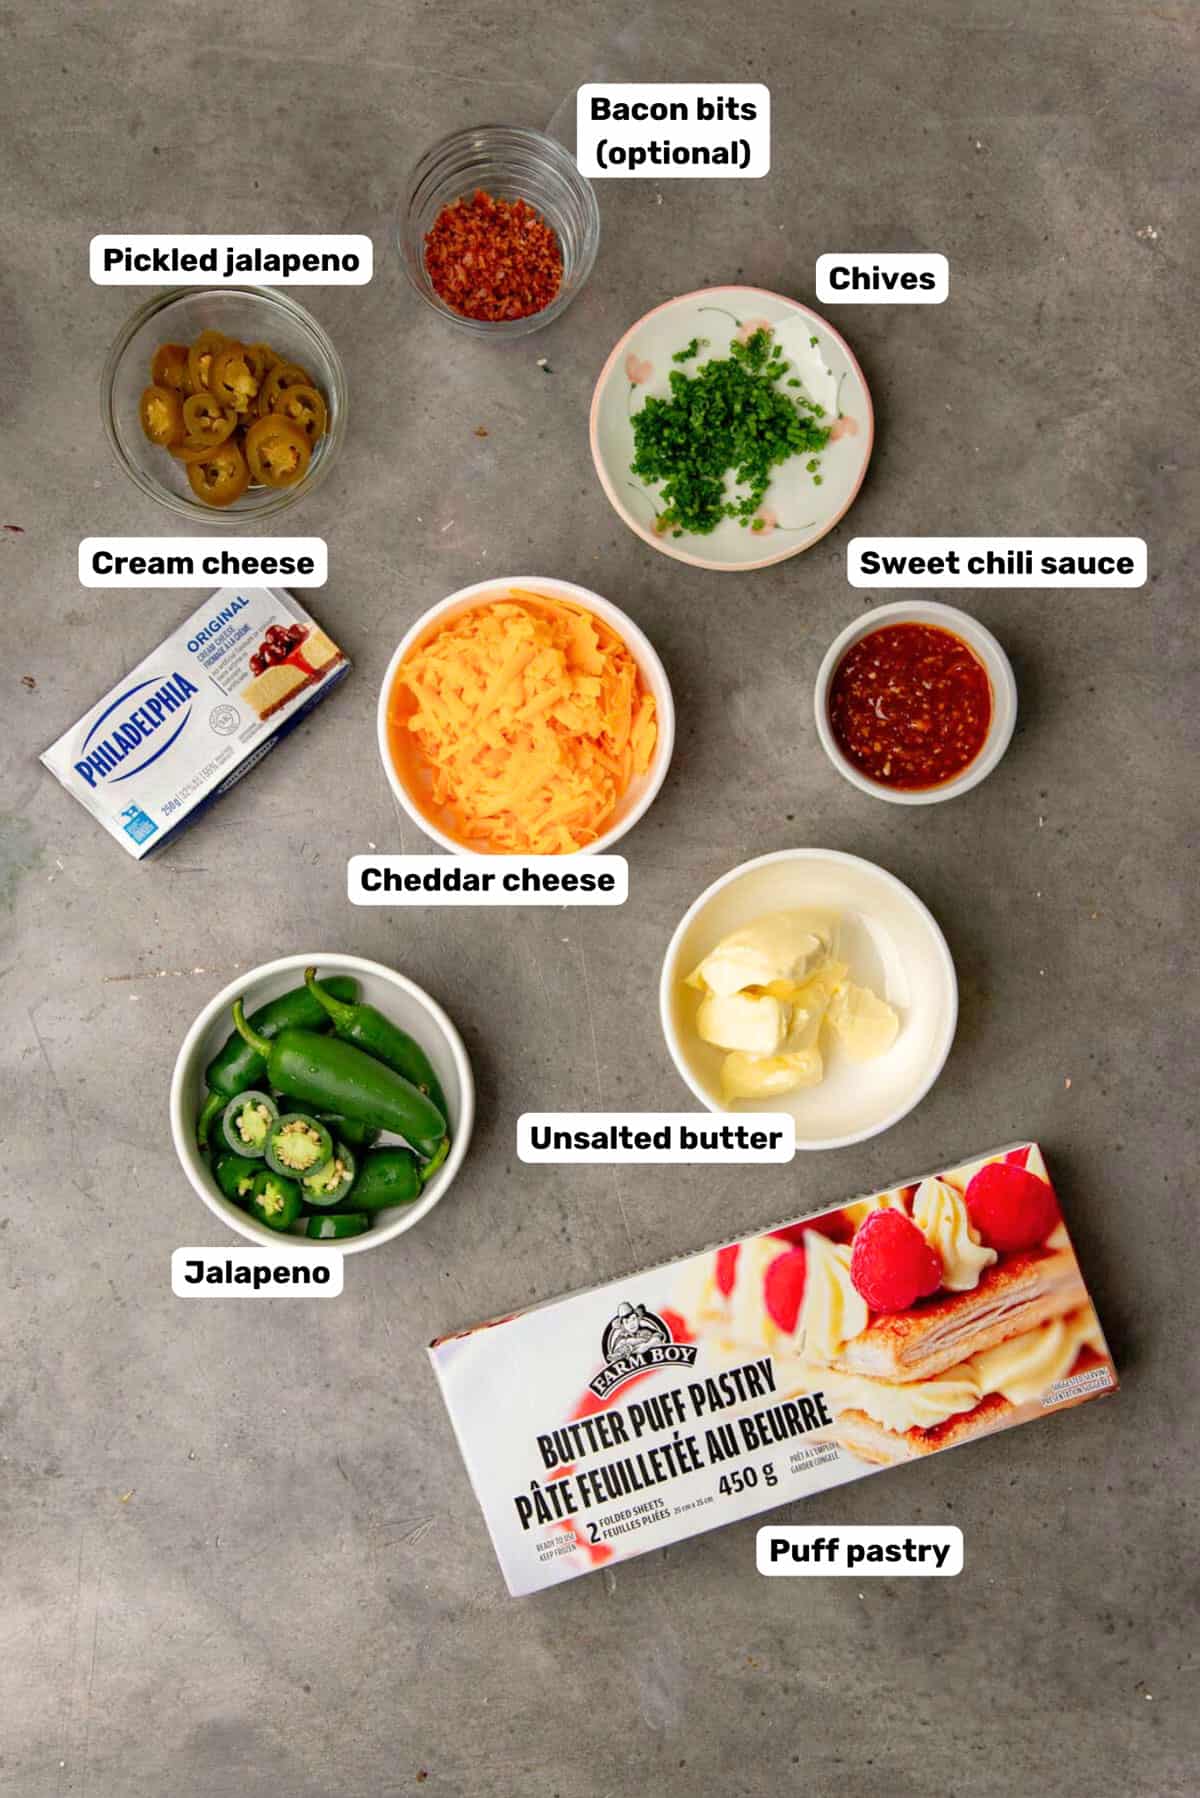
Ingredients to make jalapeno eyeball tarts
For the tart base
- Puff pastry sheets – Store-bought is the easiest, but you can make your own homemade puff pastry too.
- Unsalted softened butter
For the jalapeno popper filling
- Cream cheese
- Cheddar cheese
- Chopped jalapenos or pickled jalapenos
- Chives or spring onions
- Bacon (optional – leave out for vegetarian option)
- Fresh jalapenos (for topping)
- Sweet chili sauce (homemade or store-bought) or red pepper jelly

Ingredient notes
Puff pastry sheets – For 1 batch, you need 450 g of puff pastry or 2 sheets. Store-bought is of course much easier, but you can also use homemade puff pastry. As long as it’s rolled out to the right size, it’ll work.
Cream cheese – Please use the block for this recipe. The spreadable tub is too soft and the cheese may melt away completely as they are baking. To add more flavor to the filling, substitute some of the cream cheese (up to 50%) with goat cheese.
Sweet chili sauce – I make my own sweet chili sauce for this recipe, which allows me to make a slightly thicker consistency to be used as the “eyeball”. But you can absolutely use store-bought sweet chili or red pepper jelly instead. Since the sauce will be placed inside the jalapeno ring, it’ll be contained, and does not need to be thickened if you don’t want to.
Special equipment
These eyeball tarts will need to be made in a mini muffin pan . The mini cavities will help retain the tart pastry shape while it bakes, and minimize the filling spilling out.
Each batch will make about 48 tarts. You can absolutely use 2 muffin pans twice, but make sure the pan has completely cooled down before adding the next batch of pastry into the cavities.
How to make jalapeno eyeball tarts
There are two ways to make the base for these Halloween tarts. You can choose either, but I prefer the “more efficient way” , as described below.
Easy way
Cut out large circles of pastry (about 4 – 5 inches), and use a tart tamper to shape the circle into the muffin pan cavity.
The problem with this method is that there will be lots of excess pastry dough. This will need to be carefully mixed together again and re-rolled to get more tart shells, and the re-rolled dough may not work as well either.
With 2 sheets of puff pastry, you will get a maximum of 8 – 12 circles only with this method.
More efficient way
This method ensures minimal waste, and maximum amount of tart bases. With 2 sheets, you can get about 46 – 48 shells!
The two puff pastry sheets are rolled up into a log, and cut into portions. These spiral tart shells are made and shaped in the same way as pastel de nata, and I’ve used it to make these goat cheese appetizers before.
Make the puff pastry tart base

Place two puff pastry sheet on a lightly floured surface (image 1) . The two square puff pastry sheets will be connected to make one long pastry sheet that’s about 18 – 20 inches long and 9 – 10 inches wide.
Overlap one end of a pastry sheet over the other – about 1/4 – 1/2 cm. Stick them together using just a little bit of water. Press down along the edge to seal (image 2) .
Use a rolling pin to gently roll out the dough to make the sheet about 12 inches wide (image 3) . The length can stay the same or become a little longer too.
Spread the softened butter in a thin layer over the surface of the pastry sheet, only leaving a 2.5 – 4 cm (1 – 1.5 inch) border at one of the shorter edges of the sheet with no butter (the end that is away from you) (image 4) .

Tightly roll the puff pastry, starting from the edge that is close to you (image 5) , towards the end that is not buttered (image 6) . The spiral should be nice and tight with no gaps. Once the pastry is rolled up, seal the edge (with no butter) to form an even pastry log (images 7 – 8) . Wrap it in plastic wrap and place in the fridge to chill (image 9) .
Roll the pastry log gently on a floured surface to make the diameter about 2 inches throughout. Cut off the ends of the chilled pastry log, so that the ends are even and not tapered.
Cut this log into slices that are about 1 cm (3/8 inch) thick (images 10 – 11) . Each slice will be used to make a tart base.

Forming the tart shell
Take each disc into well floured hands. Use more flour if the butter softens at any stage to avoid the pastry from sticking to your hands.

Press down in the middle of the disc with your thumb (images 12 – 13) , and rotate the disc while still pressing on the center. This will help form a cup shape with the disc (image 14) .
As you rotate the disc, move the pressure from the middle to the sides of the disc to flatten the sides of the tart shell, while creating a bowl or cup shape (images 15 – 16) . The bottom and sides should be fairly thin, with thick edges.

Place this in the mini muffin pan, and use your thumb or finger to flatten the tart to the sides of the cavity (image 17) . The top will rise above the cavity, and be thicker than the rest of the shell (image 18) .
This process is really easy! I learned how to do this when I was taught how to make Portuguese custard tarts. Once you get the hang of it, it’s really fast and easy to do.
How to form mini tarts (video)
Make the filling

Make the filling while the tart dough log is chilling in the fridge.
You can use store-bought bacon bits or fry up 2 – 3 slices of regular bacon and crumble / chop them as well.
Finely slice the chives, or finely chop the spring onions. To add a little pickled flavor and additional jalapeno flavor, I like to add chopped pickled jalapenos to the filling too! Fresh jalapeno will work as well, but I really like the pickled flavor in the filling.
Place all the ingredients in a large bowl (images 19 – 20) . Use a spatula or hand-held mixer to mix all the ingredients together (image 21) .
Fill and bake the tarts
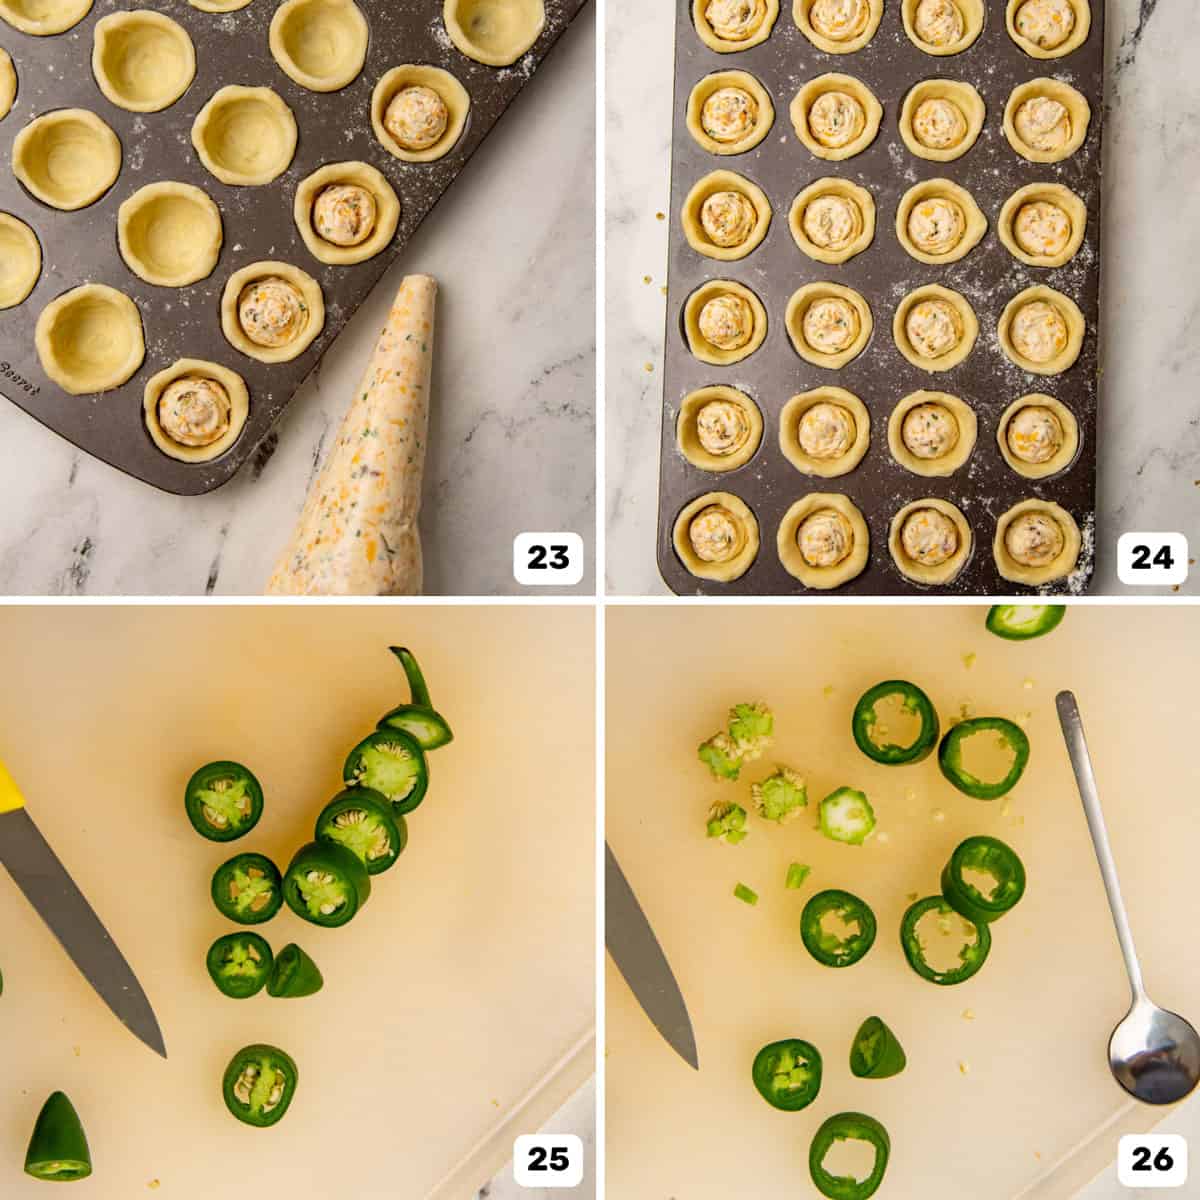
Use a spoon or a piping bag (filled with the cheese filling – image 22 ) to fill each tart with the cheese filling. Only add about a tablespoon to each tart, so that it’s just over half full. Don’t fill it to the top (images 23 – 24) .
Bake the tarts in a preheated oven for about 15 – 20 minutes until the tops are golden brown in color.
While the tarts are baking, slice the jalapenos into 1/2 inch thick slices and remove the seed and pith in the middle (images 25 – 26) . You need 1 slice for each tart.

During the last 5 minutes of baking (when the tarts have just turned golden brown), take out the baking tray and place a jalapeno slice, flat, in the center of each tart (image 27) . You can do this AFTER the tarts have baked as well, but I wanted the jalapenos to soften slightly.
Bake for the remaining 5 minutes and let the tarts cool down out of the oven (image 28) .
Final decoration for eyeball tarts
Once the cheese filling has cooled down slightly, dollop the sweet chili sauce in the middle of each jalapeno slice, so that it resembles a red eyeball (images 29 – 30) .
Serve these Halloween savory jalapeno tarts while still slightly warm, with extra sweet chili sauce on the side.
<img loading=“lazy” src=“https://www.theflavorbender.com/wp-content/uploads/2024/09/Jalapeno-eyeball-tarts-2.jpg" onerror=“this.onerror=null;this.src=‘https://blogger.googleusercontent.com/img/a/AVvXsEhe7F7TRXHtjiKvHb5vS7DmnxvpHiDyoYyYvm1nHB3Qp2_w3BnM6A2eq4v7FYxCC9bfZt3a9vIMtAYEKUiaDQbHMg-ViyGmRIj39MLp0bGFfgfYw1Dc9q_H-T0wiTm3l0Uq42dETrN9eC8aGJ9_IORZsxST1AcLR7np1koOfcc7tnHa4S8Mwz_xD9d0=s16000';" alt=“Mini tarts on a wire rack with jalapeno slices and sweet chili sauce to make "eye balls". - 14”>
Variations of this eyeball recipe
- Substitute some of the cream cheese with goat cheese for a more elevated, tangy taste!
- Add other chopped herbs such as rosemary or thyme for a more herby flavor.
- Instead of the puff pastry, you can also use prosciutto. You don’t have to cook these either! Just wrap the prosciutto around little balls of cream cheese.
- Instead of the jalapeno slices on top, you can also use olive slices! Place 1 or 2 pieces of black olive slices to resemble eyes on the tart.

Make ahead tips
When I make these Halloween appetizers, my workflow is as follows.
- Day 1 – Make the puff pastry log. Cut and line the mini muffin tray. Make the filling. Fill the tarts. Cover and refrigerate overnight.
- Day 2 – Bake. Top with jalapeno and red chili sauce and serve.
This can be made in one day as well, but the different components can be made ahead of time, as follows.
To make puff pastry tart base ahead
The log can be made and sliced into portions and frozen for up to 1 month .
The muffin pans can be lined with the puff pastry discs for up to 2 days , but should be covered well with plastic wrap to prevent the pastry from drying out.
To make cream cheese filling ahead
The cream cheese filling can be made up to 4 days in advance and kept in the fridge in an airtight container. Let it soften before you fill the tarts.
Filled, but unbaked tarts can be stored in the fridge overnight as well. Just cover them well to prevent the pastry from drying out.
<img loading=“lazy” src=“https://www.theflavorbender.com/wp-content/uploads/2024/09/Jalapeno-eyeball-tarts-4.jpg" onerror=“this.onerror=null;this.src=‘https://blogger.googleusercontent.com/img/a/AVvXsEhe7F7TRXHtjiKvHb5vS7DmnxvpHiDyoYyYvm1nHB3Qp2_w3BnM6A2eq4v7FYxCC9bfZt3a9vIMtAYEKUiaDQbHMg-ViyGmRIj39MLp0bGFfgfYw1Dc9q_H-T0wiTm3l0Uq42dETrN9eC8aGJ9_IORZsxST1AcLR7np1koOfcc7tnHa4S8Mwz_xD9d0=s16000';" alt=“Mini tarts that look like Halloween eyeballs, with a red sweet chili sauce "eyeball iris". - 16”>
Storage tips
Baked tarts can be stored in an airtight container, and in the fridge for about 5 days .
Chilled eyeball appetizer tarts can be reheated in a 200 F oven for about 15 minutes, or until heated through, and the pastry becomes crisp again.
More Halloween recipes you’ll love
- Spooky chorizo pies
- Witch finger cookies
- Bleeding black Halloween cupcakes
- Halloween monster cookies
- Halloween rocky road slices
- Monster cakes
- Witch’s heart cocktail
- Witches brew drink
- Hocus pocus cocktail
- Unicorn blood cocktail
Recipe
Jalapeno Eyeball Tarts (Easy Halloween Appetizers)
Ingredients
For puff pastry tarts
- 450 g puff pastry sheets 2 sheets
- 115 g unsalted butter softened
For cream cheese filling
- 455 g cream cheese blocks 2 blocks (softened to room temperature)
- 150 g grated cheddar cheese 1 ¼ cups
- 50 g pickled jalapeno approximately scant ¼ cup (adjust to your heat tolerance levels)
- 3 tbsp bacon crumbles store-bought or 2 - 3 bacon strips cooked and crumbled (optional)
- 3 tbsp chopped chives or finely chopped green onions
For topping
- 15 fresh jalapenos
- 1 cup sweet chili sauce or red pepper jelly
Instructions
Puff pastry tart base
- The 2 sheets of puff pastry will weigh around 1 lb or about 450 g, and each will be a 9 - 10 inch square. Place these 2 sheets on a lightly floured work surface.
- Brush the end of one puff pastry sheet (about ¼ - ½ cm) with a little water. Place the second pastry sheet below it, with one end overlapping this brushed end of the first sheet. Press down to seal the two sheets together to form one long puff pastry sheet that’s about 9 - 10 inches wide and about 18 - 21 inches long. See pictures in the post for reference.
- Roll the dough lightly to make the width about 12 inches.
- ALTERNATIVELY - If you can make you own puff pastry dough, or buy premade dough, roll it out to form a rectangle that’s about 12 inches wide, and at least 22 inches long.
- Make sure one of the short sides of the pastry is facing you.
- Take the softened, spreadable butter, and spread a very thin layer of butter all over the surface of the pastry, only leaving a 1 - 1.5 inch strip along the shorter end that’s away from you. 115 g unsalted butter
- Roll the pastry sheet, starting from the short end close to you. Make sure that it’s rolled tightly, with no gaps in the spiral.
- Roll the pastry sheet towards the end with no butter. Once you reach that end, brush a little bit of water on the bare dough strip and pinch to seal the dough together and form a pastry log. The edge will not be even and straight, but that will be fixed later. Wrap with plastic wrap and place in the fridge to chill.
- Once the log is chilled, take it out of the fridge and plastic wrap. Place it on a lightly floured surface and roll it as evenly as possible to make it into a 2 inch diameter log throughout.
- Now cut the uneven edges to make the ends straight and even.
- Slice portions that are about 1 cm / ⅜ inch thick from this pastry log, using a very sharp knife to get clean edges.
Shape the tart base
- Take each spiraled dough slice and flour each sides. With floured hands, gently press the middle of the disc with your thumb. Continue to do this 3 - 4 times while rotating the disc with the other hand to create a concave / cup shape (without creating a hole in the pastry). See short video clip in the post for reference.
- Move the pressure from the middle to the sides of the pastry while rotating the disc. This will start to thin out the sides of the tart, while creating a larger concave shape. The edge of the pastry disc should still be thick.
- Next, transfer this into a cavity in a mini muffin pan. You do not need to butter the pan, since the pastry has enough butter to keep it from sticking to the pan.
- Use your floured fingers to flatten the pastry into the bottom and sides of the muffin pan cavity. The top edge might be sticking out of the pan and be a little thicker. This is completely OK.
- Repeat with the other disc portions until the all the cavities in the mini muffin pans are lined with pastry bases. This recipe should make about 48 tart shells, which will need 2 mini muffin pans.
- Keep the tray and any other unshaped pastry portions in the fridge until you’re ready to fill them.
Make the cream cheese filling
- Make the cream cheese filling while the puff pastry log is chilling in the fridge.
- Finely chop the pickled jalapeno, chives / spring onions, and bacon (if using). 50 g pickled jalapeno, 3 tbsp chopped chives, 3 tbsp bacon crumbles
- Place the cream cheese, cheddar cheese, and all the filling ingredients in a large bowl. 455 g cream cheese blocks, 150 g grated cheddar cheese, 50 g pickled jalapeno, 3 tbsp bacon crumbles, 3 tbsp chopped chives
- Mix well with a spatula or a hand mixer. Taste and add seasoning if needed. I do not need to add any salt, but black pepper might be a nice addition.
- Set aside in the bowl, or place the filling in a piping bag and set aside.
Topping
- Wash and pat dry the jalapenos. 15 fresh jalapenos
- Cut the jalapenos into ½ inch thick slices to get circles. Depending on the size of your jalapenos, you may get 4 slices or up to 7 slices. Make sure you have enough to top all the tarts.
- Use a sharp knife or a very small circle cutter to remove the white pith and seeds in the middle of each jalapeno slice. Set aside to top the tarts during the last few minutes of baking OR after baking.
Filling the tarts
- Preheat a conventional oven to 425°F / 218°C.
- Take the mini muffin pan with the puff pastry tarts and fill each tart with the cream cheese filling. About 10 - 12 g per tart, which is roughly about 1 tbsp or slightly less. Do not fill the tarts to the top, it should only be about ⅔ - ¾ way full.
- Once the cheese filling is added, bake the tarts in the preheated oven for about 15 - 20 minutes, or until the tarts turn deep golden brown in color.
- During the last 5 minutes of baking, place a slice of jalapeno on top of the filling to allow the jalapeno to slightly soften. Alternatively, you can place the jalapeno slice on top AFTER the tart has baked as well. This will keep the jalapeno slice fresh and crisp. 15 fresh jalapenos
- Remove the tarts from the oven when the pastry turns deep golden brown, and then let them cool down. The cheesy middle will be melted, so let it cool down slightly before the final step.
- When the tarts have cooled down slightly, fill each jalapeno slice with a dollop of red sweet chili sauce. 1 cup sweet chili sauce
- If the jalapeno slice has moved, use a toothpick to adjust it to lay flat before filling with sweet chili sauce.
- Serve while tarts are still warm, with the remaining sweet chili sauce on the side.
Nutrition
Recipe from The Flavor Bender by Dini Kodippili
Jalapeno Eyeball Tarts (Easy Halloween Appetizers) https://www.theflavorbender.com/halloween-jalapeno-eyeball-tarts/
