
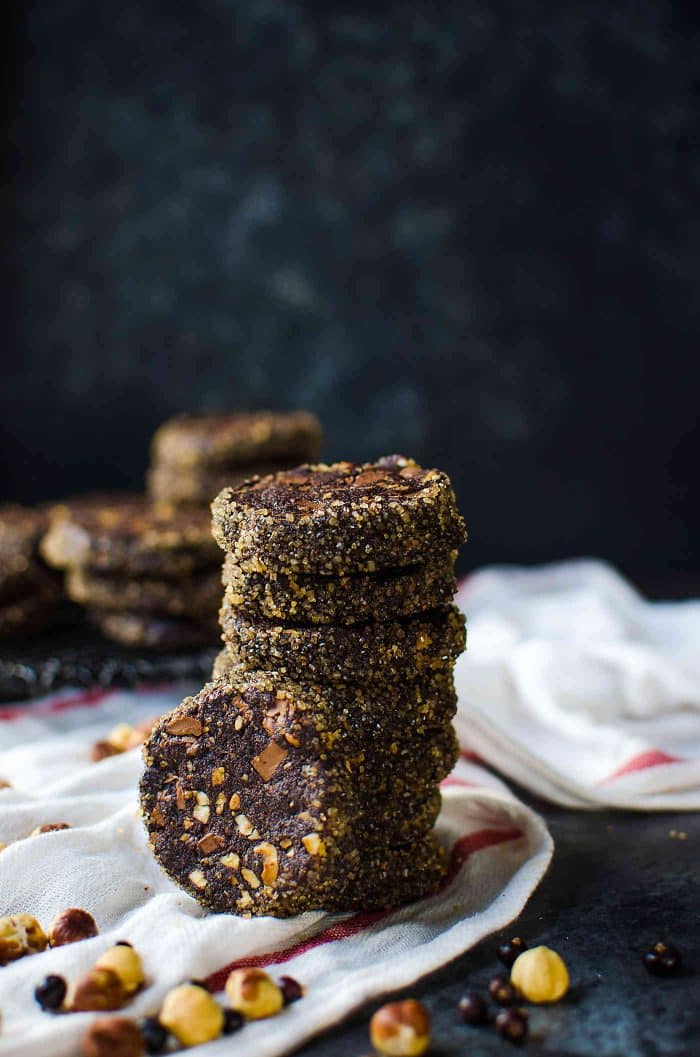
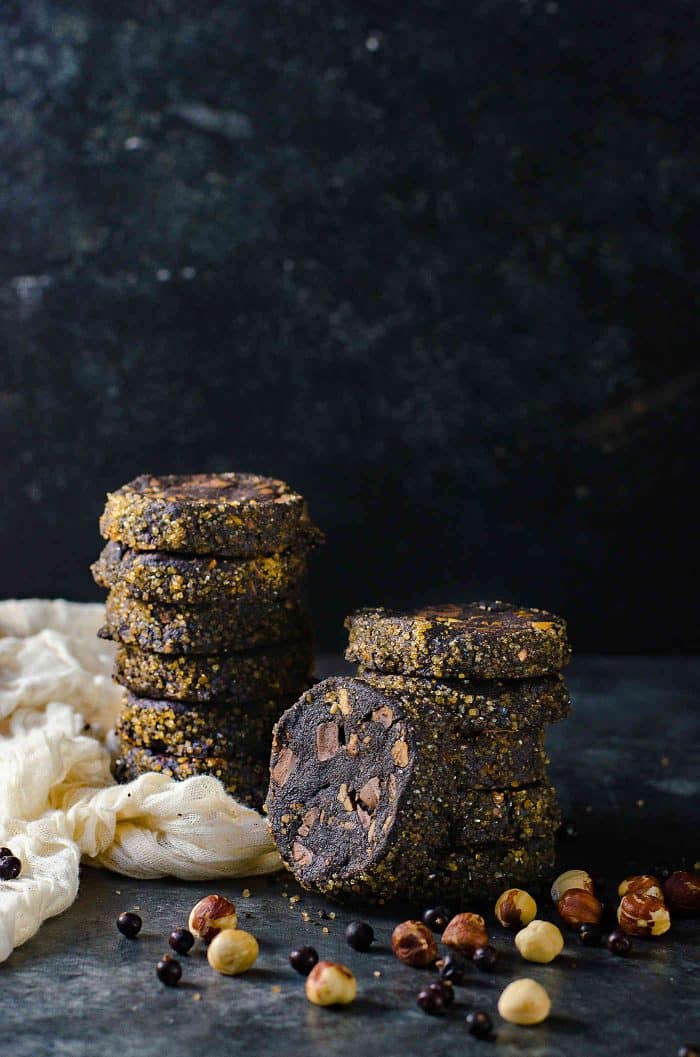
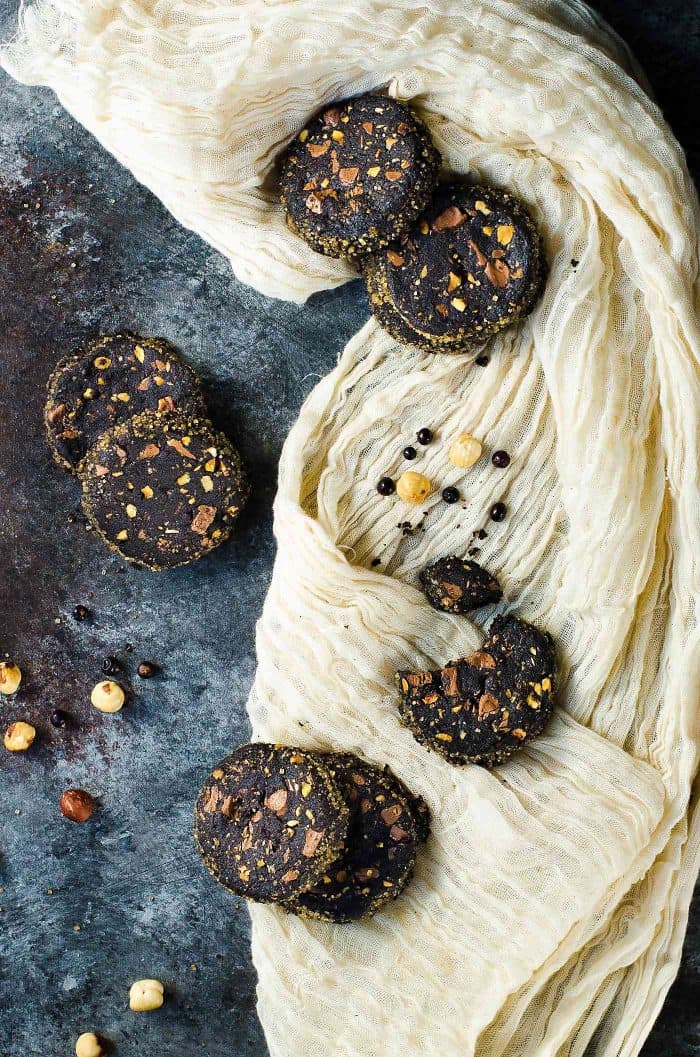
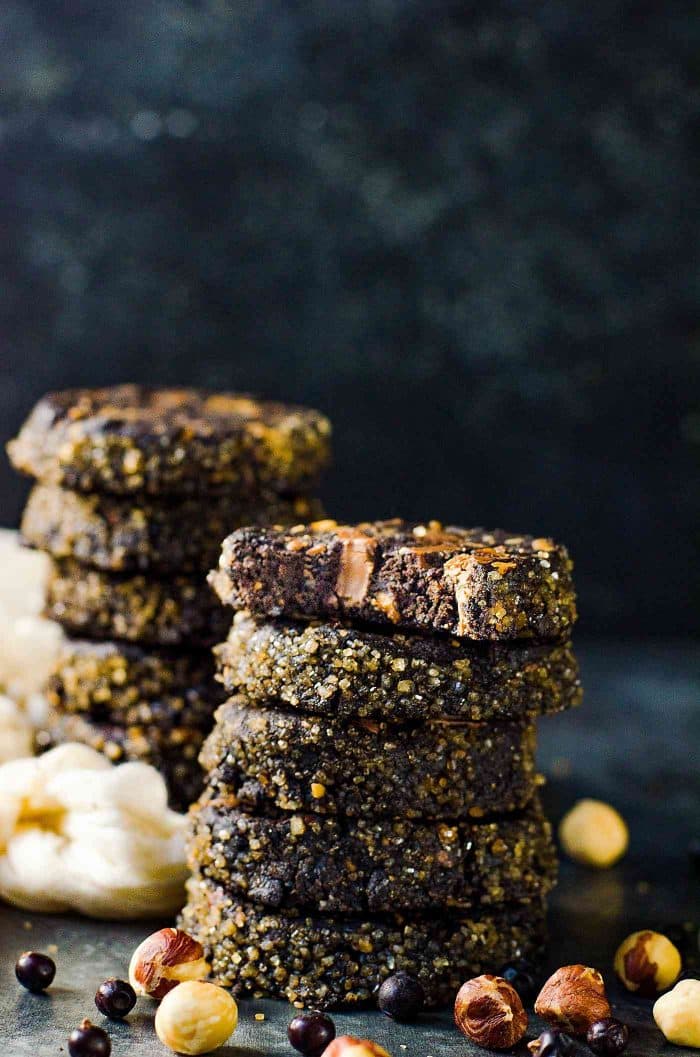
Soft, fudgy and crunchy, these Juniper Berry Spiced Chocolate Hazelnut Cookies have so much going on, but they are so easy to make, and have a unique bittersweet, chocolatey, nutty, floral flavor profile!
If you like the chocolate and hazelnut flavor combo (think Nutella), you’ll find these cookies absolutely addictive!
I’ve never met anyone who didn’t love a good cookie . And these Slice and Bake Juniper Berry Spiced Chocolate Hazelnut Cookies are especially loved around these parts. I’ve made these cookies so many times and shared them with so many people and the reaction is always swift and the same.
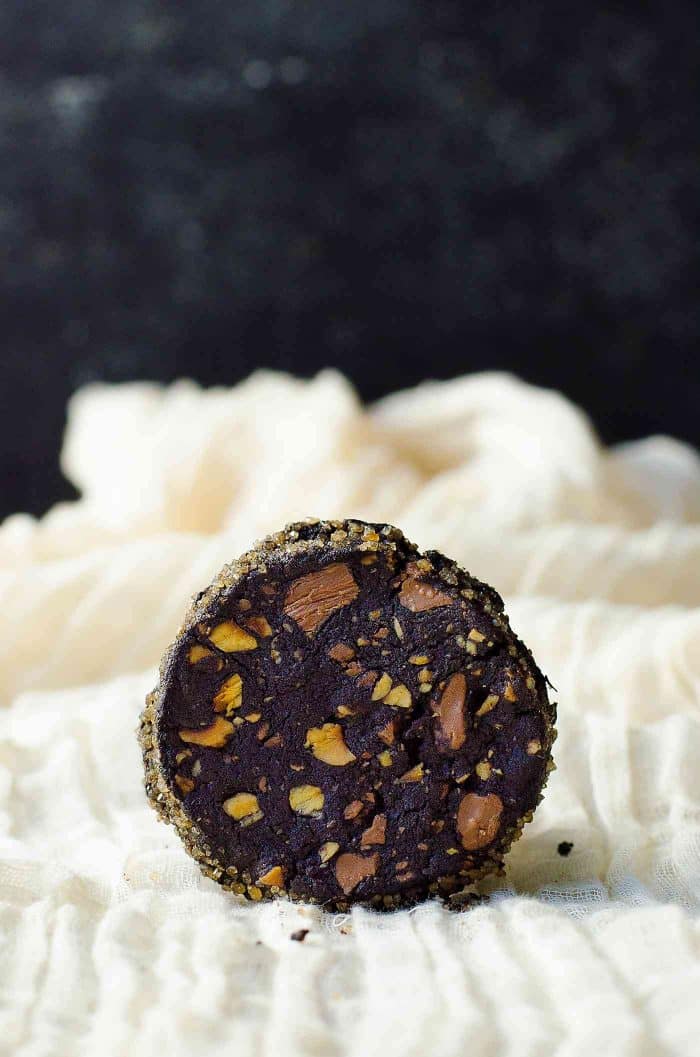
You can’t help but fall in love with these soft, fudgy, crunchy, bittersweet, chocolatey, spiced hazelnut cookies! Even my husband who doesn’t have much of a sweet tooth, can’t get enough of these addictive cookies. The cookie dough is not too sweet, has deep, bittersweet chocolate flavors from cocoa powder and deliciously nutty hazelnut flavor.
Everyone who has eaten this cookie has tried to figure out what that “extra flavor” is, but no one has guessed correctly yet (I guess, the secret is out now). Juniper berry adds a unique earthy, fresh, floral, piney sweetness that’s hard to replicate . Juniper berry isn’t a berry at all.
These are actually the ripe pine cones from the juniper shrub and they are the key flavoring of gin. They are used frequently as a spice to flavor meat and vegetables, but there’s no reason why you can’t use this bright flavor to complement all the flavors in these chocolate hazelnut cookies (and it’s almost like having gin and chocolate together!).
The raw golden sugar along the edges add a nice crunch to these slice and bake chocolate hazelnut cookies. The melted milk chocolate chunks add the sweetness and a yummy chewy texture. You can use dark chocolate instead of milk chocolate, just make sure to use GOOD quality chocolate though (preferably a bar chocolate).
I love these juniper berry spiced chocolate hazelnut cookies because they satisfy my chocolate cravings, plus how can I say no to that chocolate and hazelnut combo? And they are so easy to make, and I love trying unique flavors too.
I’ve made these cookies many times since I first perfected the recipe. So make sure to follow all the steps to get perfect juniper berry spiced chocolate hazelnut cookies. They do require to be chilled before baking, in order to maintain the shape of the cookies.
While I hadn’t planned the timing of this post, in light of what transpired in America last week and Barcelona yesterday, and the world over in recent times , I think it’s serendipity that these cookies were inspired by World Peace Cookies from Dorie Greenspan .
I read what my friend Jenni wrote after what happened in Charlottesville, and it struck a chord with me, because I know exactly how even the most well intentioned people can be swayed by their circumstances, culture, community or times they live in and give in to prejudice and intolerance. It’s a feeling that I’ve had to fight myself while growing up in a country ravaged by a civil war and where I found myself to be in the “majority” purely due to circumstances. And those exact same circumstances have now made me a part of the “minority” where I call home.
We have come so far since the middle of the 20th century. Those were dark times, and I hope the nadir of human civilization. Let’s not turn back the clock. Let’s make it clear as often as we can that those bad guys with their bigotry and racism are history and there’s no place for them in the present or the future. Just as the flavor defines a cookie, it’s the flavor of your being and your soul that makes you who you are. Not the color of your skin or your shape or size.
I’ve always faced some form of racism and sexism in my life, and been guilty of some of those feelings myself when I was little because of the environment in which I lived in. But then I learned, and grew up, and realized that it’s my words and actions that define who I am, not the extra melanin in my skin. Hatred comes at such a heavy price. It sullies your heart and your soul, and weighs them down. It’s so much easier to accept. And to love.
These juniper berry spiced hazelnut chocolate cookies won’t bring world peace… but dare I say, they come pretty close! 🙂 These are the best chocolate hazelnut cookies you’ll ever have, and if you’re a fan of that chocolate and hazelnut combo (think Nutella!), you’ll find these cookies especially addictive.
There’s a lovely crunchy texture on the outside because of the golden raw sugar crystals, and they are soft and fudgy in the middle with another layer of crunchy texture thanks to the toasted hazelnuts. The juniper berries round off the flavor profile with a very unique fresh, earthy, floral sweetness that makes these cookies one of a kind!
So go ahead and share a batch of these slice and bake chocolate hazelnut cookies with anyone you know (or don’t). I’ve never met anyone who didn’t love cookies, no matter the shape, size or color. And we CAN and SHOULD feel the same way about our fellow human beings too! Like a great man once said – “love comes more naturally to the human heart than its opposite. So if people can learn to hate, they can also be taught to love.”
Let these juniper berry spiced chocolate hazelnut cookies bring a smile to your face and others around you! We could never have enough cookies in the world. Or love.
Other holiday cookies recipes you will love
- Classic thumbprint cookies
- Classic linzer cookies
- Shortbread cookies
- Chocolate shortbread cookies
- Soft ginger cookies
- S’mores cookies
- Funfetti cookies
- Mexican wedding cookies (snowball cookies)
- Double chocolate chip cookies
- Classic chocolate chip cookies
Recipe

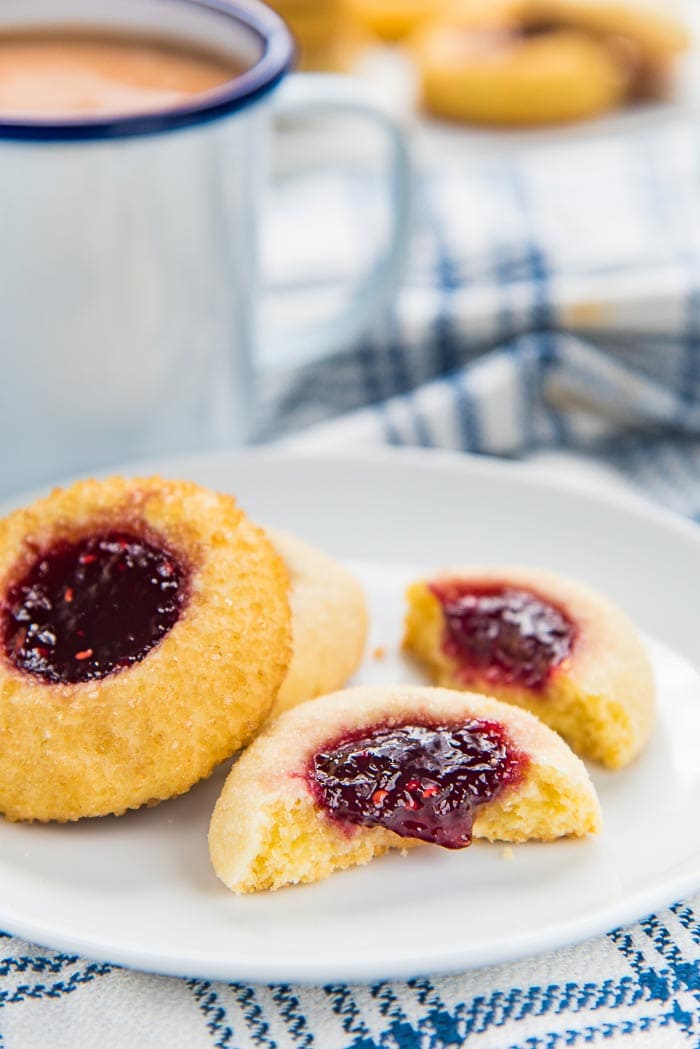
There’s a reason why Classic Thumbprint Cookies are so popular. They are a holiday favorite, easy to make, and even easier to customize with different filling and flavor variations!
I’ve shared all my tips and tricks to help you PERFECT easy thumbprint cookies!

Oh baby, it’s cookie season! It’s one of the main reasons why I love Christmas! 🙂
And with alllll the Christmas cookies out there, it’s hard – nigh impossible, for me to pick a favorite. But Classic Thumbprint Cookies …. oh yeah, they come this close to being my favorite.
Thumbprint cookies are a holiday favorite, a party favorite, and a snack favorite for me. These are one of half a dozen or so that feature in my holiday cookie boxes every year. Shortbread cookies , linzer cookies , meringue cookies , soft ginger cookies etc. are all classics for a reason.
Plus, these cookies are really easy to make and to customize too.
I’ve shared a uniquely delicious savory thumbprint cookie on the blog before, which is really popular on the blog. But I realized I’ve never shared a classic thumbprint cookie recipe with you guys before. So today, I’m going to fix that.
This is the recipe for delightfully buttery and delicious classic thumbprint cookies with a sweet jam filling . I’m sharing all my tips to help you make PERFECT thumbprint cookies and avoid cracks and spreading.
Just follow this easy guide to find out how you can nail those classic thumbprint cookies and entertain your friends and family this holiday season!
What are thumbprint cookies?
A buttery cookie with a shallow well in the middle that’s filled with a sweet filling like jam. You use your thumb to push down on the cookie dough, creating that shallow well in the middle – hence “thumbprint” cookies.
But did you know that thumbprint cookies originated in Sweden? These cookies are called Hallongrotta/hallongrottor in Swedish, meaning “raspberry cave”!
While you can fill the thumbprint in the middle with any type of jam you like, I’ll be using raspberry jam here, because that’s the flavor of classic thumbprint cookies! But I have filled these before with strawberry jam , plum jam , fig jam , and grape jelly too.
Are thumbprint cookies the same as shortbread cookies?
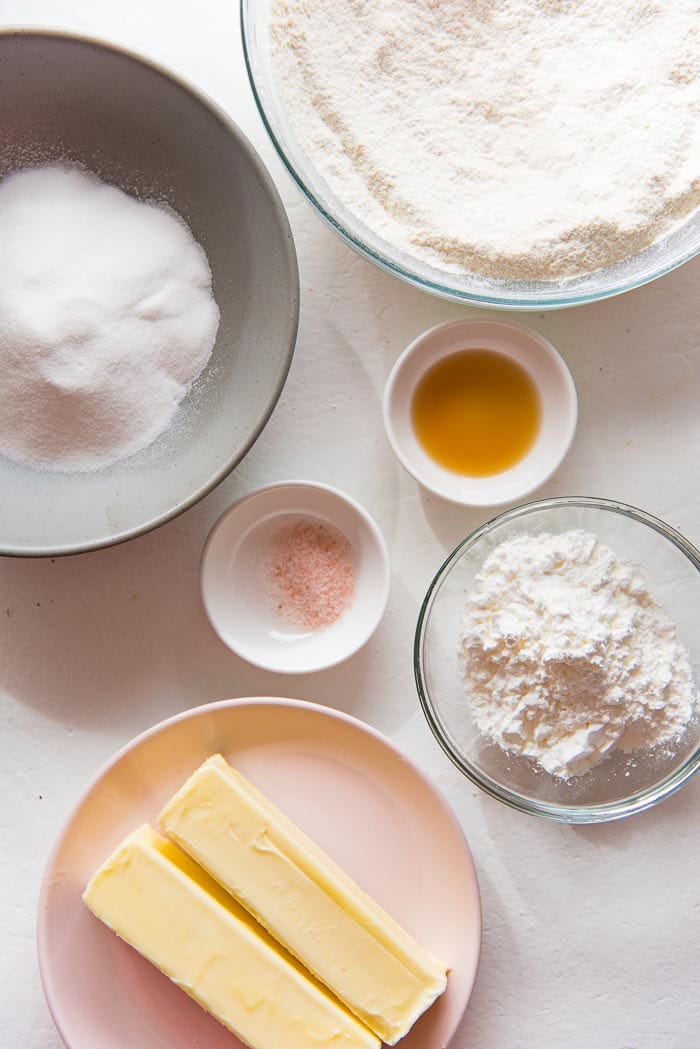
They are not the same, but they do come VERY close. Shortbread cookies use a 1:2:3 ratio of sugar, butter and flour. They are buttery, but crumblier, because they don’t have a binding agent. They rely on butter to hold the dough together.
Thumbprint cookies are made with a dough that’s identical to shortbread cookies, BUT the dough has eggs in addition. Some recipes call for whole eggs, but my recipe uses egg yolks only.
The egg yolk enriches the dough giving you a richer taste than shortbread, but more importantly, binds the dough together for a smoother and more pliable result.
That being said, you still CAN make thumbprint cookies with shortbread cookie dough as well.
How can I prevent my thumbprint cookies from cracking?
To be honest, there’s nothing wrong with thumbprint cookies with a few cracks along the edges. That’s part of the charm!
However, there are ways to minimize cracking. It’s got all to do with HOW you shape the cookies .
How to minimize thumbprint cookie cracking
- Keep the dough soft – once the cookie dough is made, cover and let it rest for at least 15 minutes at room temperature, so that the dough will be easier to handle, and be less sticky. It’s important to keep the dough at room temp. when you roll it into balls, because then it’s easier to shape the soft dough, with minimal cracking.
- Make the indentation as soon as the cookies are formed – rather than rolling ALL of the cookie dough into balls first and THEN making wells, you should roll each cookie dough ball, place it on the cookie tray and immediately make the indentation BEFORE preparing the next one.
- Roll the cookie dough balls until the surface is smooth – since the dough is soft, it’s easy to get a nice, smooth surface. Make sure there are no cracks to begin with, so that they don’t widen and show up when you press down on the cookie balls to create the wells.

To elaborate on the second point above, the reason why I like to prepare each thumbprint cookie as I go is that once you have rolled the cookie into a smooth ball, the cookie will form a “crust” – much like any dough will do, if it’s left exposed to air for any amount of time. So if you wait until the end to create the wells in the middle, the crust will most definitely cause the cookies to crack. To avoid that, I do the following.
How to make thumbprint cookies
- First, portion the cookie dough with a cookie scoop.
- Roll the cookie dough into a smooth ball.
- Roll the smooth ball in sugar (optional).
- Place the cookie ball on the parchment paper-lined baking tray.
- Use my thumb or another kitchen utensil to form an indentation in the middle of the cookie.
- Repeat steps 1-5 with the rest of the cookie dough.
- Once the baking tray is filled with cookies, fill the wells with jam.
- You can either fill a second tray with more cookies and keep those in the fridge or freezer, OR wrap any remaining dough tightly with plastic wrap and keep it at room temperature until you’re ready to use.
I also like to coat these easy thumbprint cookies in sugar before placing them on the baking tray. You can use regular granulated sugar or raw sugar for this. I prefer d emerara sugar because that gives these thumbprint cookies a nice sweet crunchy texture as well.
And rather than rolling the cookie balls in sugar, I put the sugar in a small ziploc bag and then place a cookie inside the bag, and then shake it a little bit to evenly coat the cookie with sugar. Works like a charm.

How to minimize thumbprint cookie spreading
It’s pretty much impossible to make a good cookie with NO spreading at all. I mean, in theory you can add more flour to the dough until it’s pretty stiff and won’t spread at all, but then you end up with very dry, crumbly cookies.
Not good.
The simple reason why a cookie spreads as it bakes is that the butter and sugar melt inside the cookie, causing it to spread. If you bake at too low a temperature, the cookie will spread too much before it bakes and sets properly, and if you bake at too high a temp., then the cookie bakes and sets outside quickly, but the middle will still be raw.

Tips to minimize cookie spreading
- Chill the cookies in the fridge BEFORE baking – cooling the butter in the cookies before baking means that it won’t melt as readily, making it spread too fast.
- Use a chilled or room temperature baking sheet – NEVER use a hot or warm baking sheet to place your UNBAKED cookies on. I like to chill the cookies AND the baking tray together in the fridge, but at least make sure the baking tray is at room temp. before you place the unbaked cookies on it.
- Make the indentation in the middle narrow rather than wide – use just the tip of your finger and go straight down, to create a narrow indentation in the middle of the cookie, rather than a wide indentation that would make the thumbprint cookie spread.
So there you go! That’s how you can make PERFECT and EASY thumbprint cookies that are sure to impress your friends and family! 🙂
Then you can fill these classic thumbprint cookies with any type of jam you like. Personally, I love raspberry, or apricot jam.
These easy thumbprint cookies are so so good! The cookies are buttery, with a hint of vanilla, and a deliciously fruity jam filling.
And since these classic thumbprint cookies are so easy to make, you can make multiple batches and gift them to your friends and family this holiday season too. You can fill them with different jam fillings, and even flavor the thumbprint cookies with different extracts for some creative variations.

Flavor variations
- Add some orange zest to the cookie dough, and fill the middle with cranberry sauce.
- Add some lemon zest to the cookie dough, and fill the cookies with blueberry jam.
- Or instead of jam, place a reese’s peanut butter cup or a hershey’s kiss candy in the middle.
- Add some almond extract to the cookie dough, and fill the middle with salted caramel sauce .
There are so many ways you can dress up these easy thumbprint cookies! Once you realize how easy it is to make classic thumbprint cookies, you can make them your own.

Recipe
Juniper berry spiced Chocolate Hazelnut cookies
Ingredients
- 2 tsp whole juniper berries
- 226 g unsalted softened butter 8 ounces / 2 sticks
- 226 g brown sugar 8 ounces / 1 cup (tightly packed)
- ½ tsp sea salt
- 2 tsp vanilla
- 225 g AP flour approximately 1¾ cups (spoon and leveled)
- 90 g Dutch cocoa powder 3.1 oz / ¾ cup (spoon and leveled; I use Callebaut / Valrhona)
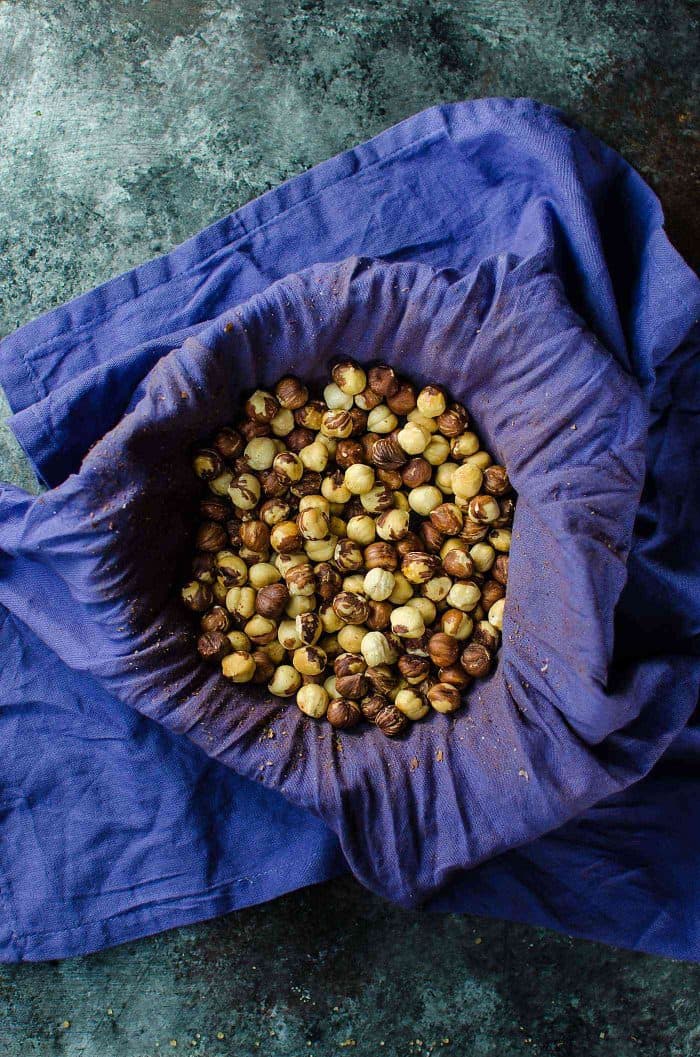
- 170 g toasted hazelnuts 6 oz (toasted and skinned)
- 226 g milk chocolate 6 oz (roughly chopped into chunks)
- 1 cup raw sugar to roll the cookies in
Instructions
- Place the juniper berries in a dry pan. Heat the pan over medium heat, to dry roast the berries for a few minutes. (You will start to smell the juniper berries when they are done.) 2 tsp whole juniper berries
- Remove from the heat and let the juniper berries cool down. Place the cooled juniper berries in a spice grinder (or use a mortar and pestle), and grind them to a powder. Juniper berry powder will be slightly wet and sticky. Set aside until needed.
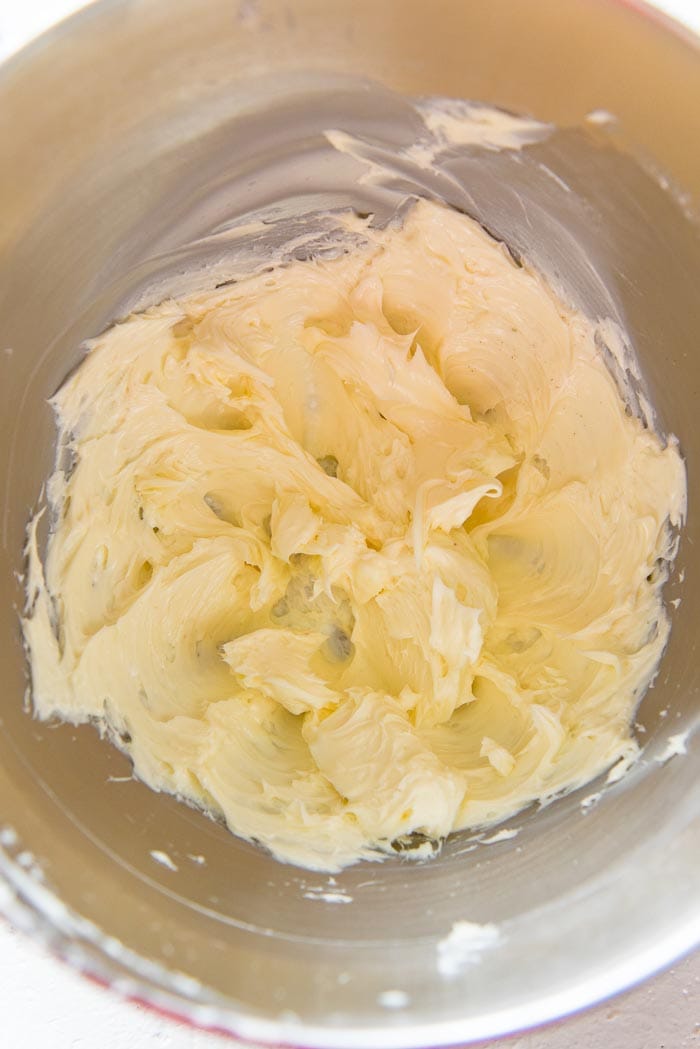
- Add the butter, brown sugar, salt, vanilla and juniper berry spice to a large bowl OR your mixer bowl. With a hand mixer or stand mixer (with a paddle mix), mix until the butter and sugar are well mixed and creamy - do not beat the butter and sugar until light and fluffy. 226 g unsalted softened butter, 226 g brown sugar, ½ tsp sea salt, 2 tsp vanilla, 2 tsp whole juniper berries
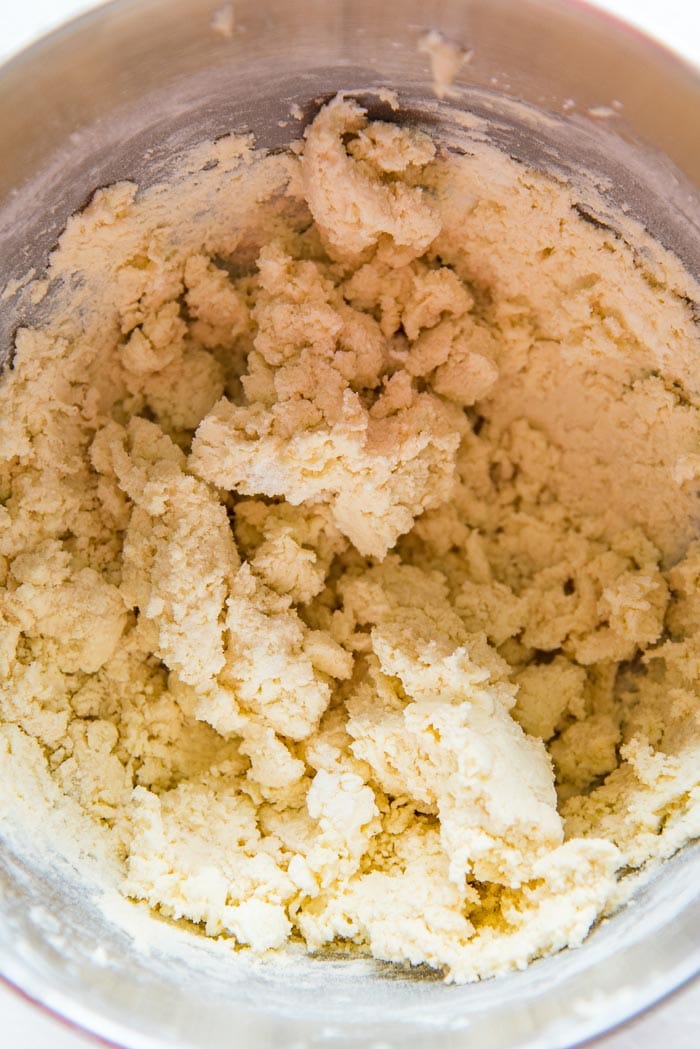
- Add the sifted flour and sifted cocoa powder. Fold them in by hand, OR use the mixer/hand mixer (on the lowest speed) to incorporate the flour and cocoa powder. 225 g AP flour, 90 g Dutch cocoa powder
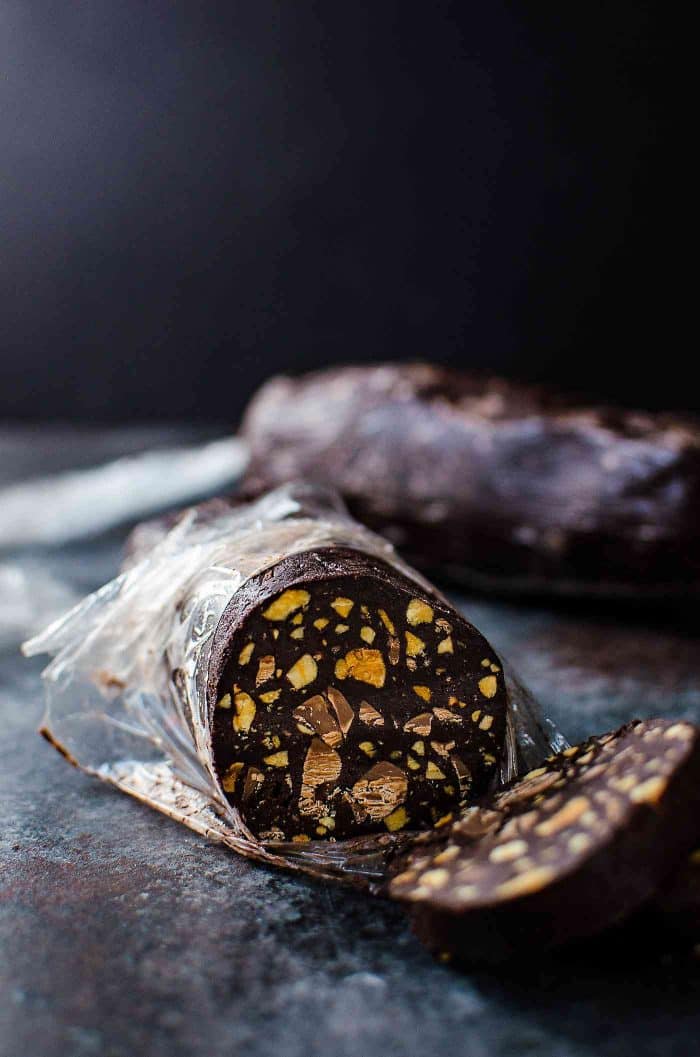
- Add the hazelnuts and milk chocolate chunks and mix them in until they are spread throughout the dough. Divide the dough in half. 170 g toasted hazelnuts, 226 g milk chocolate
- Form a 2 - 2 ½ inch diameter cookie dough log with each of the dough portions. Wrap each log in plastic wrap (knotting the ends tightly).
- Refrigerate for about 1 - 2 hours until the cookie dough is firm. The dough can be refrigerated overnight as well.
When you are ready to bake
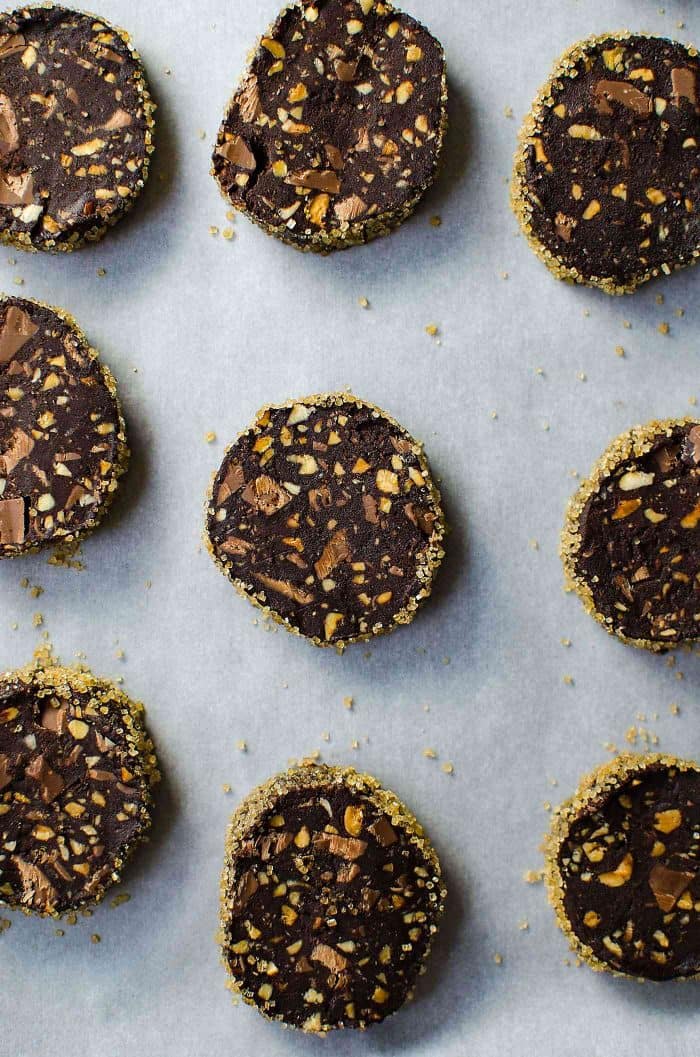
- Line two half sheet pans / cookie sheet pans with parchment paper. Sprinkle the raw sugar on a flat plate. 1 cup raw sugar
- Unwrap one of the cookie dough logs and roll the log in the raw sugar.
- Using a sharp knife, cut off the tapered end of the cookie dough log. Then cut 1cm thick slices. Please note that because of the nuts and chocolate chips, you may not get clean slices, so reshape the cookies into rounds when they don’t cut cleanly. Roll the edges in the raw sugar again if you need to.
- Place the cookies on the lined baking sheet. Each log should make about 10 -12 cookies (not including the ends).
- Cover the lined baking sheet with plastic wrap / parchment paper / or a another baking tray and chill in the refrigerator for 30 minute before baking. This chilling is important to allow the cookies to keep their shape while baking.
- While the cookies are chilling, preheat the oven to 325°F / 163°C. Bake in the preheated oven for 12 - 15 minutes. The cookie edges will be slightly firm and the middle will be soft when you take them out of the oven. And since they are dark brown, it would be hard to tell if they are done. But they will firm up as they cool.
- When the cookies have cooled down, remove them from the baking tray and place them on a wire rack.
- Repeat with the second cookie log and the second baking sheet. The cookies will be crunchy on the outside, and fudgy in the middle.
- Store in an airtight container for up to 5 days at room temperature.
Notes
Nutrition
Recipe from The Flavor Bender by Dini Kodippili
Juniper berry spiced Chocolate Hazelnut cookies https://www.theflavorbender.com/juniper-berry-spiced-chocolate-hazelnut-cookies/
