
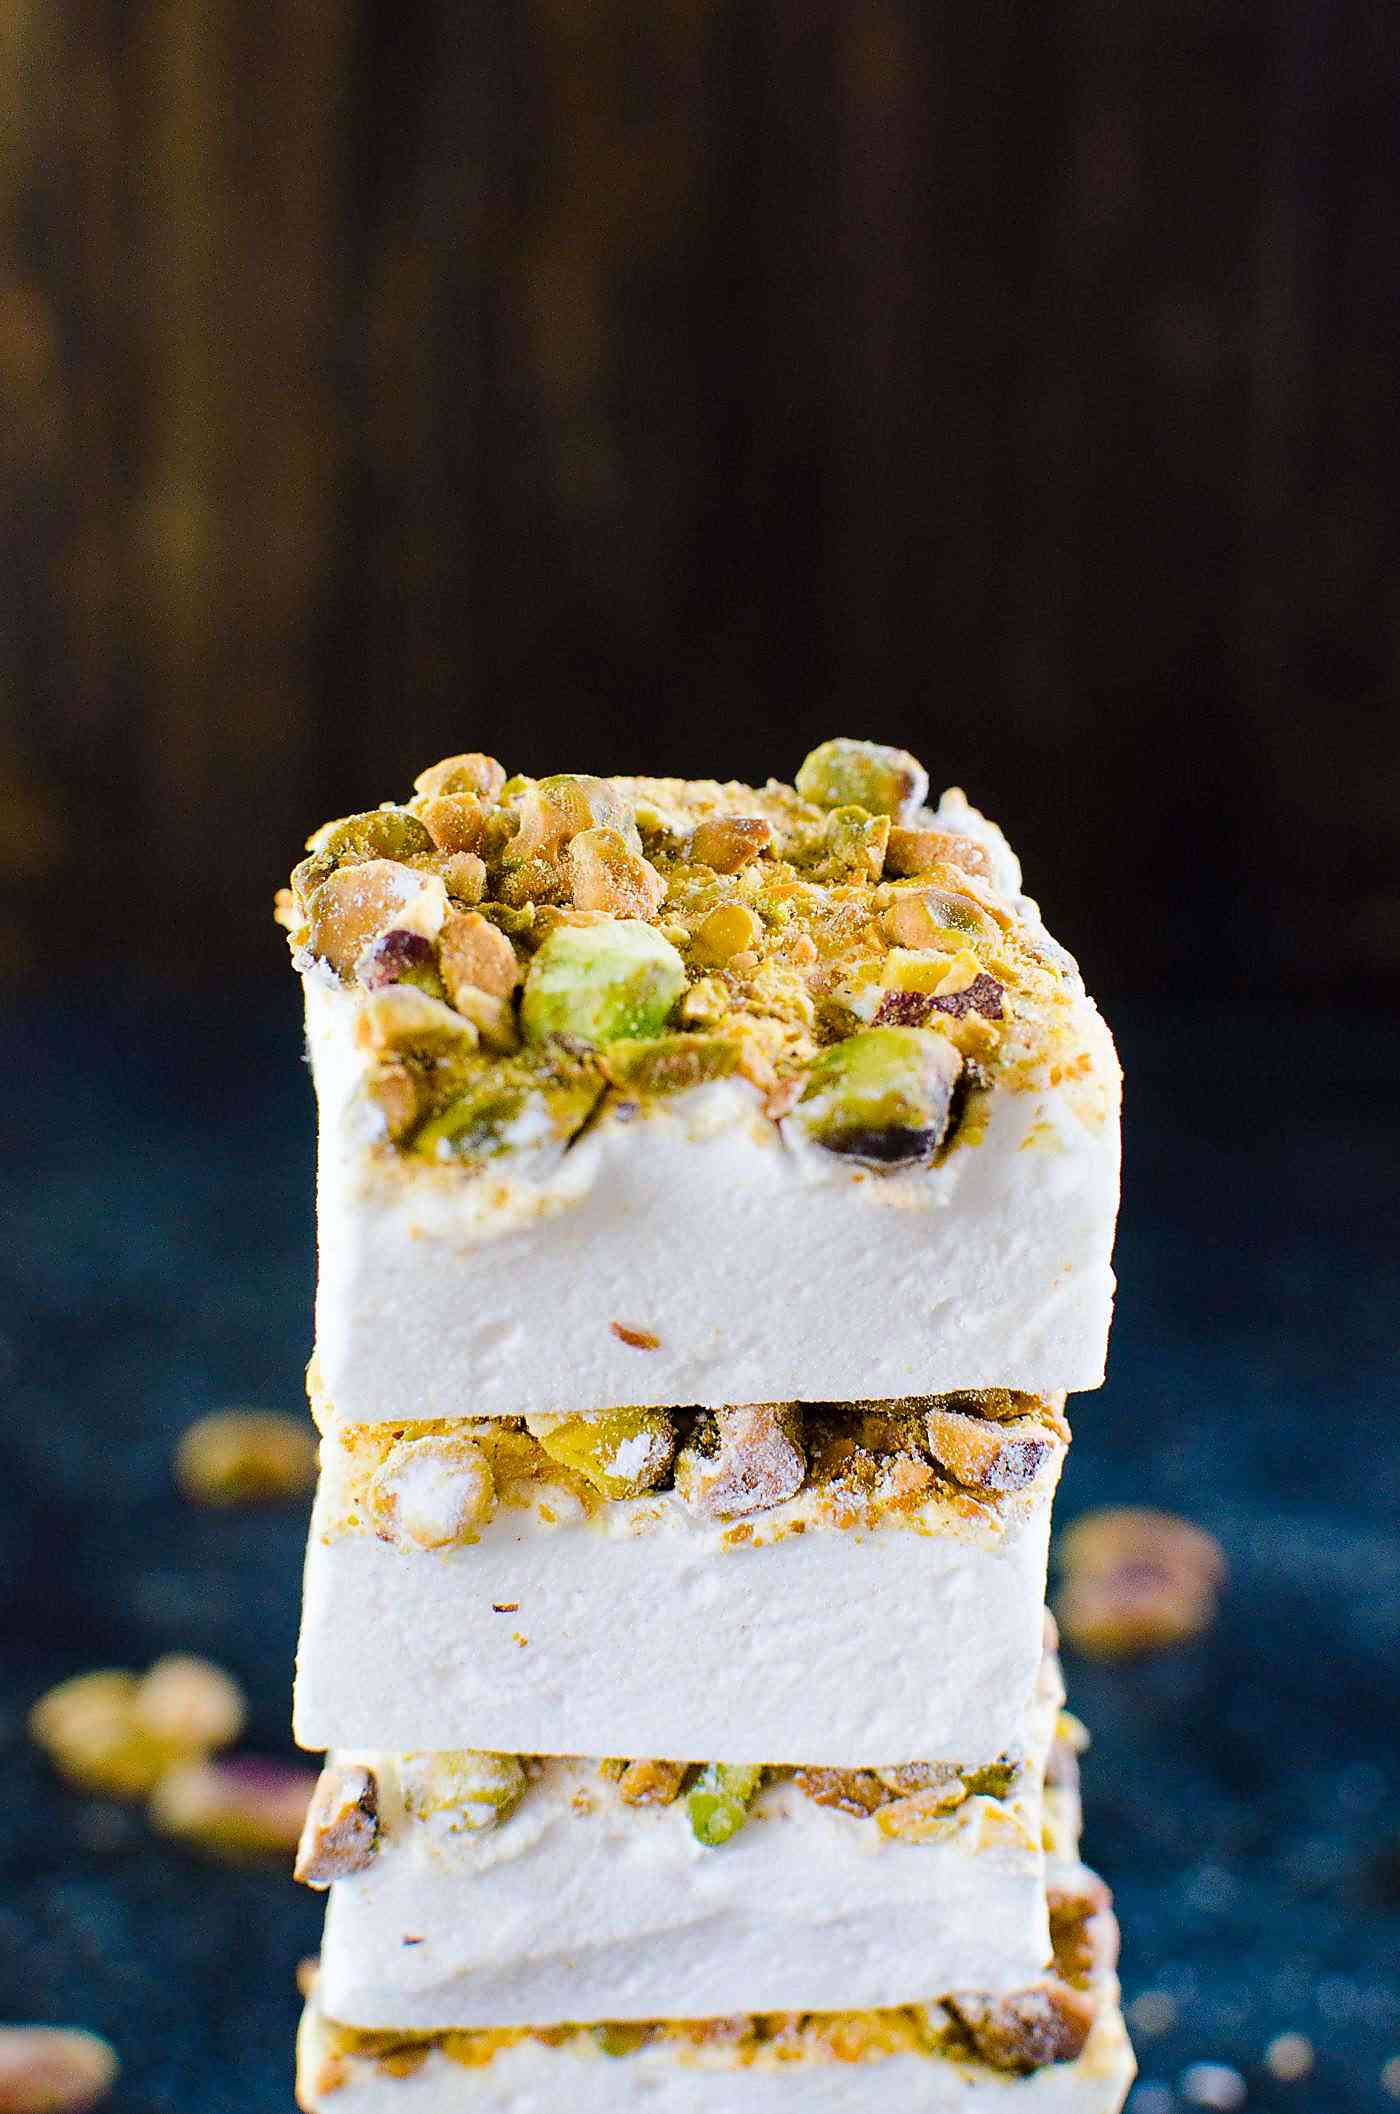
Sweet, soft, fluffy pillows of deliciousness – these Orange Blossom Marshmallows with Pistachios (orange blossom pistachio marshmallows) are easy, and they make amazing edible gifts for the holidays!
Use great-quality products like these Nielsen-Massey Vanillas and Pure Flavors to make perfect homemade marshmallows !

One of the things that I enjoy the most about the holidays is the gifts. Sure, that doesn’t sound too surprising, except what I actually enjoy is the gifts that I give to all of my loved ones, making those gifts myself and being creative with them.
As I grew up, I realized that this was one of the best ways to put my love for baking and cooking to splendid use. It was something I was really good at, and it brought me lots and lots of joy.
My holiday cookie boxes typically contain a variation of chocolate chip cookies (regular chocolate chip cookies or double chocolate chip cookies , or even these s’mores cookies! ), shortbread cookies , thumbprint cookies , linzer cookies , chocolate truffles , peanut brittle , and variations of marshmallows! 🙂 Sweet, soft, fluffy pillows of deliciousness that can be flavored in so many different ways, what’s not to love?
And since I’m gifting these to my friends and family, it’s really important to me that I use the best ingredients, especially when I make candies and sweets like this. Luckily, making homemade marshmallows is a lot easier than you’d think, and it’s also easy to make sure they taste exceptionally good by choosing great-quality products.
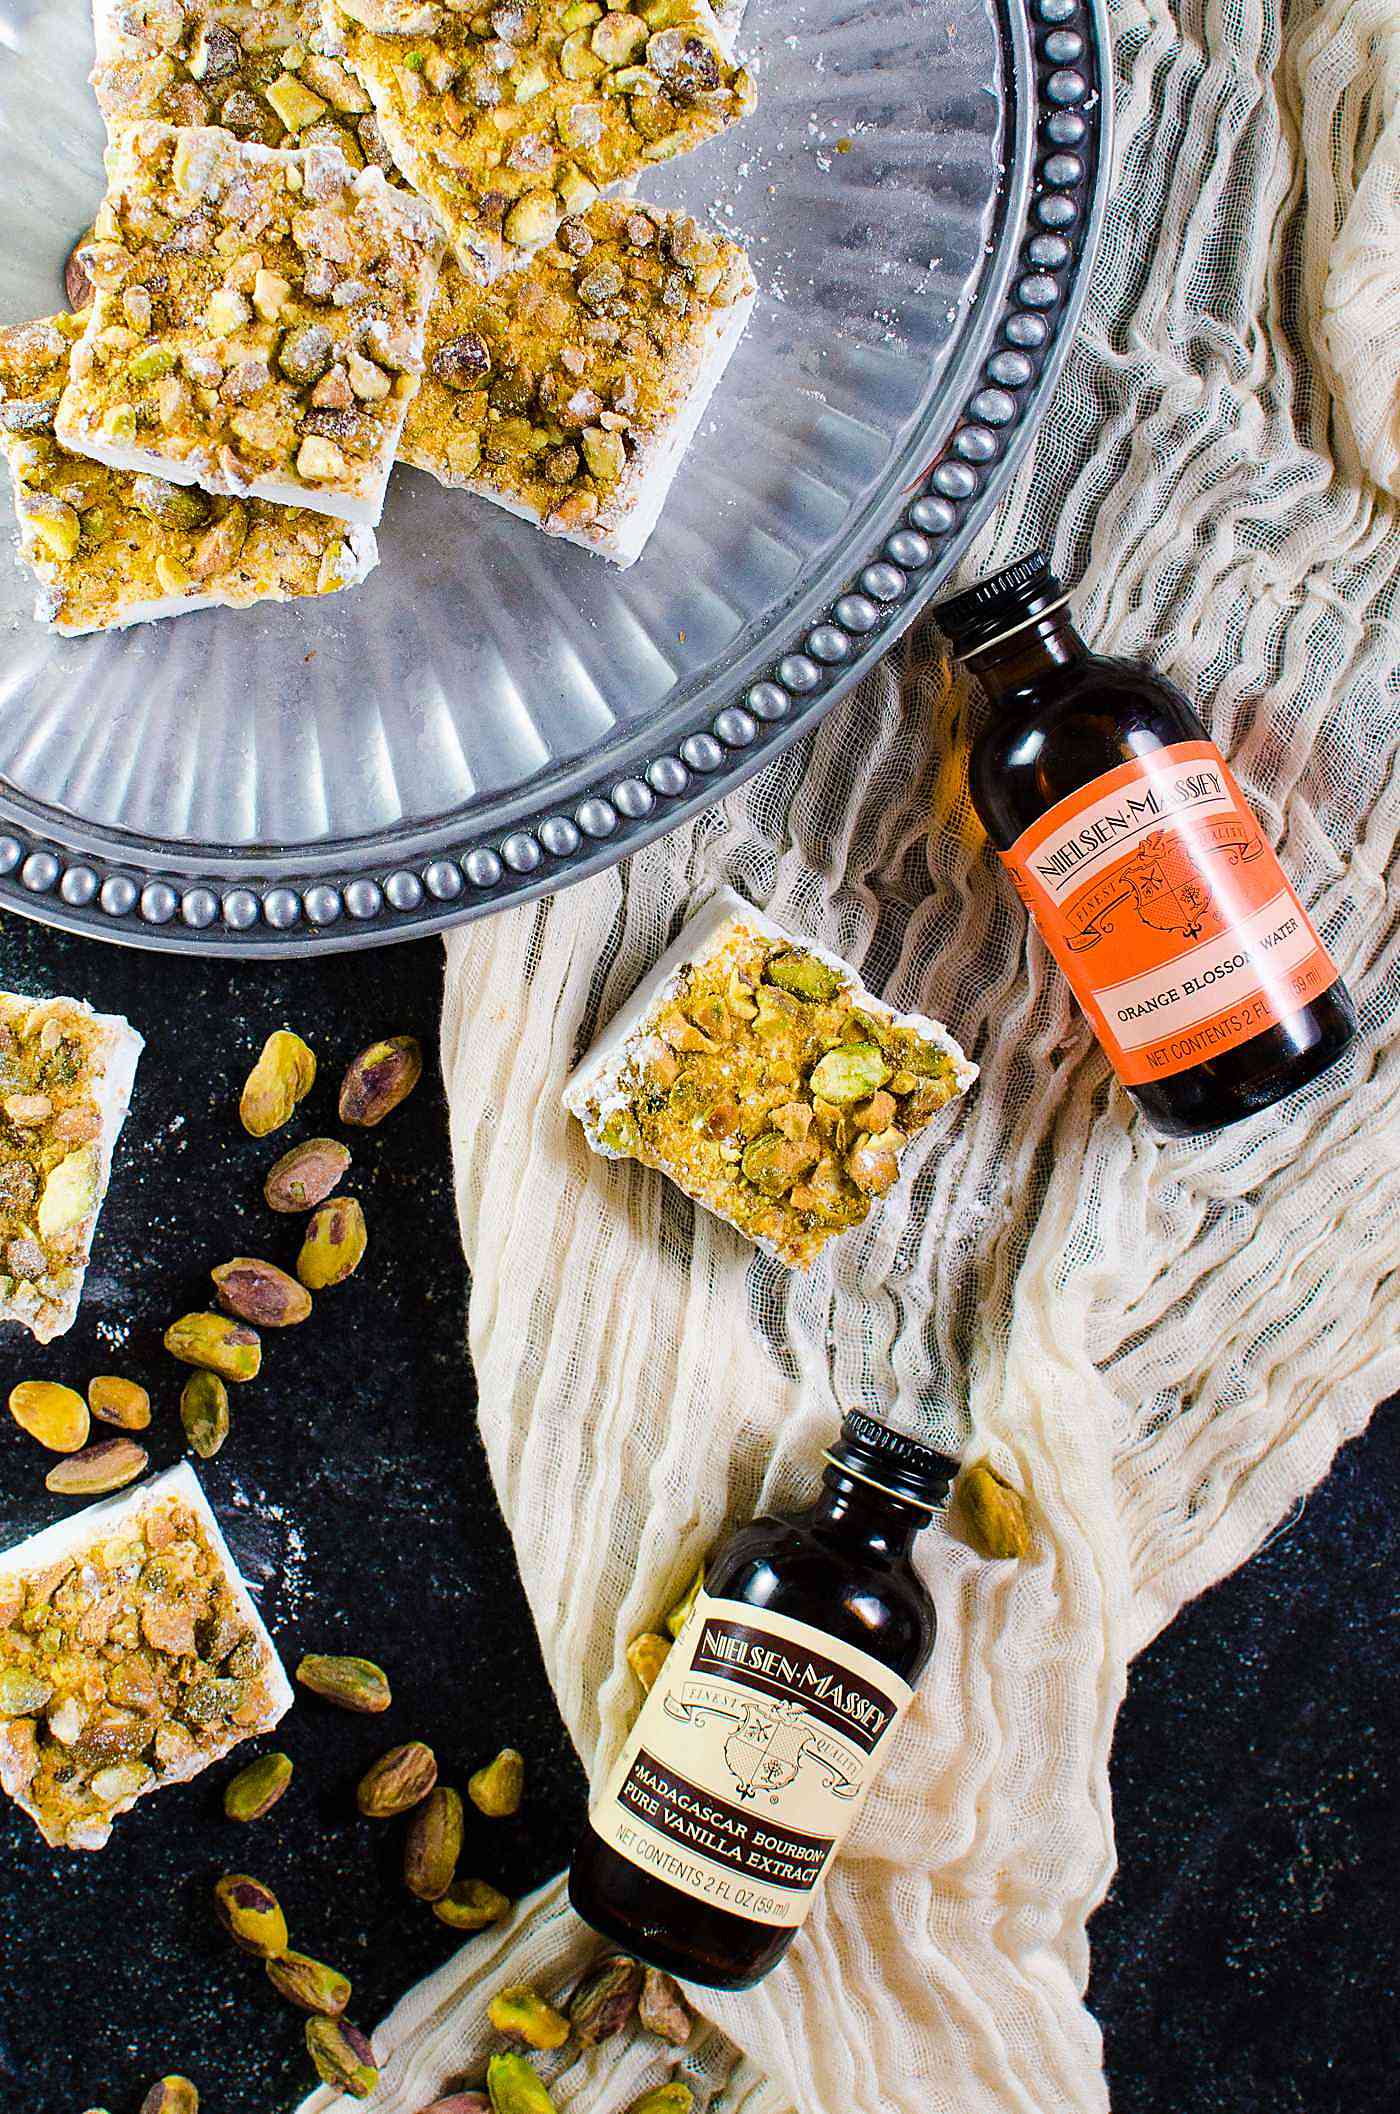
Other than the sugar you use, you have to make sure that you use fresh, pure ingredients to get the best flavor in your homemade marshmallows. That’s why I love using Nielsen-Massey Vanillas and Pure Flavors. For these Orange Blossom Marshmallows with Pistachios , I used Nielsen-Massey Orange Blossom Water, Nielsen-Massey Madagascar Bourbon Pure Vanilla Extract, and freshly roasted pistachios.
It’s the difference between regular marshmallows, and delicious, light, fluffy, springy, gift-worthy, heavenly little treats. You can also check out this fun and impressive almond m’hencha (almond snake) that I made with these products which has a similar flavor profile as well.

Since I bake a lot, I always keep a big bottle of Nielsen-Massey Vanilla in my kitchen. All Nielsen-Massey products are all-natural, certified gluten-free, certified Kosher, and allergen-free. I really love their vanillas, and it’s with good reason too. Nielsen-Massey vanillas contain 13.35 ounces of vanilla beans per gallon of 35% alcohol liquid, making sure it’s a pure vanilla extraction in line with FDA classifications.
They use a cold extraction process which preserves 300+ of the complex flavor compounds in vanilla, giving each of their vanillas (Madagascar, Tahitian, and Mexican Vanilla) a rich and complex flavor profile.
The Nielsen-Massey Orange Blossom Water is made with the blossoms of the bitter orange tree with the use of water distillation. I love orange blossom water and tend to be very picky about which brands I use. And I’m happy to say that Nielsen-Massey Orange Blossom Water is a product that I always keep coming back to.
It pairs so beautifully with baked goods and confections because it’s a great match with vanilla, chocolate, almond and even citrus flavors. It also pairs well with pistachios (orange blossom water and pistachios are two ingredients used very frequently in Persian and Turkish cuisine).
You can find all the specifics on making regular vanilla marshmallows in this my detailed recipe tutorial on how to make marshmallows . It’s so easy to make perfect marshmallows with or without a sugar thermometer, once you get the inside scoop, and know the specifics.
You can use the tips I have shared there to make sure that your syrup doesn’t crystallize. Homemade marshmallows make excellent gifts, especially during the holidays (these chocolate marshmallows and peppermint marshmallows are huge crowd favorites during the holidays!).
Plus, these have been made without corn syrup too (though you can make it with corn syrup if you choose).

The orange blossom pistachio marshmallows in this recipe use the same base as the vanilla marshmallows in my recipe tutorial post, except I add orange blossom water and chopped roasted pistachios to this recipe.
Once the orange blossom marshmallows with pistachios have set, they are cut and dusted with confectioner’s sugar OR they can also be drizzled with some white chocolate for an extra layer of yummy extravagance.
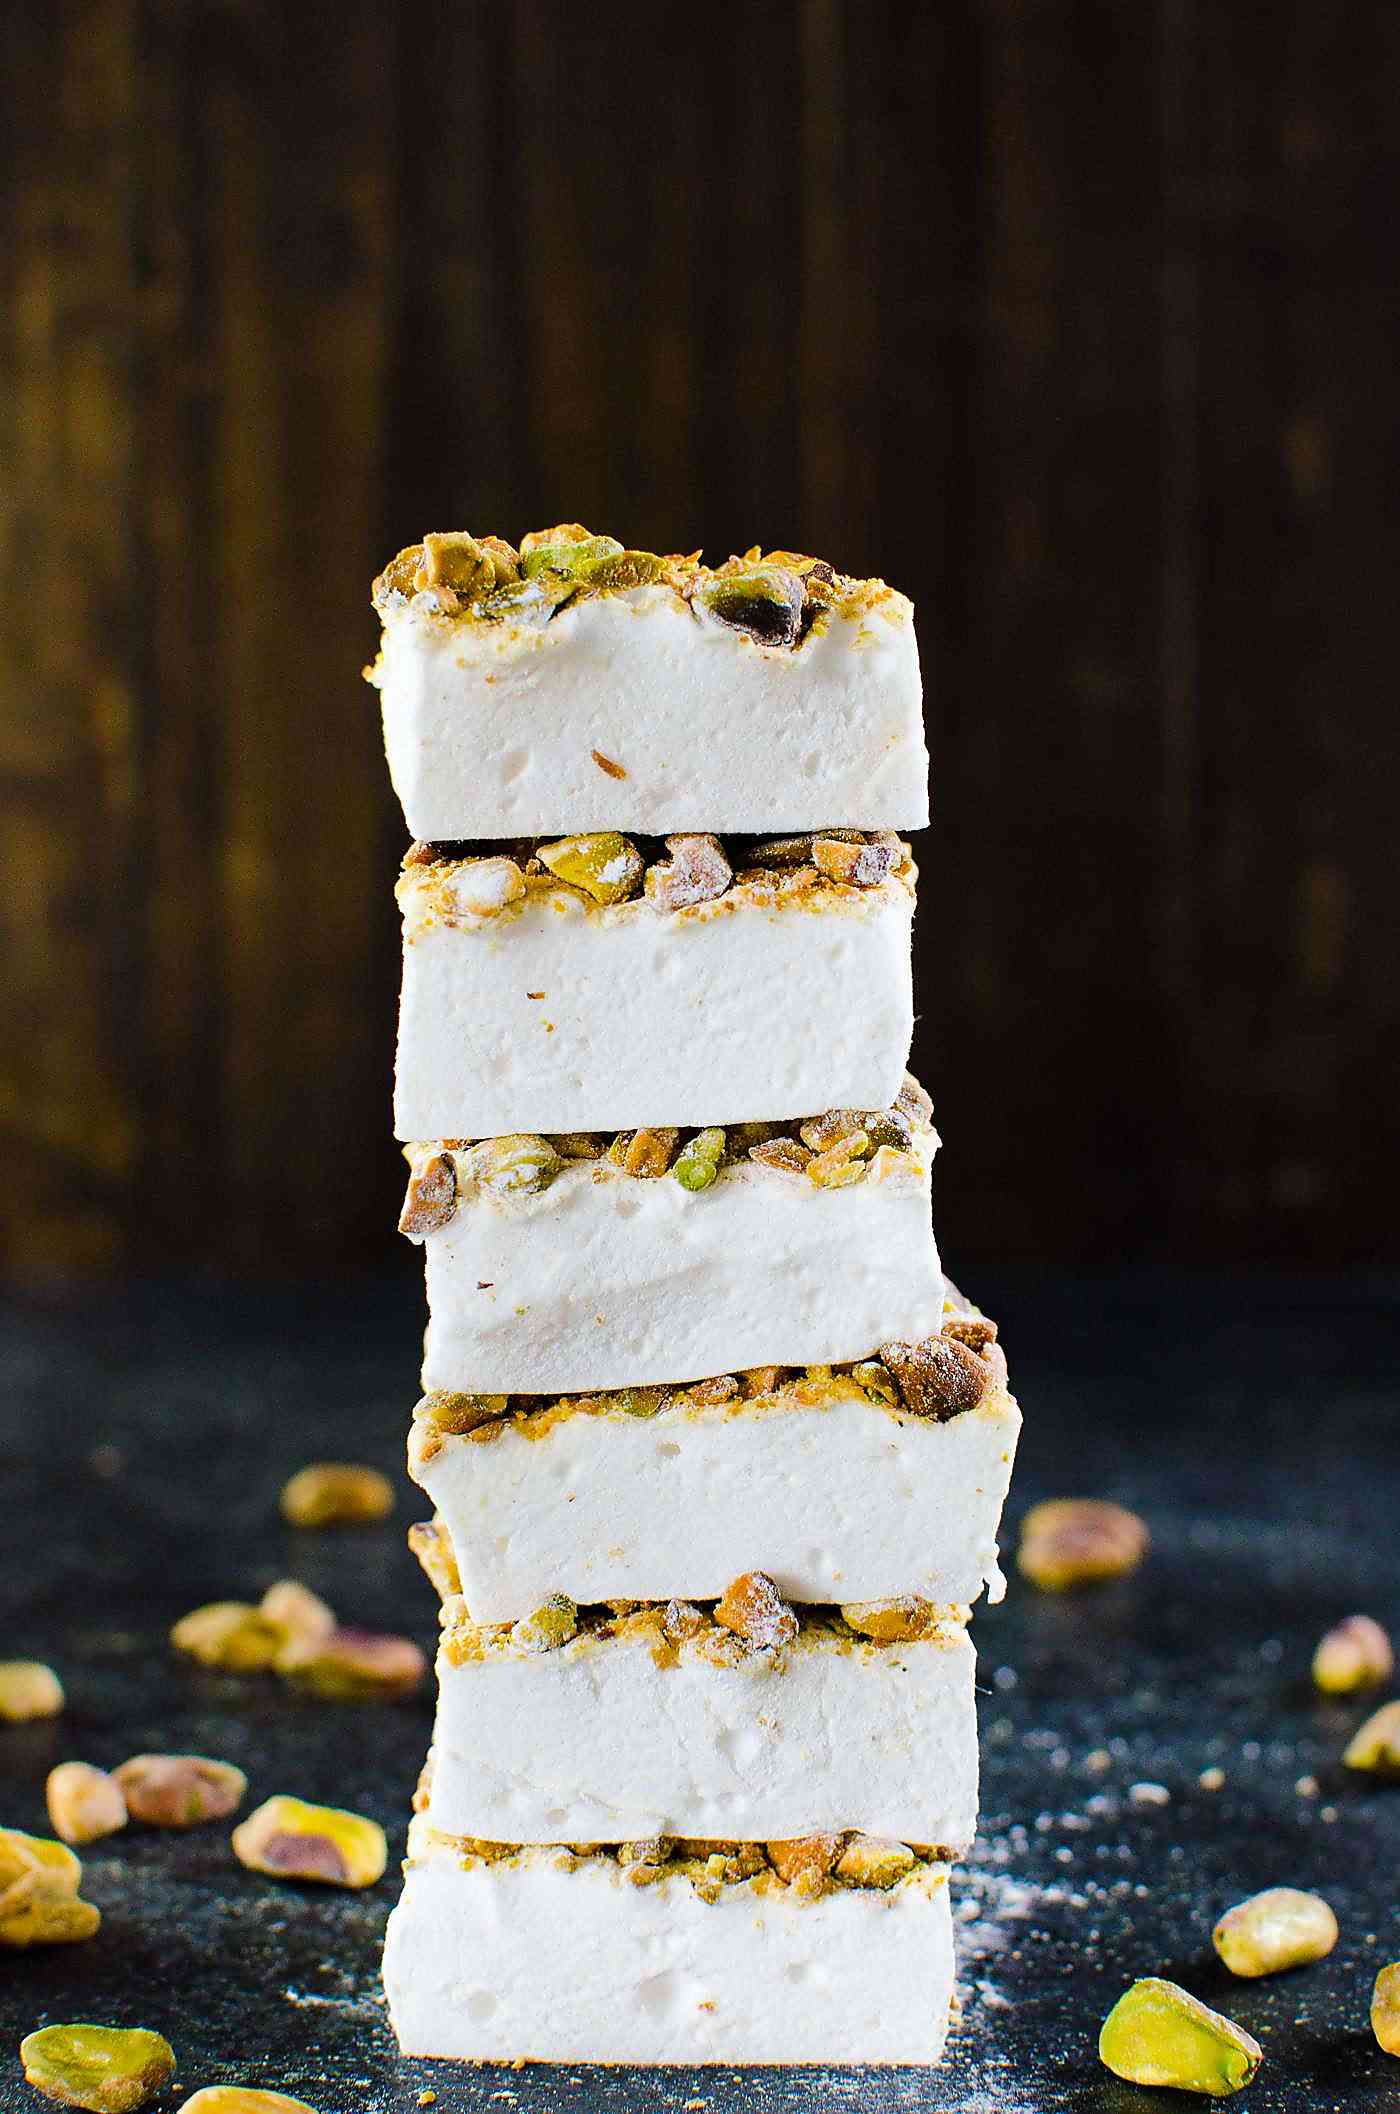
Either way, these orange blossom marshmallows (orange blossom pistachio marshmallows) will taste like the best damn marshmallows you’ve had in your life! 🙂 That floral, citrus flavor of orange blossom water, paired with the crunch and nuttiness of the pistachios take these marshmallows to a whole new level.
Yes, they are perfect for gift-giving, but I wouldn’t blame you if you decided to keep them all for yourself! 🙂 They are THAT good. Besides, I made a whole new batch just for ourselves, ’cause you know, sharing is overrated sometimes! 😉

Make sure to make homemade treats extra special this holiday season!
Recipe

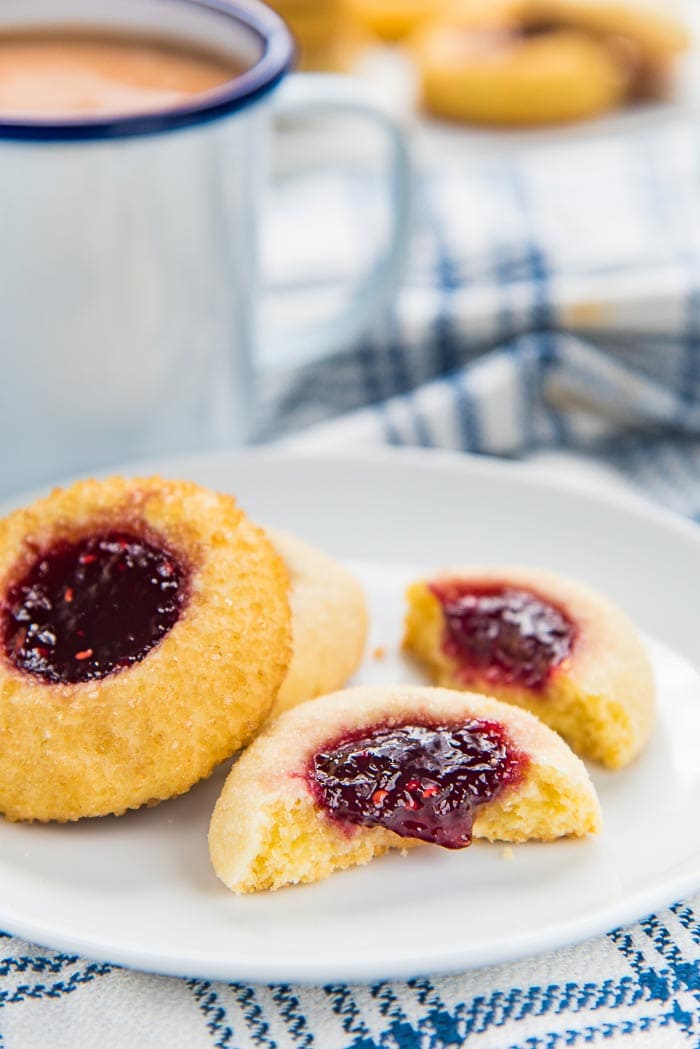
There’s a reason why Classic Thumbprint Cookies are so popular. They are a holiday favorite, easy to make, and even easier to customize with different filling and flavor variations!
I’ve shared all my tips and tricks to help you PERFECT easy thumbprint cookies!

Oh baby, it’s cookie season! It’s one of the main reasons why I love Christmas! 🙂
And with alllll the Christmas cookies out there, it’s hard – nigh impossible, for me to pick a favorite. But Classic Thumbprint Cookies …. oh yeah, they come this close to being my favorite.
Thumbprint cookies are a holiday favorite, a party favorite, and a snack favorite for me. These are one of half a dozen or so that feature in my holiday cookie boxes every year. Shortbread cookies , linzer cookies , meringue cookies , soft ginger cookies etc. are all classics for a reason.
Plus, these cookies are really easy to make and to customize too.
I’ve shared a uniquely delicious savory thumbprint cookie on the blog before, which is really popular on the blog. But I realized I’ve never shared a classic thumbprint cookie recipe with you guys before. So today, I’m going to fix that.
This is the recipe for delightfully buttery and delicious classic thumbprint cookies with a sweet jam filling . I’m sharing all my tips to help you make PERFECT thumbprint cookies and avoid cracks and spreading.
Just follow this easy guide to find out how you can nail those classic thumbprint cookies and entertain your friends and family this holiday season!
What are thumbprint cookies?
A buttery cookie with a shallow well in the middle that’s filled with a sweet filling like jam. You use your thumb to push down on the cookie dough, creating that shallow well in the middle – hence “thumbprint” cookies.
But did you know that thumbprint cookies originated in Sweden? These cookies are called Hallongrotta/hallongrottor in Swedish, meaning “raspberry cave”!
While you can fill the thumbprint in the middle with any type of jam you like, I’ll be using raspberry jam here, because that’s the flavor of classic thumbprint cookies! But I have filled these before with strawberry jam , plum jam , fig jam , and grape jelly too.
Are thumbprint cookies the same as shortbread cookies?
They are not the same, but they do come VERY close. Shortbread cookies use a 1:2:3 ratio of sugar, butter and flour. They are buttery, but crumblier, because they don’t have a binding agent. They rely on butter to hold the dough together.
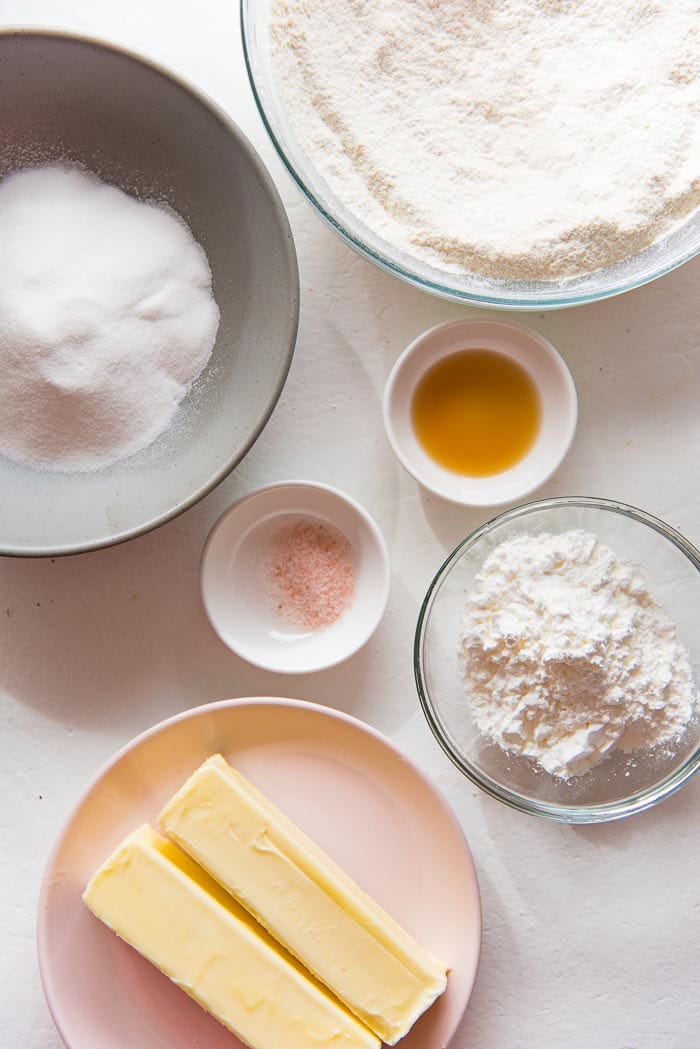
Thumbprint cookies are made with a dough that’s identical to shortbread cookies, BUT the dough has eggs in addition. Some recipes call for whole eggs, but my recipe uses egg yolks only.
The egg yolk enriches the dough giving you a richer taste than shortbread, but more importantly, binds the dough together for a smoother and more pliable result.
That being said, you still CAN make thumbprint cookies with shortbread cookie dough as well.
How can I prevent my thumbprint cookies from cracking?
To be honest, there’s nothing wrong with thumbprint cookies with a few cracks along the edges. That’s part of the charm!
However, there are ways to minimize cracking. It’s got all to do with HOW you shape the cookies .
How to minimize thumbprint cookie cracking
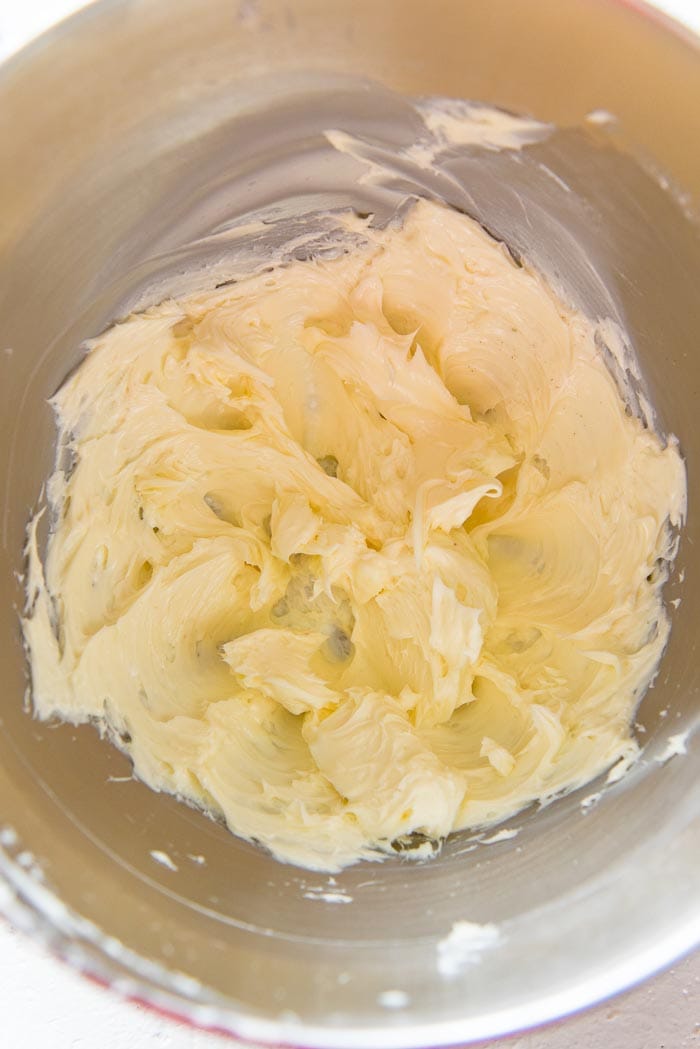
- Keep the dough soft – once the cookie dough is made, cover and let it rest for at least 15 minutes at room temperature, so that the dough will be easier to handle, and be less sticky. It’s important to keep the dough at room temp. when you roll it into balls, because then it’s easier to shape the soft dough, with minimal cracking.
- Make the indentation as soon as the cookies are formed – rather than rolling ALL of the cookie dough into balls first and THEN making wells, you should roll each cookie dough ball, place it on the cookie tray and immediately make the indentation BEFORE preparing the next one.
- Roll the cookie dough balls until the surface is smooth – since the dough is soft, it’s easy to get a nice, smooth surface. Make sure there are no cracks to begin with, so that they don’t widen and show up when you press down on the cookie balls to create the wells.

To elaborate on the second point above, the reason why I like to prepare each thumbprint cookie as I go is that once you have rolled the cookie into a smooth ball, the cookie will form a “crust” – much like any dough will do, if it’s left exposed to air for any amount of time. So if you wait until the end to create the wells in the middle, the crust will most definitely cause the cookies to crack. To avoid that, I do the following.
How to make thumbprint cookies
- First, portion the cookie dough with a cookie scoop.
- Roll the cookie dough into a smooth ball.
- Roll the smooth ball in sugar (optional).
- Place the cookie ball on the parchment paper-lined baking tray.
- Use my thumb or another kitchen utensil to form an indentation in the middle of the cookie.
- Repeat steps 1-5 with the rest of the cookie dough.
- Once the baking tray is filled with cookies, fill the wells with jam.
- You can either fill a second tray with more cookies and keep those in the fridge or freezer, OR wrap any remaining dough tightly with plastic wrap and keep it at room temperature until you’re ready to use.
I also like to coat these easy thumbprint cookies in sugar before placing them on the baking tray. You can use regular granulated sugar or raw sugar for this. I prefer d emerara sugar because that gives these thumbprint cookies a nice sweet crunchy texture as well.
And rather than rolling the cookie balls in sugar, I put the sugar in a small ziploc bag and then place a cookie inside the bag, and then shake it a little bit to evenly coat the cookie with sugar. Works like a charm.

How to minimize thumbprint cookie spreading
It’s pretty much impossible to make a good cookie with NO spreading at all. I mean, in theory you can add more flour to the dough until it’s pretty stiff and won’t spread at all, but then you end up with very dry, crumbly cookies.
Not good.
The simple reason why a cookie spreads as it bakes is that the butter and sugar melt inside the cookie, causing it to spread. If you bake at too low a temperature, the cookie will spread too much before it bakes and sets properly, and if you bake at too high a temp., then the cookie bakes and sets outside quickly, but the middle will still be raw.

Tips to minimize cookie spreading
- Chill the cookies in the fridge BEFORE baking – cooling the butter in the cookies before baking means that it won’t melt as readily, making it spread too fast.
- Use a chilled or room temperature baking sheet – NEVER use a hot or warm baking sheet to place your UNBAKED cookies on. I like to chill the cookies AND the baking tray together in the fridge, but at least make sure the baking tray is at room temp. before you place the unbaked cookies on it.
- Make the indentation in the middle narrow rather than wide – use just the tip of your finger and go straight down, to create a narrow indentation in the middle of the cookie, rather than a wide indentation that would make the thumbprint cookie spread.
So there you go! That’s how you can make PERFECT and EASY thumbprint cookies that are sure to impress your friends and family! 🙂
Then you can fill these classic thumbprint cookies with any type of jam you like. Personally, I love raspberry, or apricot jam.
These easy thumbprint cookies are so so good! The cookies are buttery, with a hint of vanilla, and a deliciously fruity jam filling.
And since these classic thumbprint cookies are so easy to make, you can make multiple batches and gift them to your friends and family this holiday season too. You can fill them with different jam fillings, and even flavor the thumbprint cookies with different extracts for some creative variations.

Flavor variations
- Add some orange zest to the cookie dough, and fill the middle with cranberry sauce.
- Add some lemon zest to the cookie dough, and fill the cookies with blueberry jam.
- Or instead of jam, place a reese’s peanut butter cup or a hershey’s kiss candy in the middle.
- Add some almond extract to the cookie dough, and fill the middle with salted caramel sauce .
There are so many ways you can dress up these easy thumbprint cookies! Once you realize how easy it is to make classic thumbprint cookies, you can make them your own.

Recipe
Orange blossom marshmallows with pistachios
Ingredients
- 420 g white sugar 2⅛ cups
- 100 g corn syrup about ⅓ cup, optional
- ½ cup water for the sugar syrup
- ½ cup water for the gelatin
- 21 g powdered gelatin about 3 tbsp / 3 packets
- Pinch of salt
- 1 tsp vanilla extract I used nielsen massey
- 1 ½ tsp orange blossom water I used nielsen massey
- 200 g roasted unsalted pistachios finely chopped
Instructions
- Place the sugar, ½ cup water, and corn syrup in a saucepan. Stir gently once or twice to moisten the sugar with the water/corn syrup. 420 g white sugar, 100 g corn syrup, ½ cup water
- Bring the sugar-water mix to a boil over medium high heat, while swirling the pan a couple of times to help heat the sugar syrup evenly. Cover the saucepan with the lid and lower the heat to medium and let the syrup cook for 1 - 2 minutes. Do not remove the lid during this time.
- After 2 minutes, remove the lid and place the sugar thermometer in the syrup. Heat the syrup until it reaches 245°F / 118°C. Swirl the pan occasionally to redistribute the heat in the syrup. Also make sure to record the temperature in several spots to make sure the syrup is heating evenly.
- While the sugar syrup is heating, prepare the gelatin.
- Place the rest of the water ( ½ cup) in the mixer bowl. Sprinkle the gelatin over the water evenly and mix to combine. Let the gelatin bloom for at least 10 minutes (or until the sugar is cooked). Add a pinch of salt to the gelatin. ½ cup water, 21 g powdered gelatin, Pinch of salt
- Keep the mixer bowl attached to your mixer, with the whisk attachment ready to go, for when the sugar syrup reaches the right temperature.
- When the sugar reaches the right temperature, remove from the heat and leave it to rest for about 1 minute.
- Just before adding the sugar to the gelatin mix, start the mixer on medium speed. Pour the sugar syrup along the wall of the bowl. This is to make sure the gelatin isn’t over-heated. Add the sugar while the mixer is running, while gradually increasing the speed to dissolve the gelatin completely. Increase the speed to the highest speed and let the marshmallow whisk on high for about 4 - 5 minutes, until it’s white, light and fluffy, and at least tripled in size.
- While the marshmallow is whisking, line a quarter pan (9 x 13 inch) with parchment paper OR rub the pan directly with a very thin layer of shortening or butter. Set aside until the marshmallow is ready. Brush all utensils with the butter as well (spatulas and spoons).
- When the marshmallow mix is ready, add the vanilla and orange blossom water and continue to whisk on high for a further minute to mix thoroughly. 1 tsp vanilla extract, 1 ½ tsp orange blossom water
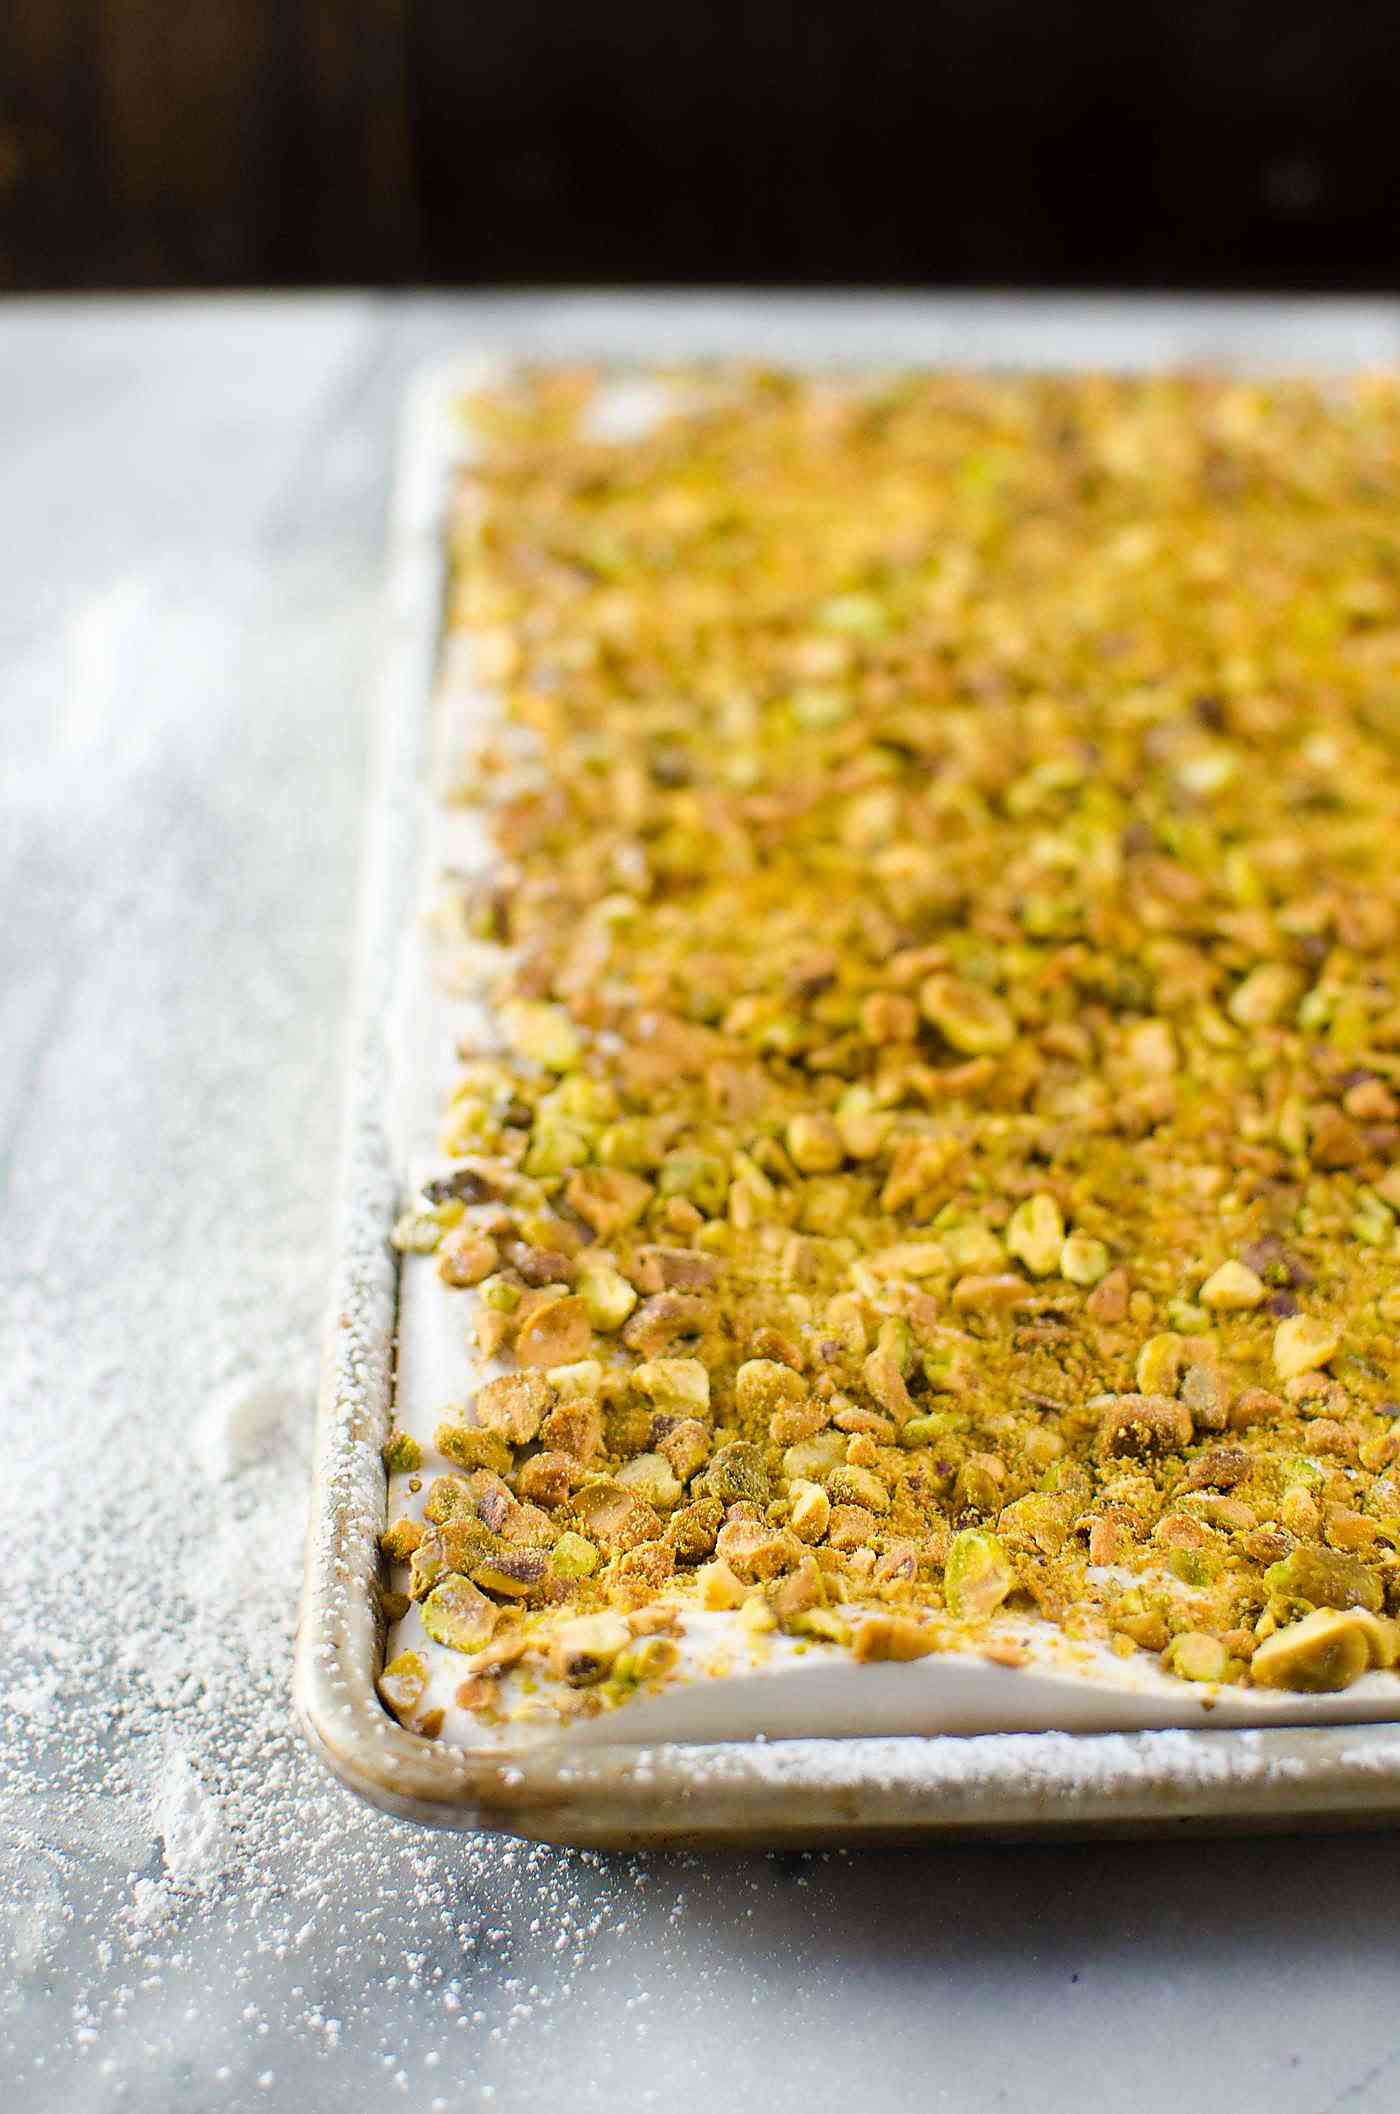
- Remove the marshmallow mix from the mixer, and scrape it into the prepared pan. Using an oiled offset spatula, spread the marshmallow evenly in the pan. Sprinkle the pistachios over the top and then using your hands, gently press them into the marshmallow surface so that they stick. 200 g roasted unsalted pistachios
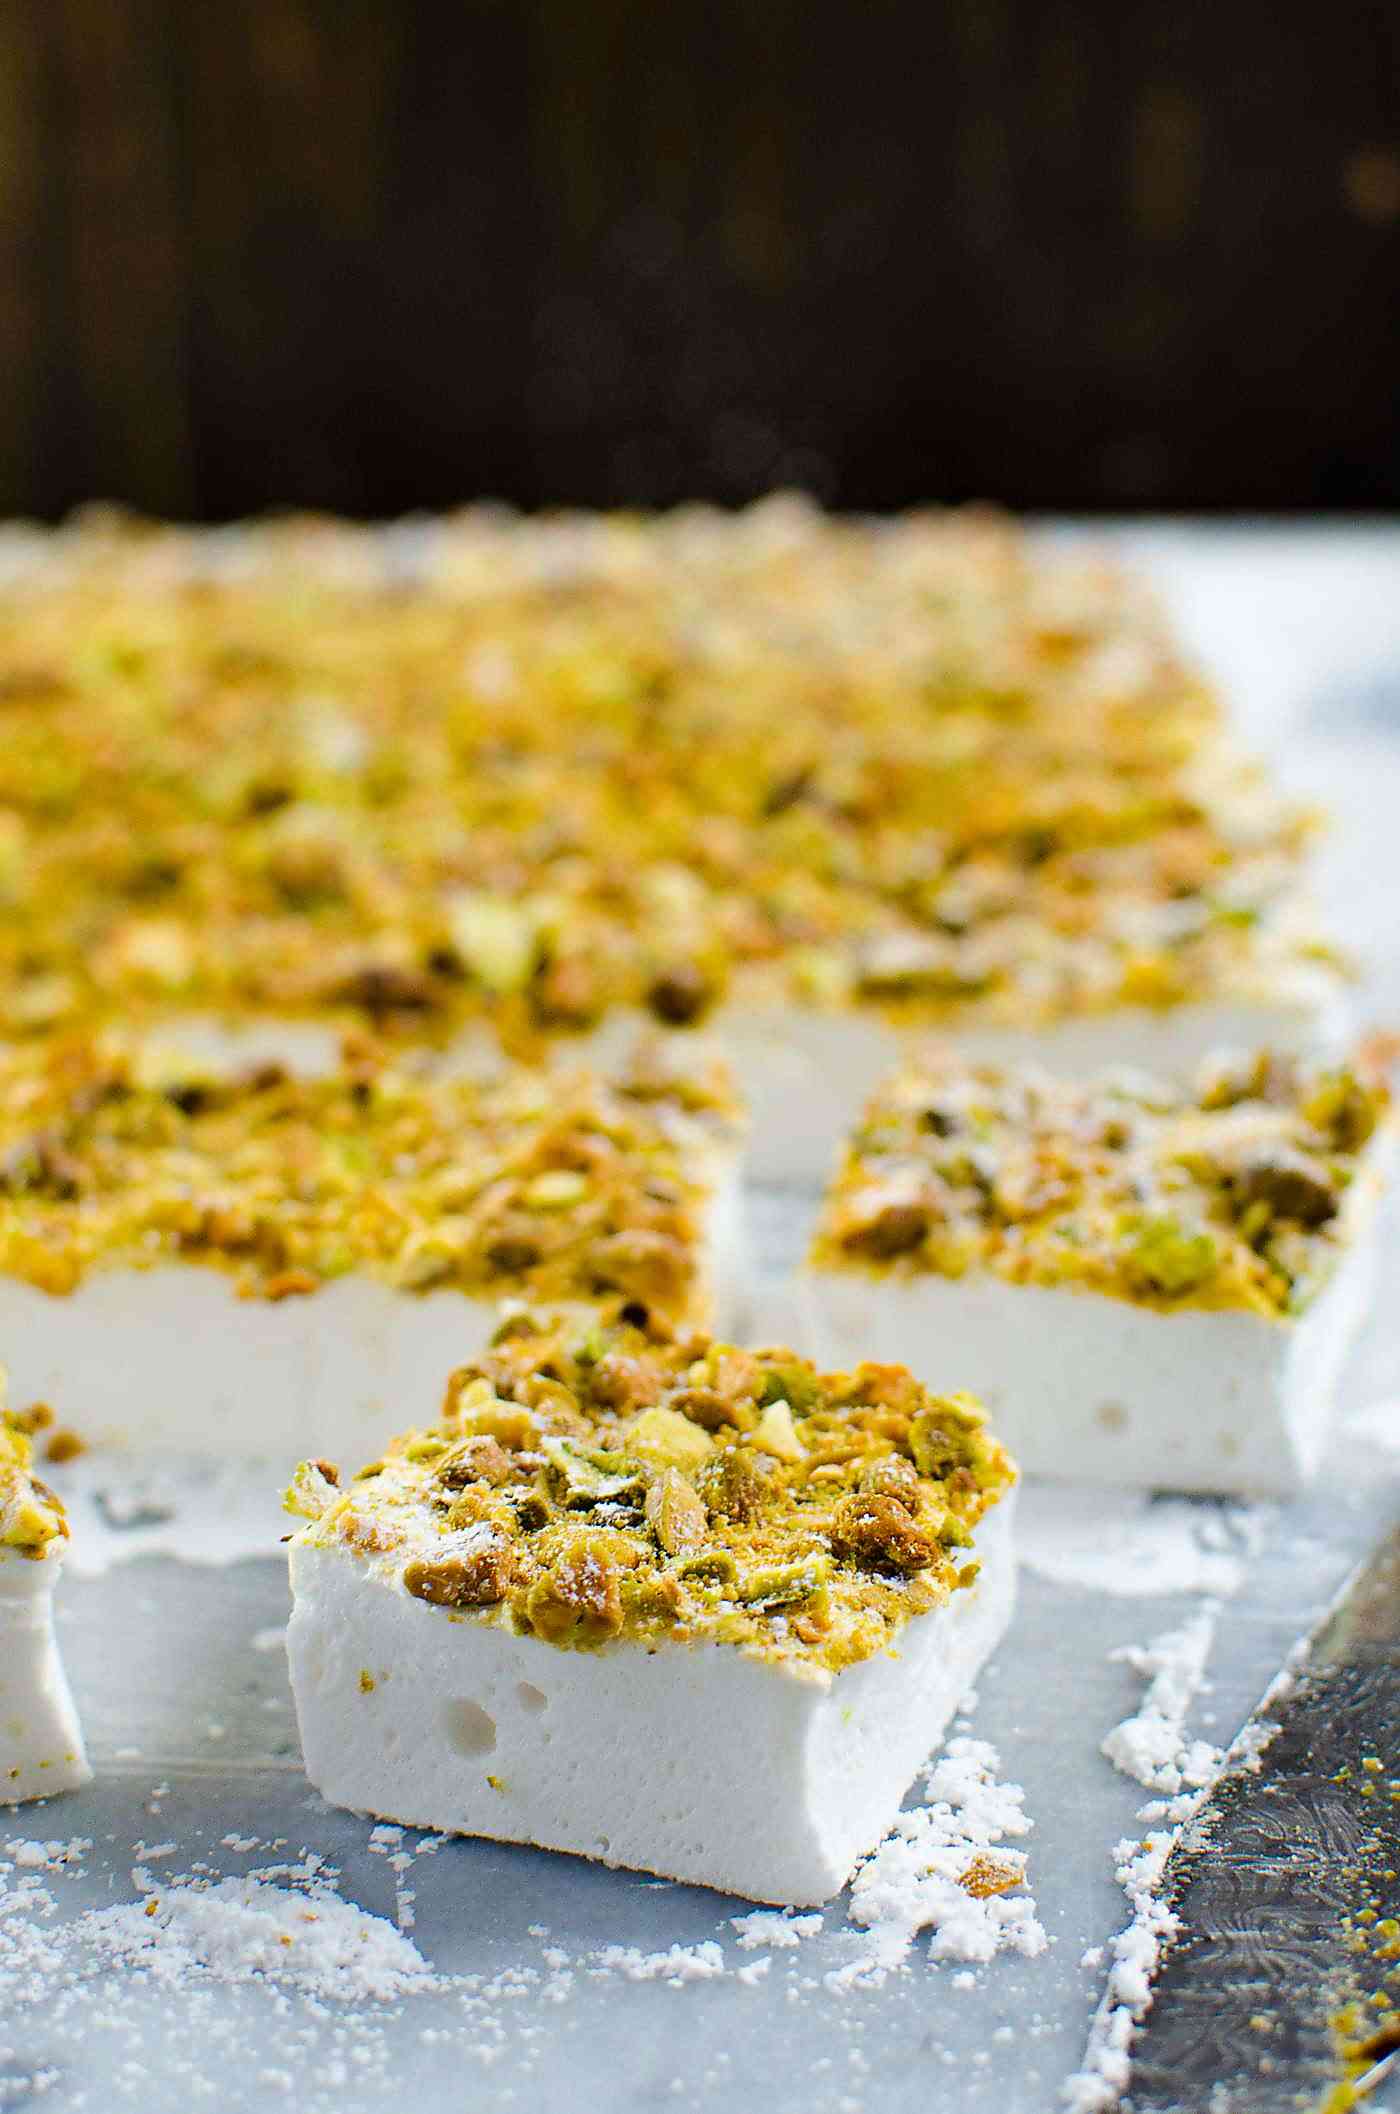
- Allow the marshmallow to set for at least 6 hours. When the marshmallow has set, release it from the pan, and place it on a surface dusted with confectioner’s sugar. Using an oil brushed knife, cut the marshmallow into squares. Cut the marshmallows into 6 long strips along the short edge. Cut each strip into 8 pieces to get 48 marshmallows that are roughly 1.5 x 1.5 inches each in size.
- Dust the sides and bottom of the marshmallow squares with confectioner’s sugar and place them in a dry, air-tight container until ready to serve.
Nutrition
Recipe from The Flavor Bender by Dini Kodippili
Orange blossom marshmallows with pistachios https://www.theflavorbender.com/orange-blossom-marshmallows-pisatachios/
